Crochet Rose - Pattern

Creating an American-style Easter placemat with crochet bunny – Pattern is one of the most delightful ways to prepare your home for the spring season. These handmade pieces bring a touch of rustic charm and personalized warmth to your dining table that store-bought decorations simply cannot replicate. By following a structured American-style Easter placemat with crochet bunny – Pattern, you can transform simple yarn into a functional work of art that will impress your guests and provide a festive backdrop for your holiday brunch.
The beauty of an American-style Easter placemat with crochet bunny – Pattern lies in its versatility and the joy of the crafting process itself. In the United States, the “American style” often refers to a rectangular, generous-sized mat that provides ample space for plates, cutlery, and glassware, often featuring a sturdy stitch definition. Incorporating a crochet bunny into the design adds a whimsical, seasonal element that appeals to both children and adults, making the Easter celebration feel truly special and cohesive.
Whether you are an experienced maker or a beginner looking for a rewarding project, mastering the American-style Easter placemat with crochet bunny – Pattern is a fantastic goal. This project allows you to practice essential techniques like chain stitches, double crochets, and appliqué attachment while creating something durable and washable. In the following sections, we will break down the essential components, materials, and steps needed to complete your own American-style Easter placemat with crochet bunny – Pattern with professional-looking results.
To begin your journey, you must understand that the American-style Easter placemat with crochet bunny – Pattern is designed for both aesthetics and utility. The “American style” typically dictates a standard size of approximately 12 by 18 inches, ensuring it fits perfectly on most dining tables. Using a high-quality cotton yarn is highly recommended for this pattern because it offers the heat resistance and absorbency required for a functional kitchen item.
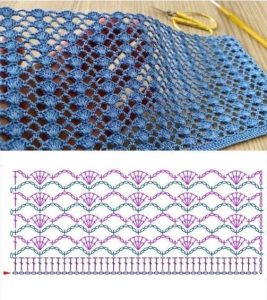
The core of the American-style Easter placemat with crochet bunny – Pattern usually involves a solid, repetitive stitch like the half double crochet or the herringbone stitch. These stitches create a dense fabric that stays flat on the table without curling at the edges. Consistency in your tension is key here, as you want all your placemats to look identical when laid out together for a full set of four or six.
A unique aspect of this pattern is the integration of the crochet bunny. This can be worked directly into the corner using tapestry crochet techniques, or it can be created as a separate appliqué and sewn onto the finished mat. Most crafters prefer the appliqué method because it allows the bunny to have a slightly 3D effect, making the American-style Easter placemat with crochet bunny – Pattern pop with texture.
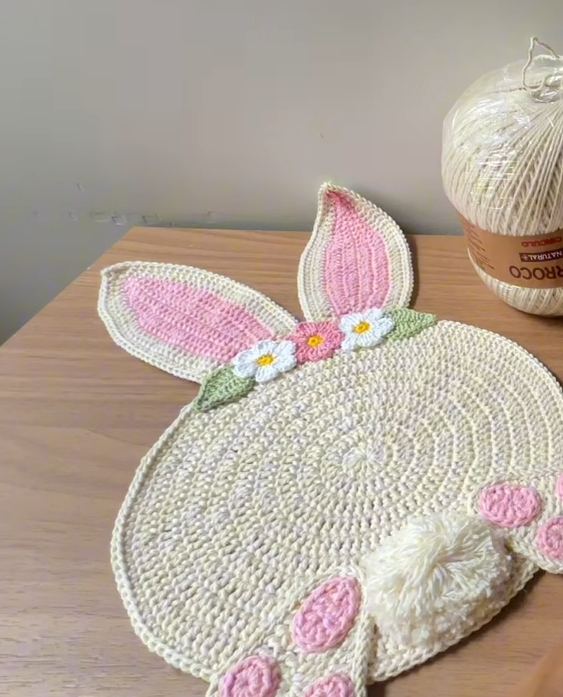
Color selection plays a massive role in the success of your Easter decor. Traditional pastel shades like mint green, baby blue, lemon yellow, and soft pink are the hallmarks of this American-style Easter placemat with crochet bunny – Pattern. However, for a more modern farmhouse look, you might choose a neutral cream or beige background with a white crochet bunny and a small pink pom-pom for the tail.
Before you start your first stitch, always create a gauge swatch. This is a small sample square that ensures your hook size and yarn weight match the requirements of the American-style Easter placemat with crochet bunny – Pattern. If your swatch is too small, your placemat will look like a coaster; if it is too large, it might overwhelm your table setting.
Finally, remember that the American-style Easter placemat with crochet bunny – Pattern is a labor of love. It takes time to complete a full set, so starting your project a few weeks before the holiday is a smart move. This ensures you aren’t rushing through the finishing touches, like weaving in ends or blocking the fabric, which are crucial for a professional handmade appearance.
Selecting the right tools is the second step in mastering the American-style Easter placemat with crochet bunny – Pattern. For the best results, look for mercerized cotton yarn, which has a slight sheen and is less likely to pill over time. This type of yarn ensures that your Easter placemat remains vibrant and sturdy even after multiple trips through the washing machine following a messy holiday dinner.
An ergonomic crochet hook is your best friend when working on a large project like this. Since the American-style Easter placemat with crochet bunny – Pattern requires a lot of repetitive motion, using a hook with a comfortable grip will prevent hand fatigue. Usually, a 5.0mm (H) hook is the standard for worsted weight yarn, but always check the specific requirements listed in your crochet pattern.
Don’t forget the small but essential notions, such as stitch markers, a tapestry needle, and sharp scissors. Stitch markers are incredibly helpful for keeping track of your rows in the American-style Easter placemat with crochet bunny – Pattern, especially if you are multitasking. The tapestry needle will be used to sew the crochet bunny securely to the base and to hide those pesky yarn tails.
The crochet bunny element of the pattern often requires a smaller hook size to create a tighter, more detailed shape. If the main mat uses a 5.0mm hook, consider switching to a 3.5mm or 4.0mm hook for the bunny ears and body. This contrast in texture adds a professional layer of detail to your American-style Easter placemat with crochet bunny – Pattern, making the character stand out clearly.
If you want to add a bit of “flair” to your Easter project, consider buying small satin ribbons or beads for the bunny’s neck. Some versions of the American-style Easter placemat with crochet bunny – Pattern even suggest using a small fork to create a DIY yarn pom-pom for the tail. These tiny details are what make a handmade pattern feel like a high-end boutique find.
Lastly, consider your workspace. Having a clear, well-lit area to follow your American-style Easter placemat with crochet bunny – Pattern makes the process much more enjoyable. Keep your yarn in a bowl or bag to prevent it from tangling or picking up dust. Once you have all your supplies gathered, you are ready to dive into the actual construction of this beautiful Easter accessory.
The foundation of the American-style Easter placemat with crochet bunny – Pattern begins with a long foundation chain. For a standard size, you will likely chain between 50 and 60 stitches, depending on your yarn weight. It is vital to keep this initial chain loose so that the bottom of your placemat doesn’t pull inward, creating a “rainbow” shape instead of a clean rectangle.
Once your foundation is set, the first few rows of the American-style Easter placemat with crochet bunny – Pattern establish the borders. Many designers recommend a moss stitch or a simple single crochet border to provide stability. This ensures that as you build the height of the mat, the edges remain crisp and professional, which is a hallmark of the American-style aesthetic.
As you move into the main body of the pattern, focus on maintaining a consistent count. It is very easy to accidentally drop or add a stitch at the end of a row. In the American-style Easter placemat with crochet bunny – Pattern, even one missing stitch can make the edges look wonky. Count your stitches every few rows to ensure you are staying on track with the pattern instructions.
The center of the American-style Easter placemat with crochet bunny – Pattern is where the “canvas” is created. If you plan to sew the crochet bunny on later, you want this area to be relatively flat and smooth. Avoid using overly “bumpy” stitches like bobbles in the area where the bunny will sit, as this makes the appliqué difficult to attach and can make your plate wobble.
Color changes can be introduced here if you want a striped Easter look. To do this seamlessly within the American-style Easter placemat with crochet bunny – Pattern, change your yarn color during the last pull-through of the final stitch in a row. This creates a clean line of color that looks intentional and polished, fitting for a festive holiday table.
After reaching the desired length (usually 12 to 14 inches), you will finish the American-style Easter placemat with crochet bunny – Pattern with a final border. This mirrors the starting rows, “sandwiching” the main body of the mat. Fasten off your yarn with a long tail, which gives you plenty of room to weave in the ends securely, ensuring the placemat won’t unravel during use.
The star of the show is, of course, the crochet bunny. In this American-style Easter placemat with crochet bunny – Pattern, the bunny is usually composed of three parts: a round head, a larger oval body, and two long, floppy ears. Working in continuous rounds (the amigurumi style) helps avoid visible seams on the bunny’s face, giving it a cuter, softer appearance.
When crafting the ears for the American-style Easter placemat with crochet bunny – Pattern, you can use a contrasting color for the “inner ear” to add depth. Using a simple slip stitch around the edge of the ears can also help them hold their shape. The ears are the most expressive part of the bunny, so feel free to position them one standing up and one folded for a playful look.
Once the pieces are crocheted, you must assemble the bunny before attaching it to the mat. Use your tapestry needle to sew the head to the body with a “ghost stitch” or invisible join. This assembly phase is a critical part of the American-style Easter placemat with crochet bunny – Pattern because it determines the character and “personality” of your Easter bunny.
Now comes the attachment to the placemat. Position the bunny in the lower right or left corner, about an inch away from the edges. Pin it in place using sewing pins so it doesn’t shift. In this American-style Easter placemat with crochet bunny – Pattern, you should sew through the top loops of the mat stitches only, so the thread doesn’t show through significantly on the back of the placemat.
For the finishing facial details, a few strands of black or pink embroidery floss can create eyes and a nose. If the American-style Easter placemat with crochet bunny – Pattern is for a home with small children, avoid using plastic safety eyes, as they can be a choking hazard and make the mat uneven. Embroidered eyes are much safer and add to the handmade charm.
The final touch for your American-style Easter placemat with crochet bunny – Pattern is the tail. A small pom-pom made of white yarn or even a store-bought craft pom-pom works wonders. Secure it tightly to the bunny’s backside. With the bunny attached, your Easter project is nearly complete—all that’s left is a bit of blocking to make sure everything sits perfectly flat.
1. What is the best yarn for an American-style Easter placemat?
The best yarn is 100% cotton or a cotton-linen blend. Cotton is durable, heat-resistant, and holds its shape well, which is essential for any American-style Easter placemat with crochet bunny – Pattern.
2. How do I wash my crochet placemats after Easter dinner?
Since you used cotton yarn, you can usually machine wash them on a delicate cycle. However, to preserve the crochet bunny and any pom-poms, it is recommended to place them in a mesh laundry bag and lay them flat to dry.
3. Can a beginner complete this American-style Easter placemat with crochet bunny – Pattern?
Yes! The mat itself uses basic stitches. While the crochet bunny requires some shaping and sewing, it is a great project for a beginner looking to advance their skills to the next level.
4. How long does it take to make one placemat?
On average, it takes about 4 to 6 hours to complete one American-style Easter placemat with crochet bunny – Pattern, including the appliqué. It’s a perfect weekend project!
5. How do I stop the edges of my placemat from curling?
Curling usually happens due to tight tension or the type of stitch used. Using a slightly larger hook for the foundation chain and blocking your finished mat with a steam iron will help it stay perfectly flat.
6. Can I sell items made from this American-style Easter placemat with crochet bunny – Pattern?
Generally, yes! Most designers allow you to sell finished products made from their patterns, provided you give credit to the original design. It’s a very popular item for Easter craft fairs.
In this article, we explored the wonderful world of the American-style Easter placemat with crochet bunny – Pattern. We covered everything from selecting the right cotton yarn and tools to the step-by-step process of creating a sturdy rectangular base.
We also discussed the intricate details of crafting a crochet bunny appliqué, including assembly and safety tips for facial features. By following this guide, you now have the knowledge to create a beautiful, functional set of Easter decor that combines tradition with handmade flair.


