Basic Crochet Hat - Pattern

Creating a Basic Crochet Hat – Pattern is one of the most rewarding projects for both beginners and seasoned crafters looking for a relaxing, rhythmic activity. There is something uniquely satisfying about taking a simple ball of yarn and a single hook and transforming them into a functional, stylish accessory that provides warmth and comfort. Whether you are making this for yourself, as a thoughtful handmade gift, or to donate to charity, mastering this Basic Crochet Hat – Pattern is a fundamental skill that opens the door to endless creative possibilities in the world of fiber arts.
The beauty of a Basic Crochet Hat – Pattern lies in its incredible versatility and the way it can be customized with different colors, textures, and yarn weights. Many people find that starting with a Basic Crochet Hat – Pattern helps them understand the mechanics of shaping, increasing, and maintaining consistent tension without the stress of overly complex stitch sequences. As you dive into this guide, you will find that the steps are intuitive and designed to help you produce a professional-looking result even if this is your very first time picking up a crochet hook.
In this comprehensive guide, we are going to explore everything you need to know about the Basic Crochet Hat – Pattern, from selecting the right materials to finishing your project with flair. We will break down the essential terminology, provide clear instructions for each stage of the process, and ensure you have the confidence to troubleshoot any common issues. By following this Basic Crochet Hat – Pattern, you aren’t just making a hat; you are developing a craft that has been passed down through generations, updated for the modern maker who values sustainability and personal touch.
Choosing the right yarn is the first and most critical step when starting your Basic Crochet Hat – Pattern. For a standard beanie, a medium weight (worsted) yarn is highly recommended because it offers a great balance between warmth and ease of use. You will want to look for fibers like acrylic, wool, or a blend of both, as these provide the necessary elasticity to ensure your Basic Crochet Hat – Pattern fits comfortably on the head without losing its shape over time.
Your crochet hook size is equally important to the success of your Basic Crochet Hat – Pattern. Most worsted weight yarns pair perfectly with a 5.0mm (H/8) hook or a 5.5mm (I/9) hook. Using the correct hook size ensures that your stitches aren’t too tight, which would make the hat stiff, or too loose, which would let the cold air through. Always check the yarn label for the manufacturer’s recommendation before you begin your project.
In addition to your yarn and hook, you will need a few basic notions to complete the Basic Crochet Hat – Pattern professionally. A pair of sharp scissors and a tapestry needle (also known as a yarn needle) are indispensable for cutting your yarn and weaving in the loose ends. Without these, your finished Basic Crochet Hat – Pattern might unravel or look unfinished, so keep them close by throughout your crafting session.
Stitch markers are a lifesaver when working on a Basic Crochet Hat – Pattern, especially when working in continuous rounds. These small clips allow you to mark the first stitch of each row, ensuring that you don’t lose track of your count as the hat grows. Since many hats start with a magic circle or a small loop, knowing exactly where your round begins is the key to maintaining a symmetrical and even shape.
Don’t forget the importance of a measuring tape when following a Basic Crochet Hat – Pattern. Since everyone’s head size is slightly different, you will need to measure the crown diameter and the total length of the hat as you go. This allows you to adjust the Basic Crochet Hat – Pattern for toddlers, children, or adults, making the pattern truly universal and adaptable to any recipient you have in mind.
Finally, consider the aesthetic elements of your Basic Crochet Hat – Pattern, such as adding a faux fur pom-pom or a personalized leather tag. While these are optional, they add a high-end, “boutique” feel to your handmade item. Starting with a solid foundation of quality materials ensures that the time you invest in your Basic Crochet Hat – Pattern results in a durable, beautiful garment that can be worn for many winters to come.
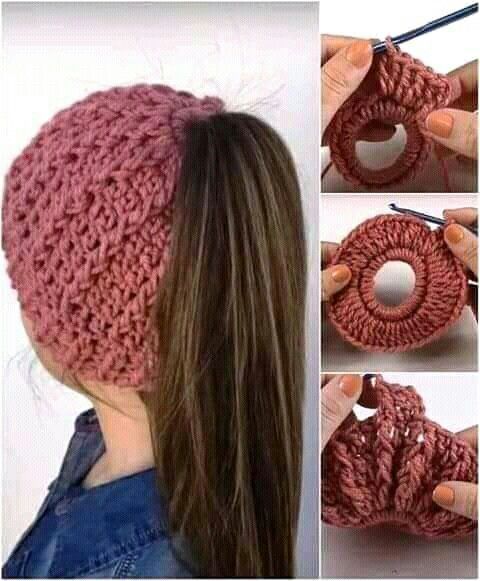
To successfully execute a Basic Crochet Hat – Pattern, you must be comfortable with a few foundational stitches, starting with the slip knot and the chain stitch. Most hats begin with a foundation chain or a magic ring, which acts as the center point of the crown. Mastered early on, these techniques provide the structural integrity needed for the Basic Crochet Hat – Pattern to expand outward in a perfect circle without warping.
The double crochet (dc) is the most common stitch used in a Basic Crochet Hat – Pattern because it builds height quickly and creates a soft, pliable fabric. It involves yarn over, inserting the hook, and pulling through loops in a specific sequence that creates a classic “V” shape. When you use the double crochet for your Basic Crochet Hat – Pattern, you can complete a project in just a few hours, making it an excellent choice for last-minute gifts.
Understanding increases is the “secret sauce” of any Basic Crochet Hat – Pattern. An increase simply means placing two stitches into the same stitch from the previous row. This technique allows the circle to grow wider while staying flat. In the early stages of the Basic Crochet Hat – Pattern, you will increase frequently, but once the crown reaches the desired diameter, you will stop increasing to allow the hat to “bowl” downward.
The half double crochet (hdc) is another fantastic alternative for a Basic Crochet Hat – Pattern if you prefer a denser, warmer fabric. It is slightly shorter than a double crochet but taller than a single crochet, providing a unique texture that looks modern and clean. Many makers prefer the hdc for their Basic Crochet Hat – Pattern because it offers excellent coverage and hides the small gaps that can sometimes appear between larger stitches.
Finishing the edges of your Basic Crochet Hat – Pattern often requires the slip stitch (sl st). This stitch has very little height and is primarily used to join rounds or to create a clean, finished “braid” look along the bottom brim of the hat. When you reach the end of your Basic Crochet Hat – Pattern, a row of slip stitches can add just enough tension to keep the brim from stretching out too much during daily wear.
Consistency in tension is what separates a beginner’s work from a master’s in a Basic Crochet Hat – Pattern. Tension refers to how tightly or loosely you hold the yarn and pull your loops. If your tension is inconsistent, your Basic Crochet Hat – Pattern might look lumpy or uneven. Practice makes perfect here, and with every row you complete, your muscle memory will improve, resulting in a smooth, professional-grade finish.
The construction of a Basic Crochet Hat – Pattern typically starts at the top, a method known as top-down. You begin by creating a small circle of 10 to 12 stitches and then gradually expand. Each round of the Basic Crochet Hat – Pattern follows a mathematical formula: for every new round, you increase the number of stitches by the same amount you started with, which keeps the circle perfectly flat as it expands toward the ears.
Once the crown of your Basic Crochet Hat – Pattern measures about 6.5 to 7 inches in diameter (for a standard adult), it is time to stop increasing. This is the “magic moment” where the flat disk begins to take the shape of a hat. From this point forward in the Basic Crochet Hat – Pattern, you will simply place one stitch in each stitch around. This builds the “body” of the hat, creating the depth needed to cover the head.
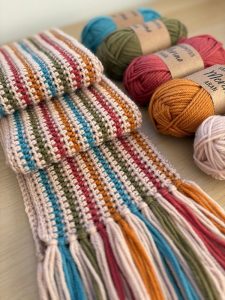
While working the body of the Basic Crochet Hat – Pattern, you can experiment with color changes or stripes. Simply join a new color at the start of a round to give your Basic Crochet Hat – Pattern a vibrant, custom look. This is a great way to use up “scrap yarn” from previous projects. Remember to keep your yarn tails on the inside of the hat so they can be hidden easily when you finish the project.
The length of the hat is entirely up to you and the style you want to achieve with your Basic Crochet Hat – Pattern. If you want a standard beanie, you should stop when the hat reaches the top of the ears. If you prefer a slouchy beanie style, continue working the rounds for an additional 2 or 3 inches. The beauty of this Basic Crochet Hat – Pattern is that you can try it on as you go to ensure the fit is exactly how you like it.
Creating a ribbed brim is a popular way to finish a Basic Crochet Hat – Pattern. This can be done by alternating front post and back post double crochets. This technique creates a stretchy, textured edge that hugs the head securely. Adding a ribbed brim to your Basic Crochet Hat – Pattern not only looks professional but also prevents the hat from sliding up or falling over the eyes, providing a much better fit.
The final step in your Basic Crochet Hat – Pattern is the fasten off. You will cut the yarn, leaving a 6-inch tail, and pull it through the final loop to secure it. Using your tapestry needle, weave that tail and any other loose ends back through the stitches on the inside of the hat. A well-finished Basic Crochet Hat – Pattern should have no visible knots or stray threads, ensuring it is as durable as it is beautiful.
A common issue when following a Basic Crochet Hat – Pattern is the “coning” effect, where the top of the hat looks like a point rather than a rounded dome. This usually happens if you aren’t increasing enough in the early rounds. To fix this in your Basic Crochet Hat – Pattern, ensure you are strictly following the increase count. If it still looks pointy, you might need to use a slightly larger hook for the crown to allow the stitches to spread out naturally.
On the other hand, if your Basic Crochet Hat – Pattern starts to look wavy or ruffled like a flower, you are likely adding too many increases. This happens when the circle grows faster than the space available. If you see ruffles forming, frog (unravel) a few rows and check your count. A flat crown is essential for a well-fitting Basic Crochet Hat – Pattern, so don’t be afraid to restart the crown if the geometry seems off.
Sizing for children can be tricky with a Basic Crochet Hat – Pattern. A good rule of thumb is to stop increasing when the crown diameter is about 5 inches for a baby or 6 inches for a child. Because crochet fabric is naturally stretchy, the Basic Crochet Hat – Pattern is quite forgiving. However, taking a quick measurement of the recipient’s head circumference and subtracting about an inch for “negative ease” will provide the most accurate fit.
If you find that the edges of your Basic Crochet Hat – Pattern are too tight and won’t stretch over the head, you may be working your slip stitches or final row too tightly. To remedy this, try using a hook one size larger specifically for the final round. This ensures the Basic Crochet Hat – Pattern remains comfortable to put on and take off while still maintaining its overall structure and aesthetic appeal.
Customizing the texture of your Basic Crochet Hat – Pattern is easy once you know the basics. You can try working in the back loops only (BLO) to create horizontal ridges throughout the hat. This simple modification to the Basic Crochet Hat – Pattern adds a modern, “knit-look” texture without requiring any advanced skills. It’s a great way to make several hats from the same pattern that all look distinctively different.
Finally, consider the care instructions for the yarn you used in your Basic Crochet Hat – Pattern. If you used wool, you might need to hand-wash the hat to prevent shrinking or felting. If you used acrylic, it’s likely machine-washable. Including a small care tag if you are gifting the Basic Crochet Hat – Pattern is a wonderful touch that ensures your handmade creation lasts for years of cozy, warm use.
1. How long does it take to finish a Basic Crochet Hat – Pattern?
For most intermediate crocheters, a basic beanie can be completed in about 2 to 3 hours. Beginners may take a bit longer, perhaps 4 to 6 hours, as they get used to the stitch rhythm and counting.
2. Which yarn is best for someone with sensitive skin?
If you or the recipient has sensitive skin, look for “baby” acrylic yarns or high-quality cotton blends. These are designed to be extra soft and won’t cause the “itchiness” often associated with traditional sheep’s wool in a Basic Crochet Hat – Pattern.
3. Can I use a smaller hook than the pattern suggests?
You can, but it will change the size of the hat. A smaller hook creates smaller, tighter stitches, meaning you will need to do more rounds of increases to reach the correct diameter for your Basic Crochet Hat – Pattern.
4. How do I know if the hat will fit an adult man?
Most adult men need a crown diameter of about 7.5 inches. Follow the Basic Crochet Hat – Pattern increases until you reach that width, then continue with the body rows until the hat is about 9 inches long from crown to brim.
5. What is the “Magic Circle” and do I have to use it?
The magic circle is a way to start crocheting in the round that leaves no hole in the middle. While it’s great for a Basic Crochet Hat – Pattern, you can also just chain 4, join with a slip stitch, and work your first round into that ring.
In this article, we have covered the essential steps to creating a beautiful and functional Basic Crochet Hat – Pattern. From selecting the perfect worsted weight yarn and the right hook size to mastering the foundational double crochet and increase techniques, you now have the tools to create a custom accessory.
We explored how to build the crown, shape the body, and add professional finishes like ribbing and pom-poms. Remember that crochet is a journey of practice; every hat you make will be better than the last as your tension and confidence improve.