Crochet Rose - Pattern

Bauble Bunting as featured in Simply Crochet – Pattern is a fun and festive crochet project that adds a charming touch to any home or celebration.
Featured in Simply Crochet, this pattern brings together the joyful and colorful spirit of baubles with the versatility and ease of bunting.
Whether you are an experienced crocheter or a beginner, this pattern is the perfect way to add some homemade charm to your decor.
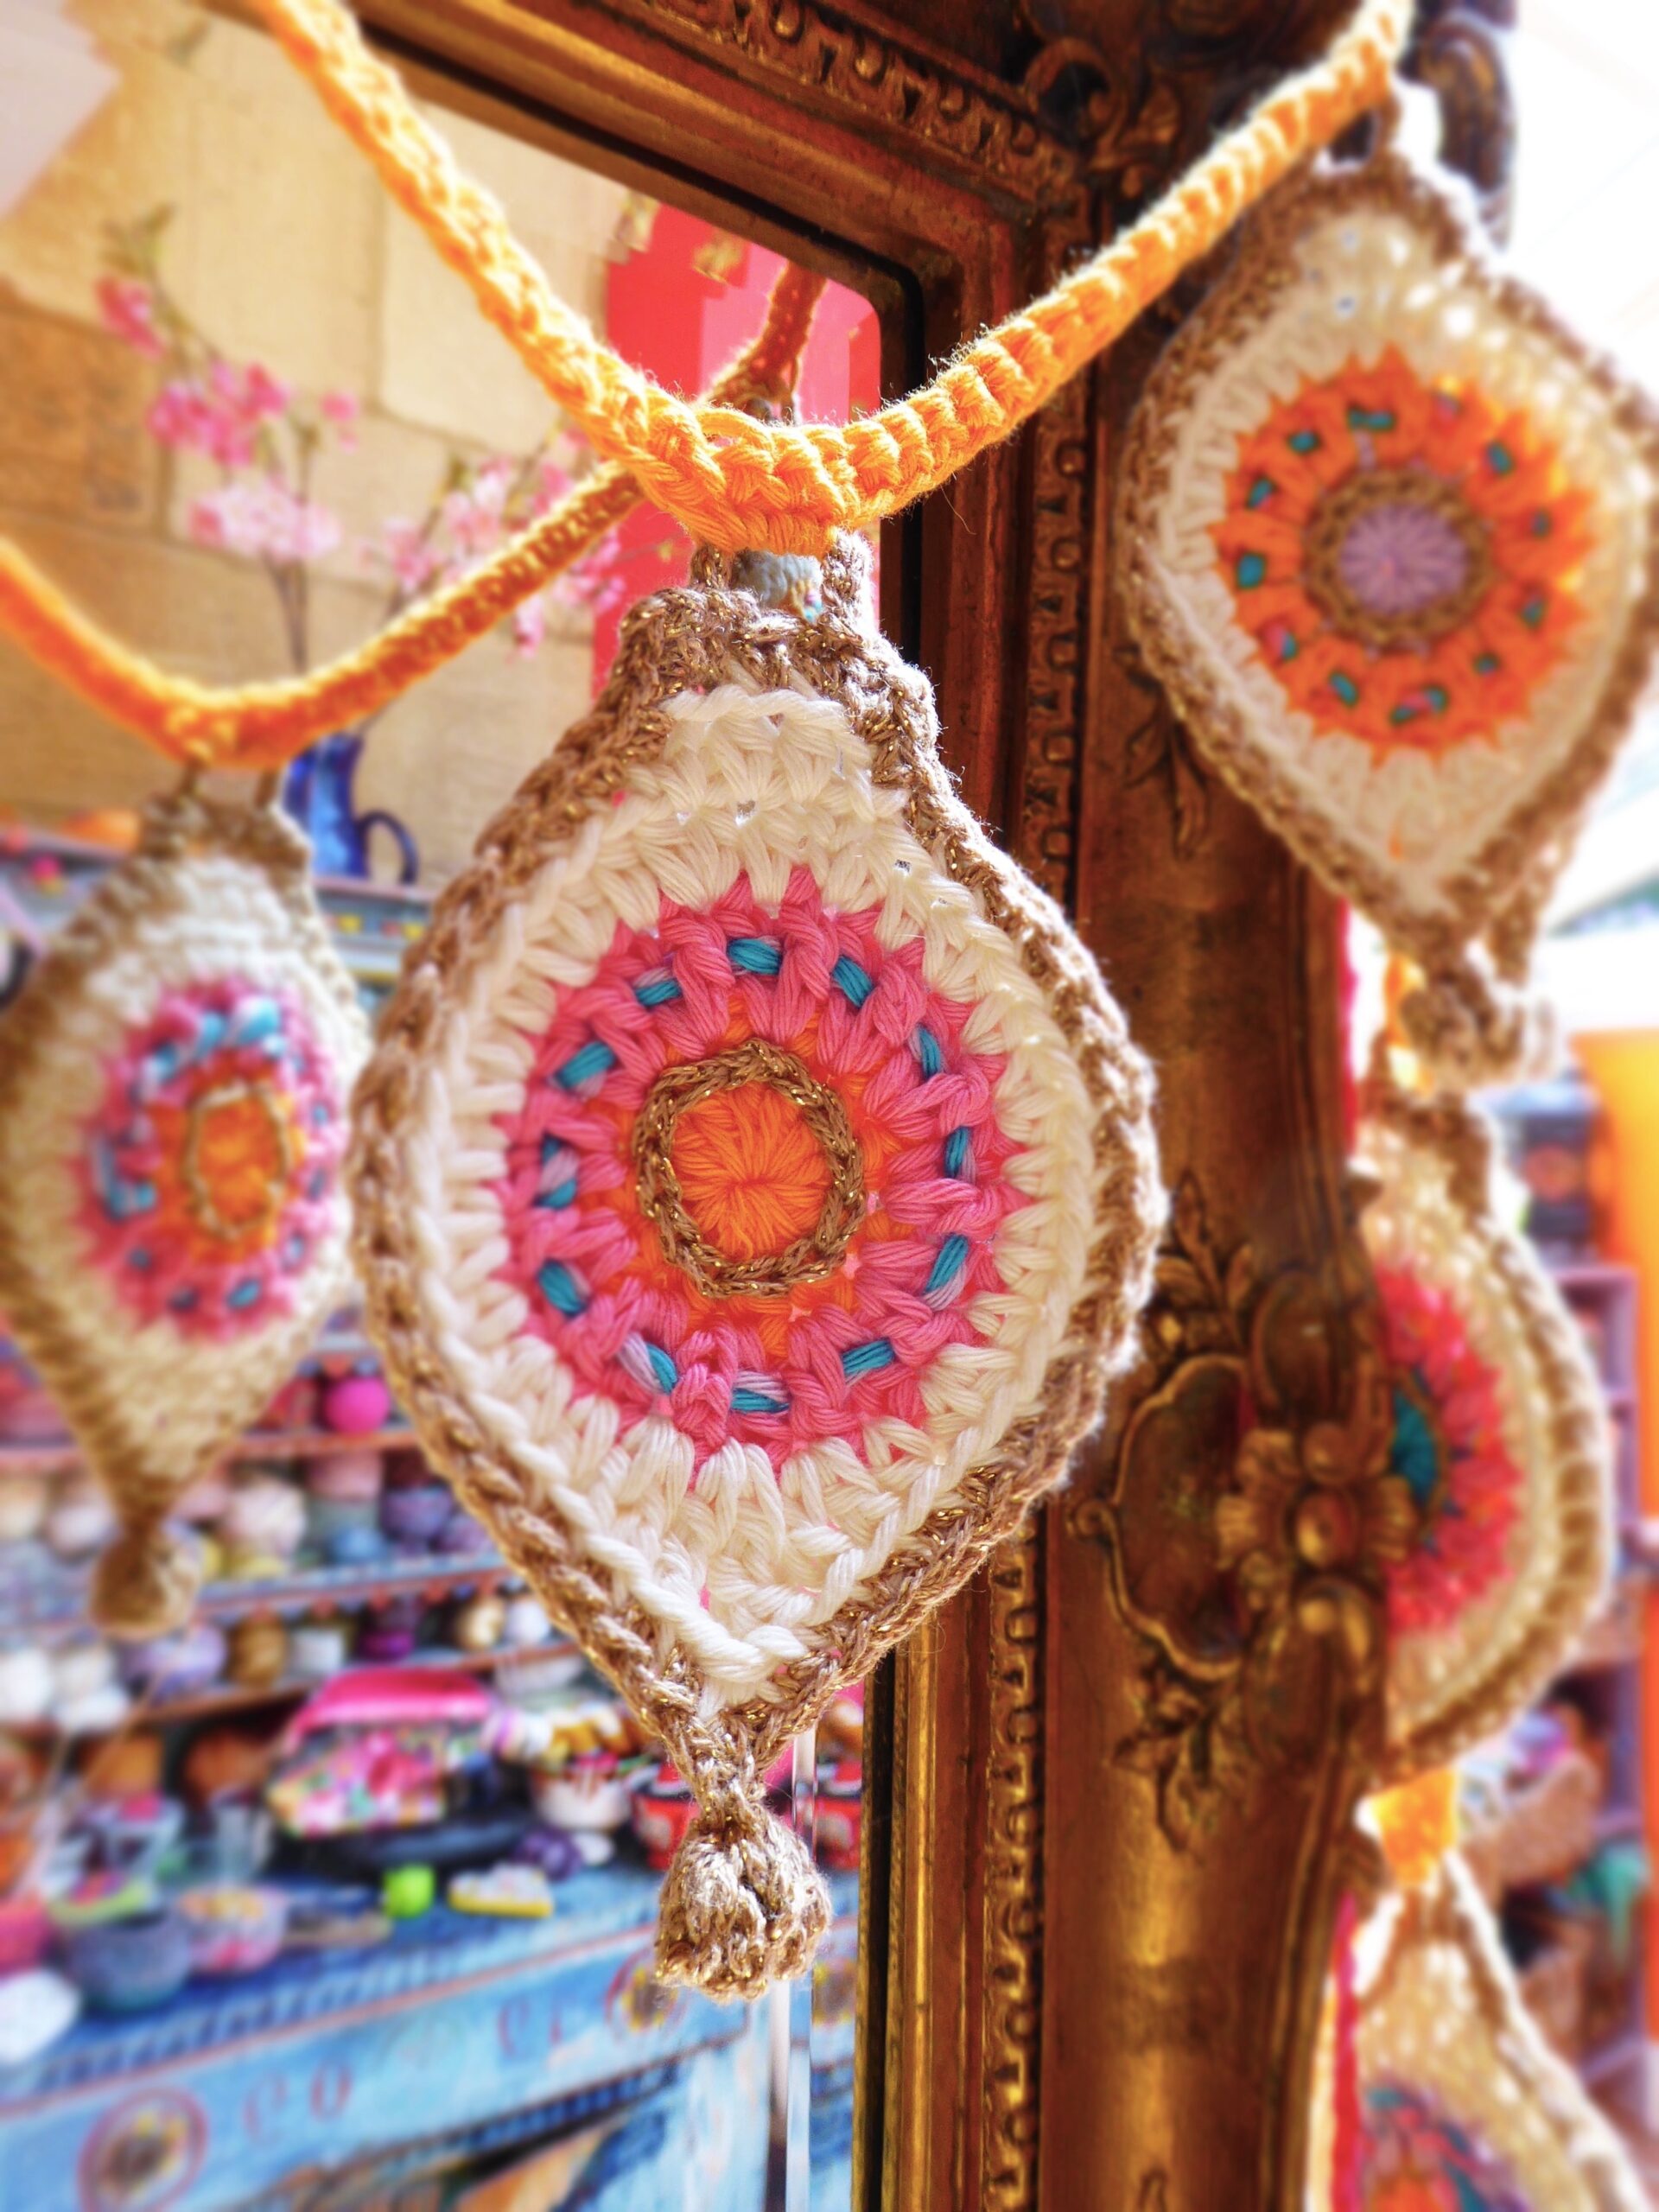
Image From Pinterest
Bauble bunting is a great way to use up leftover yarn, as it allows you to mix and match different colors and textures. It’s also an excellent project for personalizing your space, whether you’re decorating for a holiday, party, or simply adding some cheerful accents to your home. The crochet pattern is simple, making it an enjoyable and rewarding project, even for those new to the craft.
In this article, we will walk you through the steps involved in creating your own Bauble Bunting as featured in Simply Crochet. We will also provide tips on customization, helpful materials, and tricks to make your bunting even more beautiful. If you are looking for a way to brighten up your home or make a handmade gift, this crochet project is a perfect choice.
Before you start creating your Bauble Bunting as featured in Simply Crochet, you will need a few essential materials. This simple crochet project doesn’t require many items, and you can often make use of yarn scraps you already have at home. Here’s a list of materials to gather:
Yarn: The key material needed is yarn, and you can choose any type of yarn that suits your desired aesthetic. Cotton yarn is a popular choice because it is durable and holds its shape well. However, you can also use acrylic yarn or even wool yarn for a softer texture.
Crochet Hook: The size of the crochet hook you need will depend on the yarn you choose. Generally, a 4mm or 5mm hook works well for most medium-weight yarns. Be sure to adjust your hook size if you choose a thicker or thinner yarn.
Scissors: A good pair of scissors is essential for cutting your yarn once you’ve finished each piece of the bunting. Always keep your scissors sharp for clean cuts.
Yarn Needle: You’ll need a yarn needle to weave in the ends of your crochet pieces and to attach your baubles to the string or twine.
String or Twine: The bunting effect is created by stringing your crocheted baubles onto a piece of string or twine. This is what will hold the baubles in place, creating the beautiful garland look. Be sure to choose a string that complements the colors of your baubles.
With these materials, you are ready to begin creating your own unique Bauble Bunting!
Now that you have your materials ready, let’s dive into the steps involved in crocheting your Bauble Bunting. The process is straightforward, but it requires attention to detail for consistent results. Below is a step-by-step guide:
Step 1: Crochet the Baubles
Start by crocheting the individual baubles. The baubles are typically made by creating small, round shapes using double crochet stitches. You will crochet in rounds, gradually increasing the number of stitches in each round until the bauble reaches your desired size. To begin, make a magic ring, and crochet the required number of stitches for the first round.
Step 2: Continue the Rounds
As you continue crocheting, work in the round, following the pattern to increase the number of stitches per round. This will give the bauble its round shape. Be sure to mark your rounds with a stitch marker so that you can keep track of your progress. You can also add small decorative elements to your baubles, like using contrasting colors for a festive look.
Step 3: Close the Bauble
Once you’ve completed the final round, use a slip stitch to close the opening of the bauble. If you like, you can stuff the bauble with a small amount of fiberfill to give it a puffed-up, 3D effect. This will make your baubles look fuller and more dimensional.
Step 4: Weave in Ends
After finishing each bauble, use a yarn needle to weave in the loose ends. This step is important to ensure that your baubles stay intact and don’t unravel over time.
Step 5: Repeat the Process
Crochet as many baubles as needed for your bunting. You can vary the size and color of the baubles for a more dynamic, colorful look. The more baubles you crochet, the longer your bunting will be.
Step 6: Attach the Baubles to the String
Once you have crocheted all your baubles, it’s time to attach them to your string or twine. Use a yarn needle to thread the string through the top of each bauble and space them out evenly. Be sure to leave extra string at both ends for hanging.
The beauty of Bauble Bunting as featured in Simply Crochet lies in its versatility. You can customize the look of your bunting in countless ways to match the occasion or your personal style. Here are some ideas for customization:
Color Variations
You can choose from a wide range of yarn colors to create the perfect look. For a Christmas theme, consider using red, green, gold, and white. If you’re making bunting for a birthday or special event, vibrant colors like pink, blue, yellow, and purple will make a lively display.
Add Embellishments
You can also add embellishments to your baubles to give them a unique touch. For example, sew on buttons, beads, or sequins to create a sparkly, festive effect. Adding small bows or ribbons to the baubles can also elevate the design.
Vary the Size
Not all the baubles in your bunting need to be the same size. Consider crocheting larger baubles for a bold effect, or smaller ones for a delicate look. Mixing sizes will add visual interest and texture to your garland.
Incorporate Patterns
For added fun, try changing the pattern of the baubles. You can make some with simple solid colors and others with striped patterns or granny squares. This mix will give the bunting a more dynamic and playful appearance.
Add a Personal Touch
If you’re making the bunting as a gift or for a special event, consider incorporating someone’s favorite colors or initials. You can even crochet little miniature letters to spell out words like “Happy Birthday” or “Merry Christmas” and attach them to the bunting.
Play with Lengths
Adjust the length of the string or twine to suit the space where you plan to hang the bunting. You can make the garland as short or as long as you like, depending on the area you want to decorate.
With these customization ideas, you can make your Bauble Bunting truly one-of-a-kind!
Bauble Bunting is not just for seasonal decorations—it can be used for a variety of creative purposes throughout the year. Here are some fun and unique ways to incorporate your crocheted bauble bunting:
Holiday Decor
This is one of the most popular uses for bauble bunting. Hang it across your fireplace mantel, around windows, or along your dining table for an extra touch of holiday cheer. Whether it’s for Christmas, Easter, or New Year’s Eve, bauble bunting is perfect for festive occasions.
Party Decorations
If you’re hosting a birthday party, baby shower, or wedding, bauble bunting can add a handmade, whimsical element to your event. Customize the colors to match your theme, and use it to adorn walls, doorways, or buffet tables.
Room Accents
Add some color to your bedroom, living room, or nursery with a cheerful garland of baubles. Hang it above your bed, across a wall, or drape it along a bookshelf for a charming look that brings warmth and character to your space.
Gift Wrapping
Another creative use for bauble bunting is as a gift wrap accent. Instead of traditional ribbons, attach a few baubles to the top of your wrapped presents to make them even more special. This personal touch is sure to impress anyone receiving the gift.
Weddings and Celebrations
For weddings or celebrations, bauble bunting can add a unique element to the decor. Consider using it to decorate the ceremony space or the reception area, and choose soft pastel colors or metallic yarns for a more elegant look.
Craft Fairs and Gifts
If you’re looking for a fun project to sell at a craft fair or give as gifts, bauble bunting is a great choice. You can create mini garlands as keychains or bookmarks, or make larger garlands for special occasions like housewarmings and anniversaries.
1. What is Bauble Bunting?
Bauble bunting is a decorative garland made from crocheted baubles, usually strung together on a piece of twine or string. It’s a fun and festive way to decorate for special occasions or add a cozy touch to your home.
2. How do I crochet the baubles?
To crochet the baubles, you typically use a magic ring and crochet in the round, increasing stitches as you go. Once you’ve reached the desired size, close the bauble, weave in the ends, and attach it to the string.
3. Can I use different yarns for bauble bunting?
Yes! You can use different types of yarn, including cotton, acrylic, or wool. Choose yarns that complement your desired aesthetic, and experiment with textures and colors for a personalized look.
4. How do I attach the baubles to the string?
Once you’ve crocheted the baubles, use a yarn needle to thread the string through the tops of the baubles. Space them out evenly and leave extra string at both ends for hanging.
5. How long will it take to make bauble bunting?
The time it takes to make bauble bunting depends on your skill level and the number of baubles you want to crochet. On average, it may take a few hours to crochet a few baubles and assemble the bunting.
In this article, we have explored the fun and creative process of making Bauble Bunting as featured in Simply Crochet – Pattern. From gathering the materials to customizing your design and finding creative ways to display your finished bunting, this project offers endless possibilities. Whether you’re decorating for a holiday or looking to add some handmade charm to your home, bauble bunting is an enjoyable and versatile crochet project. If you have any suggestions or thoughts, feel free to share your feedback in the comments below!


