
Cat Tie Crochet - Pattern

The Cat Tie Crochet – Pattern is one of the most adorable and whimsical projects a crafter can undertake to pamper their feline friends with a touch of handmade elegance. Whether you are preparing your pet for a festive family photo shoot or simply want to add a bit of “business-casual” charm to their daily lounging, a cat tie provides a lightweight and comfortable accessory. This specific crochet pattern is designed to be quick to finish, making it an ideal choice for last-minute gifts or for those who enjoy seeing immediate results from their creative efforts.
When you embark on a Cat Tie Crochet – Pattern, you are creating more than just a piece of pet clothing; you are crafting a miniature work of art that respects a cat’s need for movement and comfort. The structure of a crochet tie is generally comprised of a neckband and the tie body, ensuring that it remains secure without being restrictive. Using high-quality, breathable cotton yarn is essential for this project, as it prevents the accessory from becoming too heavy or itchy for your cat’s sensitive fur and skin.
Mastering the Cat Tie Crochet – Pattern requires only a basic understanding of standard stitches, which makes it an excellent project for beginners who are still practicing their stitch consistency. By following a well-structured crochet guide, you will learn how to handle small-scale shaping and color changes that give the tie its classic “professional” look. From choosing the right vibrant yarn colors to adding a safe closure mechanism, this article will walk you through everything you need to know to create a professional-looking handmade cat accessory.
The most critical factor in a successful Cat Tie Crochet – Pattern is the choice of yarn weight, as a yarn that is too thick will result in a bulky tie that looks out of proportion on a small pet. We highly recommend using a Category 2 (Sport) or Category 3 (DK) cotton yarn because these fibers provide excellent stitch definition while remaining incredibly lightweight for the cat to wear.
Your crochet hook size should be matched carefully to your yarn to ensure the fabric is firm but not stiff. A 3.5mm (E) hook is often the “sweet spot” for most cat tie patterns, as it creates a dense enough fabric to hold the shape of the tie without gaps, which is important if you want the accessory to look crisp and sharp.
Safety is paramount when working on any pet crochet pattern, so choosing a yarn that is machine washable is a smart move for long-term use. Since cats can be adventurous and occasionally messy, having a Cat Tie Crochet – Pattern that can withstand a gentle wash cycle ensures that your pet’s “formal wear” stays looking brand new for years.
In addition to yarn, you will need a reliable closure system for the neckband of your cat tie. While some prefer simple ties, using hook-and-loop fasteners (Velcro) or a breakaway safety buckle is much safer for cats, as it allows the tie to come off easily if it happens to get snagged on furniture or branches.
Don’t forget to include a few stitch markers in your toolkit before starting the Cat Tie Crochet – Pattern. Because the project is so small, losing track of a single stitch can significantly alter the symmetry of the tie, so marking the center point of the triangular tip will save you time and frustration during the shaping phase.
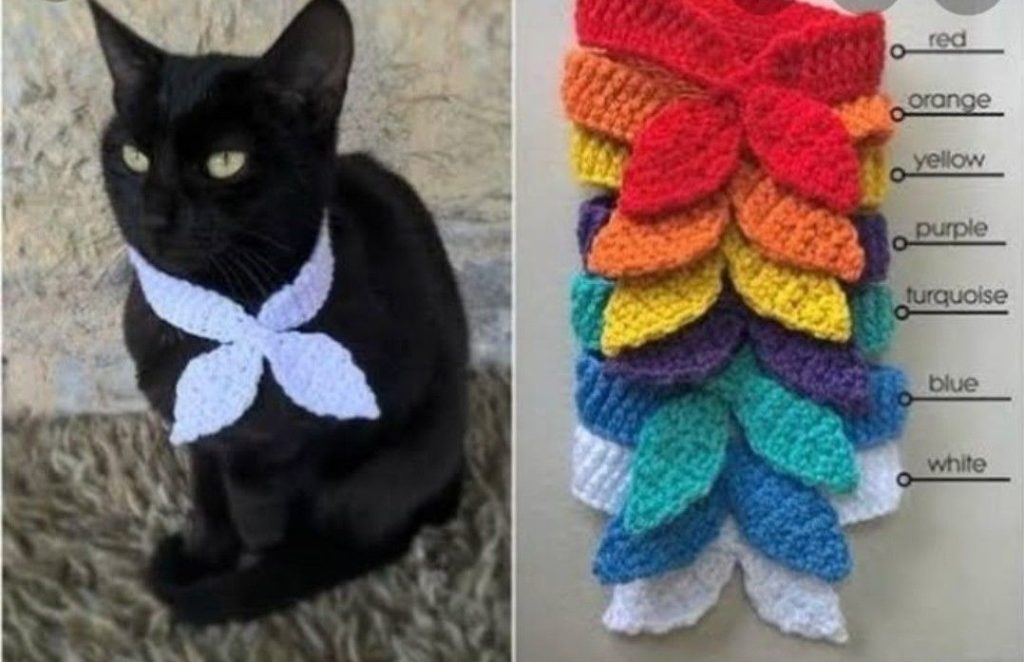
Lastly, consider the color palette of your yarn in relation to your cat’s fur color. A bright red or bold striped Cat Tie Crochet – Pattern looks stunning on a black or white cat, while softer pastels or earthy tones can complement a tabby or ginger cat beautifully, making the crochet project truly personalized.
The body of the Cat Tie Crochet – Pattern usually begins with a small number of chains, followed by rows of single crochet (sc) or half double crochet (hdc). These stitches are preferred because they create a solid, fabric-like texture that mimics the look of a traditional silk tie while maintaining the unique crocheted aesthetic.
To achieve the classic pointed end of a tie, you will need to master basic increases and decreases within the pattern. By adding an extra stitch at the beginning and end of specific rows, you can expand the width of the tie gradually, creating that iconic tapered shape that makes the accessory recognizable.
The “knot” of the tie in a Cat Tie Crochet – Pattern is often a separate small rectangle of crochet fabric that is wrapped around the top of the tie body and the neckband. This clever assembly technique gives the illusion of a real knotted tie without the bulk of an actual knot, ensuring it sits flat and comfortable against the cat’s chest.
Texture can be added to your crochet pattern by experimenting with the back loop only (BLO) technique. Working in the back loops creates horizontal ridges that give the tie a ribbed appearance, adding a touch of sophisticated detail to your handmade pet tie without requiring any advanced or difficult stitches.
Maintaining even tension is especially important when working on a miniature project like the Cat Tie Crochet – Pattern. If your tension varies, the edges of the tie may curl or look uneven, so try to keep a relaxed but consistent grip on your yarn to ensure the finished product lies flat and looks professional.
If you want to create a “power tie” look, you can incorporate color changes every two rows to create stripes. This is a great way to practice carrying yarn or changing colors cleanly at the end of a row, adding a dynamic and fun visual element to your Cat Tie Crochet – Pattern that is sure to get plenty of compliments.
The neckband is a vital component of the Cat Tie Crochet – Pattern because it determines the fit and the safety of the accessory. It is usually worked as a long, narrow strip of foundation chains followed by a few rows of single crochet to ensure it is durable enough to hold the weight of the tie.
Measuring your cat’s neck accurately is the first step toward a perfect crochet fit. You should be able to fit two fingers comfortably between the neckband and the cat’s neck; if the pattern is too tight, the cat will be distressed, and if it is too loose, the tie will drag on the floor or get caught in their paws.
For an adjustable pattern, you can incorporate a series of buttonholes or simply use a stretchy ribbed stitch. However, for the safety of your pet, many modern Cat Tie Crochet – Patterns suggest using a small piece of elastic integrated into the band, allowing it to stretch and slip over the head easily.
The attachment of the tie body to the neckband should be done with a tapestry needle and a strong whipstitch. Ensuring this connection is secure is vital, as cats may try to groom or play with the tie, and you want your Cat Tie Crochet – Pattern to remain in one piece even during a vigorous play session.
Some crafters like to add a soft lining to the neckband using a scrap of felt or cotton fabric. This extra step in the pattern construction provides a smooth surface against the cat’s neck, which is especially beneficial for hairless breeds or cats with very short, fine fur that might be sensitive to yarn.
Finally, ensure that any decorative elements like buttons are sewn on extremely tightly. In a Cat Tie Crochet – Pattern, buttons are purely aesthetic, but they can become a choking hazard if they are not secured properly, so always double-check your finishing work before letting your cat wear their new accessory.
Once you have mastered the basic Cat Tie Crochet – Pattern, the possibilities for customization are endless. You can create a “holiday collection” by using sparkly yarn for New Year’s Eve or festive greens and reds for a Christmas cat tie that will make your pet the star of the holiday card.
You can also adapt the pattern to create a bow tie instead of a traditional long tie. This involves crocheting a simple rectangle, cinching it in the middle, and attaching it to the same style of neckband, offering a “tuxedo” look that is equally charming for your crocheted pet wardrobe.
Adding a small crochet applique to the tie, such as a tiny fish or a paw print, can add a layer of personality to the Cat Tie Crochet – Pattern. These small details are what make handmade items so special and allow you to showcase your skill as a detailed-oriented crochet artist.
For those who enjoy a bit of “twinning,” you can use the leftover yarn from your Cat Tie Crochet – Pattern to make a matching keychain or a human-sized version of the tie. Matching your pet is a huge trend on social media and provides a fun way to celebrate the bond between you and your feline companion.
If you plan on selling your creations, consider creating a pattern set with different sizes (S, M, L) to accommodate kittens and larger breeds like Maine Coons. A well-presented Cat Tie Crochet – Pattern is a popular item at craft fairs and in online shops because of its high “cute factor” and affordable price point.
The final step in your Cat Tie Crochet – Pattern journey is the photoshoot! Use natural light and a few treats to encourage your cat to pose. Seeing your crochet work on a happy, handsome cat is the ultimate reward for your hard work and provides a great sense of accomplishment for any yarn enthusiast.
1. Is the Cat Tie Crochet – Pattern safe for cats to wear all day?
While the pattern is lightweight, it is generally recommended that pets only wear accessories like ties under supervision. It is best used for photos or special events rather than 24/7 wear to ensure your cat’s absolute safety and comfort.
2. How long does it take to complete this crochet project?
A Cat Tie Crochet – Pattern is a very fast project! Most experienced crocheters can finish one in about 30 to 60 minutes, while beginners might take closer to two hours as they learn the shaping techniques.
3. What is the best type of yarn for a cat tie?
100% Cotton is the gold standard for this pattern. It is natural, breathable, holds its shape well, and is less likely to pill or trap odors compared to synthetic acrylic yarns.
4. Can I use this pattern for a small dog as well?
Absolutely! The Cat Tie Crochet – Pattern is easily adaptable for small dog breeds like Chihuahuas or Yorkies. Just make sure to measure their neck circumference and adjust the neckband length accordingly.
5. Do I need to block the finished tie?
While not strictly necessary, steam blocking the tie body can help the edges stay flat and make the pattern look much more professional. It helps set the stitches and prevents the “curling” effect common in small crochet pieces.
6. How do I make the tie look more like a real silk tie?
Using a smaller hook than recommended for your yarn will create a tighter, smoother fabric. You can also use mercerized cotton, which has a slight sheen that beautifully mimics the luster of silk in your Cat Tie Crochet – Pattern.
In this guide, we have thoroughly explored the delightful world of the Cat Tie Crochet – Pattern, covering everything from the selection of pet-safe materials to the technical details of shaping and construction. We discussed how simple stitches can be transformed into a sophisticated accessory through careful increases and decreases, and emphasized the importance of a secure neckband for your cat’s safety.
Whether you are making a single tie for your own pet or a dozen for a local animal shelter fundraiser, this pattern offers a perfect blend of creativity and practicality.


