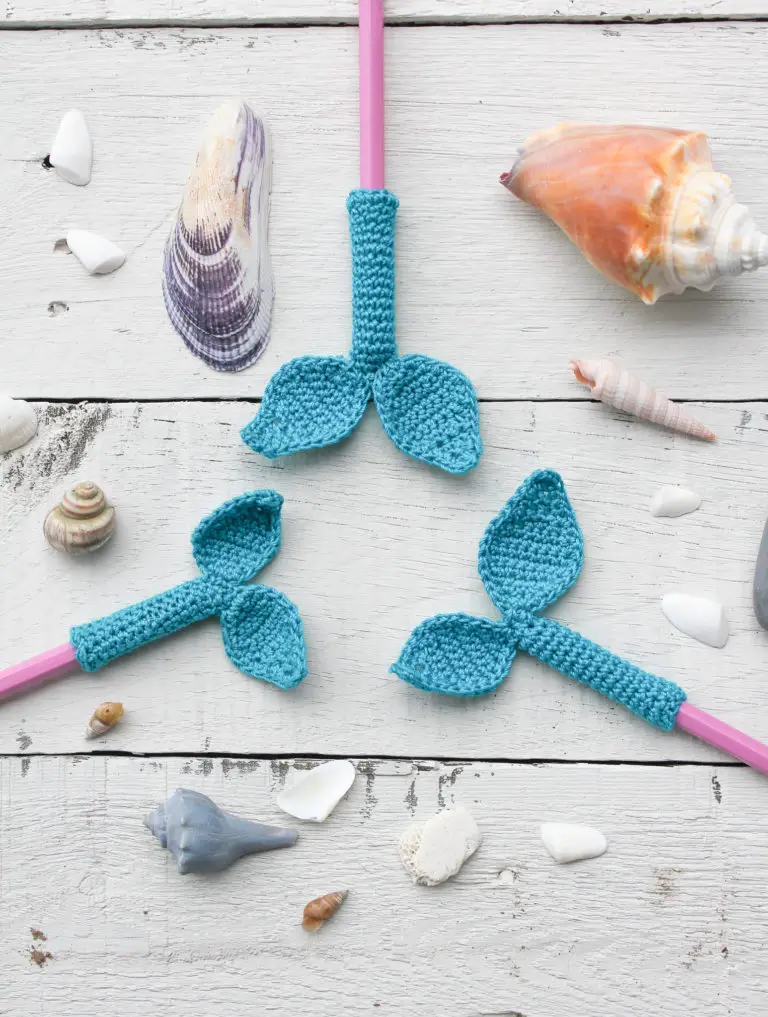
Mermaid Tail Pencil Topper Crochet - Pattern

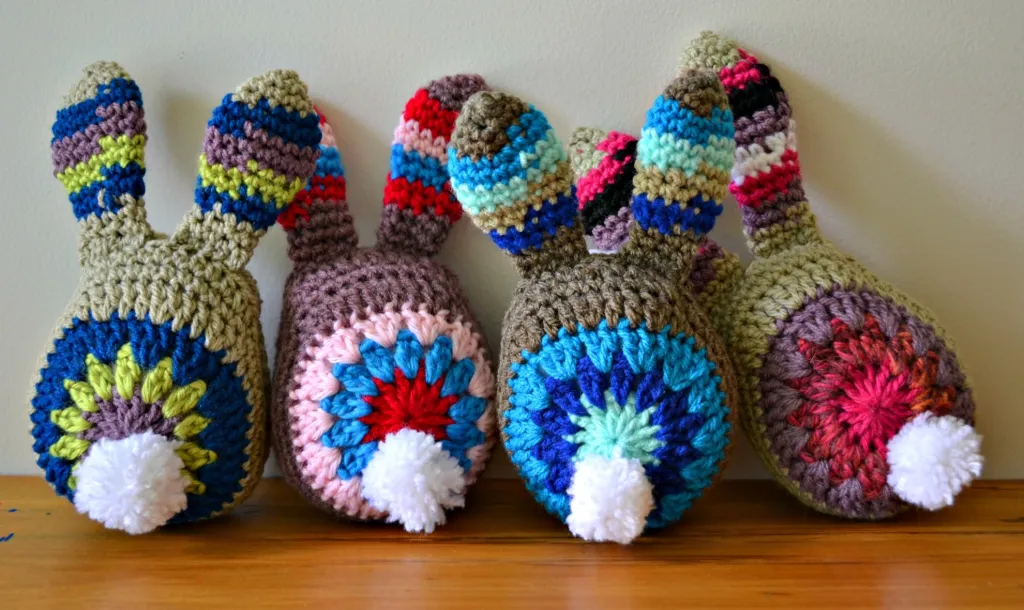
The Crochet Amigurumi Bunny – Pattern is one of the most beloved projects in the crafting community, offering a perfect blend of cuteness, creativity, and technical skill. Amigurumi, the Japanese art of knitting or crocheting small, stuffed yarn creatures, has taken the world by storm, and nothing embodies this charm quite like a long-eared bunny. Whether you are looking to create a handmade gift for a newborn, a festive Easter decoration, or simply a new addition to your own collection, mastering this specific design will open up a world of possibilities for your crochet journey.
Embarking on a Crochet Amigurumi Bunny – Pattern allows you to experiment with various shapes and textures while creating a character that truly has a personality of its own. Unlike flat crochet projects, amigurumi is worked in 3D, requiring a different approach to stitch tension and construction. The joy of seeing a floppy ear or a round little tail come to life under your hook is incomparable, making it a therapeutic and highly rewarding hobby for people of all ages. It is a project that scales well, meaning you can make a tiny pocket-sized rabbit or a giant, huggable friend simply by changing your yarn weight.
In this comprehensive guide, we are going to break down every essential element of the Crochet Amigurumi Bunny – Pattern. From selecting the right materials to mastering the “magic ring” and perfecting the final embroidery details, we will ensure you have the confidence to complete your project with professional results. By following these expert tips and structured steps, your finished handmade bunny will not only look adorable but will also be durable enough to withstand years of love and play.
Choosing the right yarn is the foundation of a successful Crochet Amigurumi Bunny – Pattern. Most experts recommend using a mercerized cotton or a high-quality acrylic blend because these fibers offer excellent stitch definition. When you are making a stuffed toy, you want the stitches to be tight and clear so that the stuffing doesn’t peek through the gaps. Cotton yarn is particularly popular for amigurumi because it is sturdy, less fuzzy than wool, and holds its shape exceptionally well over time.
The crochet hook you choose for your Crochet Amigurumi Bunny – Pattern should actually be smaller than what the yarn label suggests. This is a crucial trick in the world of amigurumi construction. By using a smaller hook, you create a much denser fabric. For a standard worsted weight yarn, a 2.5mm or 3.0mm hook is usually ideal. This ensures that your bunny’s body is firm and that the “poly-fill” stuffing remains securely inside, providing a clean and professional look to your finished toy.
Safety eyes are another vital component of the Crochet Amigurumi Bunny – Pattern. These plastic components snap together with a washer, making them very difficult to remove, which is essential if the toy is intended for a child. However, if you are making a bunny for a baby under three years old, many crafters prefer to embroider the eyes with black yarn or embroidery floss to eliminate any choking hazards. Both options add a different “soul” to the bunny, so choose the one that fits your project safety needs.
You cannot complete a Crochet Amigurumi Bunny – Pattern without high-quality stuffing. Premium polyester fiberfill is the industry standard because it is lightweight, washable, and non-allergenic. The key to a great bunny is how you stuff it; you want it to be firm but not so stuffed that the seams begin to stretch and distort. Using a small tool, like a chopstick or a specialized stuffing tool, can help you push the fill into the narrow tips of the ears and the very bottom of the feet.
Stitch markers are your best friend when working on a Crochet Amigurumi Bunny – Pattern. Because amigurumi is almost always worked in a “continuous spiral” rather than joined rounds, it is incredibly easy to lose track of where a row begins. Placing a marker in the first stitch of every round prevents mistakes that could lead to a lopsided bunny. Whether you use a plastic clip or a simple scrap of contrasting yarn, this tool is essential for maintaining the pattern accuracy required for 3D shapes.
Lastly, a blunt-tipped tapestry needle is required for the “assembly” phase of your Crochet Amigurumi Bunny – Pattern. Joining the head, body, ears, and limbs is often the most challenging part for beginners. A good needle allows you to weave the yarn between the stitches seamlessly. Having sharp scissors and a few sewing pins to hold the limbs in place before you sew will also make the process much more manageable, ensuring your bunny’s proportions are perfectly symmetrical before the final attachment.
The “Magic Ring” (or Magic Circle) is the most important technique to learn for a Crochet Amigurumi Bunny – Pattern. It allows you to start a round with a hole that can be pulled completely shut, which is vital for the top of the head and the ends of the limbs. If you use a traditional chain-start, you might be left with a small gap where stuffing can escape. Mastering the magic ring gives your crochet toy a polished, professional start that is the hallmark of experienced makers.
Once you have your ring, the primary stitch used in the Crochet Amigurumi Bunny – Pattern is the single crochet (US terminology). This stitch is short and compact, which is exactly what you need for a dense fabric. In amigurumi, you will often hear the term “sc” (single crochet), and you will be doing thousands of them. Maintaining a consistent tension is key here; if your stitches vary in tightness, your bunny might end up with an uneven surface or unexpected lumps.
Increases and decreases are the tools that shape your Crochet Amigurumi Bunny – Pattern. An increase (inc) involves working two stitches into a single stitch from the previous row, which expands the shape. To create the narrowing of the neck or the tip of a tail, you will use the “invisible decrease” (inv dec). Unlike a standard decrease, the invisible version only uses the front loops of the stitches, making the reduction almost impossible to see on the finished amigurumi surface.
Working in the “front loops only” (FLO) or “back loops only” (BLO) is another technique often found in a Crochet Amigurumi Bunny – Pattern. This can be used to create ridges for clothing or to allow the limbs to bend more easily. For example, working in the BLO at the bottom of a foot can create a flat base, allowing your bunny to stand upright. These subtle textural changes add a level of detail that makes your handmade creation stand out from store-bought alternatives.
Color changing is a great way to customize your Crochet Amigurumi Bunny – Pattern. You might want to give your bunny a colorful sweater or different colored inner ears. The secret to a clean color change is to pull the new color through the last two loops of the previous stitch. This ensures the new row starts with a clean line. Learning this colorwork technique allows you to create stripes or patches, making each bunny you crochet completely unique.
The “yarn under” (YU) vs “yarn over” (YO) technique is a trending topic in the Crochet Amigurumi Bunny – Pattern community. Many amigurumi artists prefer to “yarn under” because it creates a slightly smaller, more “X” shaped stitch rather than a “V” shape. This makes the fabric even tighter and reduces the lean of the stitches as you work in spirals. Experimenting with these stitch variations can help you find the specific aesthetic you prefer for your softies.
The head is usually the focal point of the Crochet Amigurumi Bunny – Pattern. Most patterns start from the top and expand to a wide sphere before narrowing back down. The placement of the eyes is critical; putting them too high can make the bunny look forehead-heavy, while placing them lower and wider apart often creates a “kawaii” or cute appearance. Following the row count in your pattern precisely for eye placement is the best way to ensure a balanced facial expression.
Ears are the most defining feature of any Crochet Amigurumi Bunny – Pattern. Depending on the design, you might have long, floppy ears or short, perky ones. When sewing the ears to the head, the “ladder stitch” is the best method for a hidden seam. Positioning is key—pin the ears in several different spots to see which look you prefer. Some quilters like them right at the top, while others prefer them slightly to the sides for a “lop-eared” bunny style.
The body of the Crochet Amigurumi Bunny – Pattern often acts as a weighted base. Some crafters like to add a small pouch of plastic pellets (poly-beads) at the bottom of the body before finishing the stuffing. This gives the bunny a “beanie” feel and helps it sit up on a shelf without tipping over. Just ensure the pellets are in a secure fabric bag so they don’t leak through the crochet stitches, especially if the toy is for a child.
Attaching the limbs to the Crochet Amigurumi Bunny – Pattern requires patience. For a “sitting” bunny, you will attach the legs to the sides of the lower body. For a “standing” bunny, they go directly underneath. A popular technique is “button jointing” or “yarn jointing,” which allows the arms and legs to move. By threading a long piece of yarn through the body and both limbs, you create a simple hinge that adds a level of interactivity to your toy.
The muzzle and nose are the final “personality” touches of the Crochet Amigurumi Bunny – Pattern. You can crochet a separate small oval for the muzzle or embroider a simple “Y” shape for the nose and mouth directly onto the face. Using a pink or peach embroidery floss adds a soft, delicate touch. These facial details are where you can really get creative, giving your bunny a smile, a frown, or a sleepy look.
Don’t forget the tail! A Crochet Amigurumi Bunny – Pattern usually finishes with a small pom-pom or a tiny crocheted sphere. A pom-pom adds a fluffy, realistic texture, while a crocheted tail keeps the project 100% yarn-based. If you choose a pom-pom, make sure it is attached very securely. This final detail completes the iconic silhouette of the rabbit and adds that last bit of charm that makes everyone want to pick it up and squeeze it.
If you notice your Crochet Amigurumi Bunny – Pattern has gaps where the stuffing is visible, your hook is likely too large or your tension is too loose. Don’t be discouraged! You can try “doubling up” your yarn (using two strands at once) or simply dropping down a hook size. Another trick is to use a matching color of fabric or a nylon stocking inside the crochet shell to hold the stuffing, which hides any tension gaps effectively.
Sometimes the bunny’s head might feel “wobbly” or too heavy for the neck. To fix this in your Crochet Amigurumi Bunny – Pattern, you can insert a “neck support.” This can be a rolled-up piece of felt or a thick bundle of pipe cleaners (with the ends folded over for safety). This provides a structural skeleton that helps the bunny maintain its posture, ensuring your amigurumi character looks great even after lots of handling.
If your bunny’s limbs are uneven, it usually comes down to the stuffing. In a Crochet Amigurumi Bunny – Pattern, it is easy to stuff one leg firmer than the other, which makes them look like different lengths. Use a kitchen scale to weigh your stuffing for each limb if you want to be incredibly precise. This level of consistency ensures that your bunny stands or sits perfectly straight every time.
Customizing the “fur” of your Crochet Amigurumi Bunny – Pattern can yield amazing results. While smooth yarn is standard, you can use “eyelash yarn” or chenille yarn for a super-soft, fuzzy feel. Be warned: these yarns make it very difficult to see your stitches! It is often best to hold a strand of fuzzy yarn together with a strand of regular cotton so you can still feel the “V” of the stitch while achieving a fluffy texture.
What if your bunny looks “inside out”? In crochet, there is a “right side” and a “wrong side.” For a Crochet Amigurumi Bunny – Pattern, the right side should be on the outside. You can tell the difference by the look of the stitches—the right side has little “V” shapes, while the wrong side looks more like “horizontal bars.” If your work is curling the wrong way, simply flip it like a sock to ensure the proper aesthetic is showing.
Finally, adding accessories is the best part of finishing a Crochet Amigurumi Bunny – Pattern. You can crochet a tiny carrot, a bowtie, a flower for the ear, or even a little removable waistcoat. These additions don’t just add cuteness; they tell a story. By personalizing your crochet rabbit, you transform a standard pattern into a unique heirloom that will be cherished for years to come.
1. How long does it take to finish a Crochet Amigurumi Bunny – Pattern?
For an intermediate crocheter, a medium-sized bunny (about 8-10 inches) usually takes between 6 and 10 hours of active work. Beginners might take longer as they learn to navigate the assembly and shaping.
2. Can I wash my amigurumi bunny?
Yes, if you used cotton or acrylic yarn and polyester stuffing. It is best to place the bunny in a pillowcase and use a delicate cycle with cold water, then air dry. Avoid high heat as it can melt synthetic fibers or “pill” the yarn.
3. What is the “Invisible Decrease” and why is it important?
The invisible decrease is a way to join two stitches together by only using the front loops. In a Crochet Amigurumi Bunny – Pattern, this prevents the unsightly bumps or holes that traditional decreases can leave, making the fabric look much smoother.
4. My bunny won’t stand up. What did I do wrong?
This is usually a matter of balance and stuffing. Make sure the feet are attached at the same level and that the body has enough weight at the bottom. You can also try “squishing” the bottom of the bunny to create a flatter base.
5. How do I make the ears floppy?
To make ears floppy in a Crochet Amigurumi Bunny – Pattern, do not stuff them. If they are left hollow and sewn to the head in a way that allows them to hang, gravity will do the rest. For extra “flop,” use a slightly larger hook for the ears than the body.
6. Is this pattern suitable for someone who only knows basic crochet?
Yes! As long as you know the single crochet, increase, and decrease, you can follow an amigurumi pattern. The most “difficult” part is the assembly, which just requires a bit of patience and sewing.
Mastering the Crochet Amigurumi Bunny – Pattern is a journey of patience, precision, and a lot of heart. In this article, we’ve covered the essential materials needed to get started, the core stitches that form the foundation of 3D shapes, and the secrets to successful assembly and troubleshooting.
By focusing on tight tension, using the magic ring, and paying close attention to facial placement, you can create a professional-grade toy that rivals any commercial product.


