
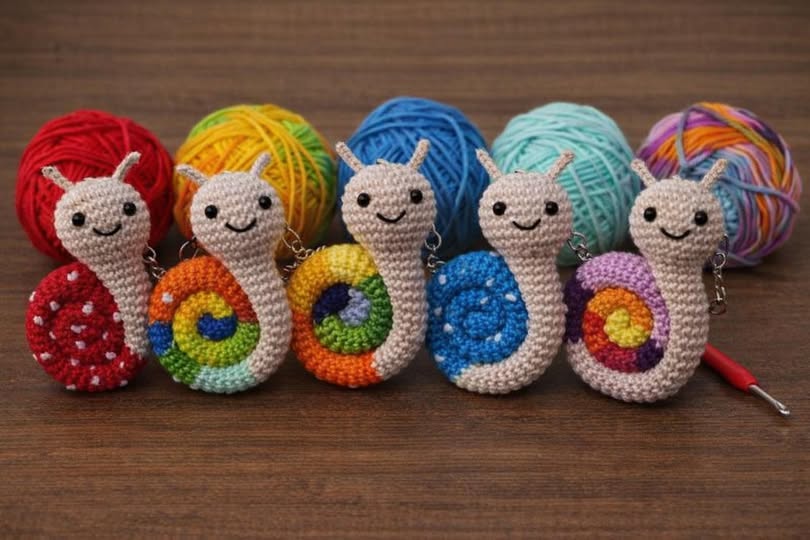
Lily in Crochet - Pattern

Creating a Crochet amigurumi snail – Pattern is one of the most delightful projects for crafters who enjoy bringing tiny, whimsical creatures to life with just a hook and some yarn. There is something inherently charming about the slow, steady nature of a snail, and capturing that essence in a soft, plush toy makes for a wonderful gift or a cute addition to your home workspace. This guide is designed to provide you with a comprehensive look at how to master the Crochet amigurumi snail – Pattern, ensuring that your finished piece is as durable as it is adorable.
When you decide to start a Crochet amigurumi snail – Pattern, you are embarking on a journey that combines basic geometric shapes like spheres and cylinders with creative finishing touches. Amigurumi, the Japanese art of knitting or crocheting small, stuffed yarn creatures, relies heavily on the “magic ring” and working in continuous rounds. By following a well-structured Crochet amigurumi snail – Pattern, even those who are relatively new to the craft can produce a professional-looking result that boasts clean lines and a whimsical personality.
The beauty of working with a Crochet amigurumi snail – Pattern lies in its versatility and the small amount of materials required to get started. You can experiment with vibrant variegated yarns for the shell or keep it classic with earthy tones for a more realistic garden companion. This Crochet amigurumi snail – Pattern will walk you through the essential stitches, the best types of stuffing to use, and how to assemble the pieces so your snail stands tall and proud. Let’s dive into the specifics of this enchanting project and transform a simple skein of yarn into a handcrafted treasure.
To achieve the best results with your Crochet amigurumi snail – Pattern, selecting the appropriate yarn weight is the first critical step. Most amigurumi artists prefer a 100% cotton yarn or a high-quality cotton blend because it offers excellent stitch definition and does not pill easily. When working on a Crochet amigurumi snail – Pattern, you want your stitches to be tight and crisp so that the fiberfill stuffing doesn’t peek through the gaps of your work.
The hook size you choose for your Crochet amigurumi snail – Pattern should typically be one or two sizes smaller than what the yarn label suggests. This technique is a staple in any Crochet amigurumi snail – Pattern because it creates a dense fabric that holds its shape well. For a standard DK or worsted weight yarn, a 2.5mm or 3.0mm hook is often the perfect choice to ensure your snail’s body and shell are firm and sturdy.
Safety eyes are a popular addition to any Crochet amigurumi snail – Pattern, providing a professional and “alive” look to your little creature. These plastic eyes snap together securely, making them ideal for toys, though you should always use embroidered eyes if the snail is intended for a very young child. In this Crochet amigurumi snail – Pattern, we recommend 6mm or 8mm eyes to give your snail a friendly and curious expression.
Stuffing is the secret ingredient that gives your Crochet amigurumi snail – Pattern its squishy, huggable volume. High-quality polyester fiberfill is the standard choice because it is washable and retains its bounce over time. As you follow the Crochet amigurumi snail – Pattern, remember to stuff firmly but gradually, ensuring there are no lumps and that the shell maintains its iconic spiral shape without looking overstretched.
You will also need a few basic notions to complete your Crochet amigurumi snail – Pattern, such as a sharp pair of scissors and a bent-tip tapestry needle. The tapestry needle is especially important for the assembly phase of the Crochet amigurumi snail – Pattern, as it allows you to sew the head to the body and the shell to the back with precision. A few stitch markers will also help you keep track of the beginning of your rounds.
Finally, consider the aesthetic you want for your Crochet amigurumi snail – Pattern before you begin. Do you want a bright, neon snail or a soft, pastel one? Planning your colors ahead of time ensures that the shell and the body complement each other perfectly. Once your kit is assembled, you are ready to move on to the actual construction of the Crochet amigurumi snail – Pattern and watch your character come to life.
The shell is arguably the most important feature of the Crochet amigurumi snail – Pattern, as it provides the character’s silhouette. To create the spiral effect, the pattern often uses a long, tapered tube that is rolled up and sewn into place. This specific approach in the Crochet amigurumi snail – Pattern creates a 3D effect that looks much more sophisticated than a simple flat circle and adds a lovely weight to the finished toy.
When working on the shell portion of the Crochet amigurumi snail – Pattern, you will mostly use the single crochet stitch. To create the tapering effect, you will slowly increase the number of stitches in each round as you move from the center outwards. This part of the Crochet amigurumi snail – Pattern requires a bit of patience, but the repetitive motion is very relaxing and great for practicing consistent tension.
In some variations of the Crochet amigurumi snail – Pattern, you might use back-loop-only (BLO) stitches to create visible ridges on the shell. These ridges mimic the growth rings found on real snail shells and add a wonderful tactile element to your amigurumi. Following a Crochet amigurumi snail – Pattern that utilizes BLO stitches is a great way to learn how to manipulate the texture of your crochet fabric.
Color changes are a fantastic way to customize the shell in your Crochet amigurumi snail – Pattern. You can create stripes by switching yarn colors every few rounds, or use a self-striping yarn to let the colors transition naturally. This Crochet amigurumi snail – Pattern encourages you to be creative; there are no rules in nature that say a snail can’t have a rainbow-colored home on its back.
Once the long tube for the shell is finished, the Crochet amigurumi snail – Pattern will instruct you to stuff it lightly. If you stuff it too much, it will be difficult to roll into a spiral; if you stuff it too little, the shell will look deflated. Finding the right balance is a skill you’ll hone as you work through the Crochet amigurumi snail – Pattern, ensuring the shell looks plump and perfectly coiled.
To finish the shell, you will roll the tube starting from the narrowest end and use your tapestry needle to secure the layers together. This step of the Crochet amigurumi snail – Pattern is where the magic happens, as a simple tube suddenly transforms into a recognizable snail house. Take your time with the sewing to ensure the stitches are hidden between the rounds for a seamless look.
The body of the snail in this Crochet amigurumi snail – Pattern is usually a simple, elongated shape that curves slightly at the front to form the head. Because snails are gastropods, their “foot” is their entire underside, so the body should have a wide, flat base. This ensures that your finished Crochet amigurumi snail – Pattern can sit flat on a shelf or desk without tipping over.
Creating the head involves a series of increases to form a rounded sphere-like shape at one end of the body. In our Crochet amigurumi snail – Pattern, we focus on making the transition from the neck to the head as smooth as possible. This involves careful placement of your single crochet stitches to avoid any sharp angles, giving the Crochet amigurumi snail – Pattern a soft and organic appearance.
The tentacles (or “horns”) are the most delicate part of the Crochet amigurumi snail – Pattern. These are usually made by creating a very small chain and working a few stitches back down, or by crocheting a tiny tube of just 4 or 5 stitches wide. This part of the Crochet amigurumi snail – Pattern can be a bit fiddly, but it adds an enormous amount of character to the snail’s face.
When attaching the tentacles to the head of your Crochet amigurumi snail – Pattern, placement is key. Placing them too close together can make the snail look surprised, while placing them too far apart can make it look a bit confused. Most Crochet amigurumi snail – Pattern instructions recommend placing them between rounds 4 and 6 of the head, but feel free to pin them in place first to see what looks best to you.
The “tail” of the snail is the final part of the body construction in the Crochet amigurumi snail – Pattern. It usually tapers off into a point at the back. As you finish the body, the Crochet amigurumi snail – Pattern will guide you to decrease until you have only a few stitches left, which you then cinch closed. This creates a clean finish that hides the end of your yarn inside the body.
Before you close the body completely, make sure to add a bit of weighted stuffing, like plastic pellets, to the bottom of the Crochet amigurumi snail – Pattern. While not strictly necessary, it helps the snail stay upright, especially once the heavy shell is attached. This pro-tip in the Crochet amigurumi snail – Pattern makes the final product feel more like a high-end collector’s item than a simple toy.
Assembly is the stage where all your hard work on the Crochet amigurumi snail – Pattern comes together. You will start by centering the shell on the middle of the snail’s back. It is helpful to use long quilting pins to hold the shell in place before you start sewing. A well-assembled Crochet amigurumi snail – Pattern should look balanced, with the shell looking like a natural part of the creature.
Using a “whip stitch” or a “ladder stitch” is the best way to attach the pieces of your Crochet amigurumi snail – Pattern. The goal is to make the joining stitches invisible. By picking up only the loops on the inside of the pieces, you can create a bond that is both strong and aesthetically pleasing, which is a hallmark of a masterfully executed Crochet amigurumi snail – Pattern.
Adding a face is the most rewarding part of the Crochet amigurumi snail – Pattern. Beyond the safety eyes, you can use a small scrap of pink yarn to embroider a little smile or some rosy cheeks. These small details in the Crochet amigurumi snail – Pattern are what give your creation its soul and make it a unique piece of art that reflects your personality.
If you want to take your Crochet amigurumi snail – Pattern to the next level, consider adding accessories. A tiny crochet flower tucked behind a tentacle or a small bow tie around the neck can add layers of storytelling to your project. This Crochet amigurumi snail – Pattern serves as a foundation that you can build upon to create a whole family of diverse snail characters.
For those who want to use the Crochet amigurumi snail – Pattern as a keychain, you can attach a metal lobster clasp to the top of the shell. Because the shell is securely sewn to the body, it can easily support the weight of the amigurumi. This makes the Crochet amigurumi snail – Pattern a practical project as well as a decorative one, allowing you to take your handmade friend wherever you go.
Finally, give your finished Crochet amigurumi snail – Pattern a gentle squeeze and a “spa day.” Brush off any stray fibers and ensure the shape is exactly how you want it. Completing a Crochet amigurumi snail – Pattern is a significant achievement, and you should take a moment to appreciate the skill and care you put into every single stitch. You have successfully turned a string of yarn into a beautiful, lasting companion.
Is the Crochet amigurumi snail – Pattern suitable for children?
Yes, it is very suitable! However, if you are making it for a child under three years old, we recommend embroidering the eyes with black yarn instead of using plastic safety eyes to prevent any potential choking hazards. The rest of the Crochet amigurumi snail – Pattern is perfectly safe and soft.
How long does it take to complete the Crochet amigurumi snail – Pattern?
An intermediate crocheter can usually finish a small snail in about 2 to 3 hours. If you are a beginner, it might take a bit longer as you get used to the small rounds, but the Crochet amigurumi snail – Pattern is straightforward enough that it won’t feel overwhelming.
What yarn is best for the Crochet amigurumi snail – Pattern?
Mercerized cotton is often considered the gold standard for this Crochet amigurumi snail – Pattern. It has a slight sheen, doesn’t stretch much, and shows off your stitches beautifully. Brands like Scheepjes Catona or Lily Sugar ‘n Cream are excellent choices.
Can I wash my amigurumi snail?
Yes, if you use acrylic or cotton yarn and polyester stuffing, you can gently hand wash your snail. Avoid the washing machine if possible to prevent the shell from losing its shape. After washing, reshape your Crochet amigurumi snail – Pattern and let it air dry completely.
My shell won’t stay in a spiral, what did I do wrong?
This is usually a matter of sewing. Ensure you are sewing through multiple layers of the “rolled” tube as you go. If the tube is stuffed too firmly, it will resist being rolled. Next time you follow the Crochet amigurumi snail – Pattern, try using a bit less stuffing in the shell tube.
Can I sell snails made from this Crochet amigurumi snail – Pattern?
Most designers allow you to sell finished items made from their patterns as long as you give them credit for the design. It’s a great way to turn your hobby into a small business! Check the specific terms of the Crochet amigurumi snail – Pattern you are using to be sure.
In this article, we have journeyed through the entire process of creating a Crochet amigurumi snail – Pattern, from the initial selection of hooks and yarn to the final, intricate assembly of the shell and body.
learned that the secret to a great amigurumi lies in tight tension, the right stuffing techniques, and those tiny facial details that bring a character to life. This project is a wonderful way to practice working in rounds and mastering the art of seamless sewing.


