
Lily in Crochet - Pattern

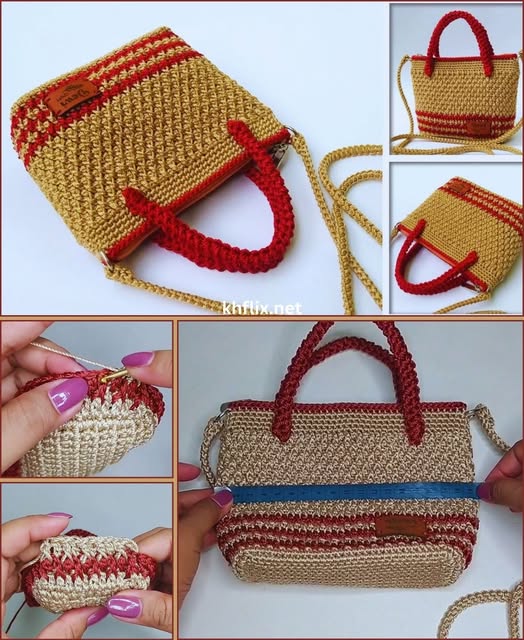
A Crochet Bag Tutorial – Pattern is the ultimate gateway for any crafter looking to merge high-fashion aesthetics with the soulful touch of handmade artistry. Creating your own accessories allows you to break away from the world of fast fashion, providing a sustainable alternative that is customized to your specific needs and personal style. This Crochet Bag Tutorial – Pattern is meticulously designed to take you from a simple skein of yarn to a functional, durable, and stylish tote that can accompany you to the farmer’s market, the beach, or even a formal evening out.
The beauty of a Crochet Bag Tutorial – Pattern lies in its immense versatility and the relatively low barrier to entry for beginners. Unlike complex garments that require precise sizing and tailoring, a bag is much more forgiving, allowing you to focus on mastering new stitches and experimenting with color gradients. By following a structured Crochet Bag Tutorial – Pattern, you ensure that the structural integrity of the piece is maintained, meaning your handles won’t stretch to the ground once you put your wallet and keys inside—a common pitfall for those who try to freehand their first project.
In this comprehensive guide, we will delve into every technical layer of the Crochet Bag Tutorial – Pattern, from selecting the most resilient fibers to the final decorative flourishes that make your work stand out. We will explore the geometric foundations of bag making, such as how to create a flat base and how to reinforce stress points. Whether you are seeking a boho-chic aesthetic or a sleek, minimalist design, this Crochet Bag Tutorial – Pattern will serve as your creative roadmap, proving that with a hook and some thread, you can carry your world in something you built with your own two hands.
The first step in any successful Crochet Bag Tutorial – Pattern is choosing a yarn that can handle the weight of daily use without losing its shape. For a sturdy Crochet Bag Tutorial – Pattern, natural fibers like cotton, linen, or hemp are the preferred choices because they have very little “give” or stretch compared to wool. A mercerized cotton is particularly excellent for a Crochet Bag Tutorial – Pattern because it has a subtle sheen and a tight twist that prevents the bag from pilling or fraying over time.
Weight and thickness are also crucial considerations when you are following a Crochet Bag Tutorial – Pattern. Most bag designs work best with “worsted” or “bulky” weight yarns, as these create a dense fabric that keeps your items secure inside. If you choose a yarn that is too thin for your Crochet Bag Tutorial – Pattern, you might find that small items like pens or coins can slip through the gaps in the stitches.
The crochet hook you select for your Crochet Bag Tutorial – Pattern should ideally be one size smaller than what is recommended on the yarn label. This is a secret tip for any Crochet Bag Tutorial – Pattern because it creates a tighter “tension,” resulting in a stiffer fabric that stands up on its own. Using an ergonomic hook is also a great idea for a Crochet Bag Tutorial – Pattern, as bags often require thousands of repetitive stitches that can lead to hand fatigue if your tool isn’t comfortable.
Color theory plays a massive role in the final look of your Crochet Bag Tutorial – Pattern. You can choose a variegated yarn to create automatic stripes without having to weave in dozens of ends, or stick to a solid neutral for a Crochet Bag Tutorial – Pattern that matches every outfit in your wardrobe. Darker colors are often more practical for a Crochet Bag Tutorial – Pattern that will be placed on the ground, as they hide dirt and wear much better than whites or pastels.
Hardware can elevate your Crochet Bag Tutorial – Pattern from a simple craft project to a professional-looking accessory. Many modern Crochet Bag Tutorial – Pattern guides suggest adding magnetic snaps, metal d-rings, or even leather pre-punched bottoms for extra durability. Incorporating these non-yarn elements into your Crochet Bag Tutorial – Pattern adds a level of sophistication and functionality that makes the bag feel like it came straight from a boutique.
Lastly, consider the lining for your Crochet Bag Tutorial – Pattern. While not strictly necessary for every design, a fabric lining prevents the crochet stitches from stretching under the weight of heavy items. You can choose a fun, printed cotton fabric to hide inside your Crochet Bag Tutorial – Pattern, adding a “secret” pop of color and an extra layer of protection for both the yarn and your belongings.
The foundation of a good Crochet Bag Tutorial – Pattern is the base, which determines the overall shape—whether it be a flat envelope style, a circular bucket, or a rectangular tote. For a circular Crochet Bag Tutorial – Pattern, you will likely start with a “magic ring” and work in increasing rounds, ensuring that the base stays flat and doesn’t “bowl” upward too early. Following the mathematical increases of the Crochet Bag Tutorial – Pattern is essential for maintaining a perfect, symmetrical circle.
Once the base reaches the desired diameter in your Crochet Bag Tutorial – Pattern, you will stop increasing and begin working even rounds to create the sides. This is the moment in the Crochet Bag Tutorial – Pattern where the project magically transforms from a flat disc into a 3D vessel. The “thermal stitch” or a “waistcoat stitch” are popular choices for the body of a Crochet Bag Tutorial – Pattern because they create a thick, double-layered fabric that is incredibly strong.
If your Crochet Bag Tutorial – Pattern features a “market bag” style, you will likely incorporate “mesh” or “lace” stitches to allow the bag to expand. These open-work sections of the Crochet Bag Tutorial – Pattern make the bag lightweight and breathable, which is perfect for carrying fresh produce or beach towels. However, even in a mesh Crochet Bag Tutorial – Pattern, the first few rows near the bottom should remain solid to ensure small items don’t fall out.
Managing “seams” is another technical hurdle addressed in a high-quality Crochet Bag Tutorial – Pattern. Most bags are worked in a continuous spiral to avoid a visible “stair-step” seam where the rounds join. Using a stitch marker in your Crochet Bag Tutorial – Pattern is non-negotiable, as it allows you to keep track of the beginning of each round and ensures your stitch counts remain accurate as the bag grows taller.
Texture can be added to the walls of your Crochet Bag Tutorial – Pattern through the use of “post stitches” or “bobbles.” These decorative elements are often detailed in the Crochet Bag Tutorial – Pattern to add visual interest and a tactile quality to the finished piece. While these stitches use more yarn, they also add thickness to the Crochet Bag Tutorial – Pattern, making the bag more robust and less likely to sag over time.
As you reach the top of the body in your Crochet Bag Tutorial – Pattern, it is often recommended to switch to a smaller hook or a tighter stitch like the “single crochet.” This creates a sturdy “rim” for the Crochet Bag Tutorial – Pattern, which provides a solid anchor point for the handles. A well-constructed rim is the difference between a Crochet Bag Tutorial – Pattern that lasts for years and one that loses its shape after just a few uses.
The handles are arguably the most important part of any Crochet Bag Tutorial – Pattern, as they bear the brunt of the tension and weight. A common mistake in a DIY Crochet Bag Tutorial – Pattern is making the handles too thin or using a stretchy stitch that elongates too much. To prevent this, many Crochet Bag Tutorial – Pattern experts recommend “corded” handles or “I-cord” techniques that provide a dense, circular structure that resists stretching.
Placement of the handles in your Crochet Bag Tutorial – Pattern must be perfectly symmetrical to ensure the bag hangs correctly on your shoulder. You should use stitch markers to map out the attachment points according to the Crochet Bag Tutorial – Pattern instructions before you begin sewing or crocheting them on. If the handles are even one stitch off in your Crochet Bag Tutorial – Pattern, the bag will feel awkward to carry and may wear unevenly.
Reinforcement is a key theme in a professional Crochet Bag Tutorial – Pattern. You can reinforce handles by crocheting over a piece of nylon cord or “clothesline” to give them a permanent, non-stretch core. This technique is especially useful for a Crochet Bag Tutorial – Pattern designed for heavy duty, like a grocery tote or a laptop bag, where the weight could easily pull standard crochet stitches out of alignment.
The length of the handles in your Crochet Bag Tutorial – Pattern can be customized to your preference—short for a handbag, medium for a shoulder bag, or long for a crossbody. When adjusting the length in a Crochet Bag Tutorial – Pattern, remember that even the sturdiest yarn will stretch slightly under weight. A good rule of thumb in a Crochet Bag Tutorial – Pattern is to make the handles about two inches shorter than your “ideal” length to account for this natural settle.
For a more modern look, some Crochet Bag Tutorial – Pattern designs use “cut-out” handles that are worked directly into the top rows of the bag. This creates a sleek, integrated look and eliminates the need for sewing separate pieces together in your Crochet Bag Tutorial – Pattern. These “grab handles” are perfect for smaller clutches or minimalist totes where a clean silhouette is the primary goal of the Crochet Bag Tutorial – Pattern.
Finally, don’t forget to double-check the “join” where the handle meets the bag body in your Crochet Bag Tutorial – Pattern. This is the most common point of failure, so using a “cross-stitch” or multiple passes of yarn to secure the handle is a standard practice in any reliable Crochet Bag Tutorial – Pattern. By investing extra time into the handles, you ensure that your Crochet Bag Tutorial – Pattern remains a functional part of your wardrobe for a long time.
The final stage of a Crochet Bag Tutorial – Pattern is where you turn a simple textile project into a piece of wearable art. Weaving in the ends is the first step; in a Crochet Bag Tutorial – Pattern, you should weave them in very securely, following the path of the stitches to ensure they don’t pop out when the bag is stretched. Using a “sharp” tapestry needle for your Crochet Bag Tutorial – Pattern allows you to pierce the yarn fibers, creating a friction-lock that is much more secure than simply sliding under the loops.
Blocking your finished Crochet Bag Tutorial – Pattern is a game-changer for the final appearance and drape. By pinning the bag to its intended shape and steaming it lightly, you “set” the stitches and smooth out any puckering that occurred during the Crochet Bag Tutorial – Pattern assembly. This is particularly important for a Crochet Bag Tutorial – Pattern with lace or open-work sections, as it allows the design to fully open up and look its best.
Personalization is the most fun part of following a Crochet Bag Tutorial – Pattern. You can add tassels, pom-poms, or crocheted flowers to the handle to give your Crochet Bag Tutorial – Pattern a bohemian vibe. Many crafters also enjoy adding a “handmade” leather tag to their Crochet Bag Tutorial – Pattern, which instantly gives the project a high-end, professional feel and makes it a great candidate for a thoughtful gift.
If your Crochet Bag Tutorial – Pattern is intended for a professional setting, consider adding a zipper closure. While sewing a zipper into crochet can be intimidating, a good Crochet Bag Tutorial – Pattern will explain how to use a “backstitch” to attach the zipper tape securely to the yarn. This addition makes your Crochet Bag Tutorial – Pattern much more secure for city commuting and protects your valuables from falling out.
For those who want a rustic look, adding a wooden or bamboo handle to the top of your Crochet Bag Tutorial – Pattern is a fantastic modification. You can crochet directly around the handle base or sew it on afterward using a coordinating yarn. These natural elements complement the texture of the crochet in your Crochet Bag Tutorial – Pattern, resulting in a bag that feels earthy, organic, and incredibly trendy.
Lastly, consider the longevity of your Crochet Bag Tutorial – Pattern by applying a fabric protector spray once it is finished. This is especially useful for cotton-based Crochet Bag Tutorial – Pattern projects, as it helps repel water and stains, keeping your bag looking new for longer. With these final touches, your Crochet Bag Tutorial – Pattern is complete—a unique, durable, and beautiful accessory that serves as a testament to your patience and creative vision.
Which yarn is best for a Crochet Bag Tutorial – Pattern?
Cotton is universally considered the best choice for a Crochet Bag Tutorial – Pattern because of its strength and lack of stretch. Unlike wool or acrylic, cotton won’t sag excessively when the bag is filled. For a more rugged look, you can also use jute or “t-shirt yarn” in your Crochet Bag Tutorial – Pattern.
How do I prevent my bag from stretching out?
The most effective way to prevent stretching in a Crochet Bag Tutorial – Pattern is to use a smaller hook to create a tight gauge and to add a fabric lining. Additionally, choosing non-stretchy stitches like the “Single Crochet” or “Waistcoat Stitch” within your Crochet Bag Tutorial – Pattern will provide much better structural support.
Can a beginner finish this Crochet Bag Tutorial – Pattern?
Absolutely! Most Crochet Bag Tutorial – Pattern designs are built on basic shapes like rectangles and circles. If you know how to chain and do a single crochet, you have the skills needed to complete a beautiful bag. We recommend starting with a simple “tote” style Crochet Bag Tutorial – Pattern before moving on to complex lace designs.
How do I wash a bag made from a Crochet Bag Tutorial – Pattern?
If you used cotton yarn, you can usually hand-wash your Crochet Bag Tutorial – Pattern in cold water and lay it flat to dry. Avoid hanging the bag while it is wet, as the weight of the water will stretch out the fibers. If your Crochet Bag Tutorial – Pattern includes leather or metal hardware, spot cleaning is the safest option.
How long does it take to complete a Crochet Bag Tutorial – Pattern?
The timeframe depends on the size and complexity of the Crochet Bag Tutorial – Pattern. A small “market bag” with an open-work mesh can be finished in a weekend (about 5-8 hours), while a large, dense tote with intricate textures might take 15-20 hours of focused work.
In conclusion, the Crochet Bag Tutorial – Pattern is an incredibly rewarding project that bridges the gap between traditional craft and modern fashion. Throughout this article, we have explored the essential steps for success, beginning with the selection of durable, low-stretch fibers like cotton and the importance of choosing the correct hook size for a stiff, reliable fabric.
We delved into the technical construction of the base and body, emphasizing the need for consistent tension and accurate stitch counts to maintain the bag’s silhouette. Furthermore, we covered the vital aspects of handle reinforcement and the professional finishing touches, such as blocking and lining, that ensure your Crochet Bag Tutorial – Pattern stands the test of time. By following a structured Crochet Bag Tutorial – Pattern, you are not just making a bag; you are creating a customized, sustainable accessory that reflects your unique style and craftsmanship.


