
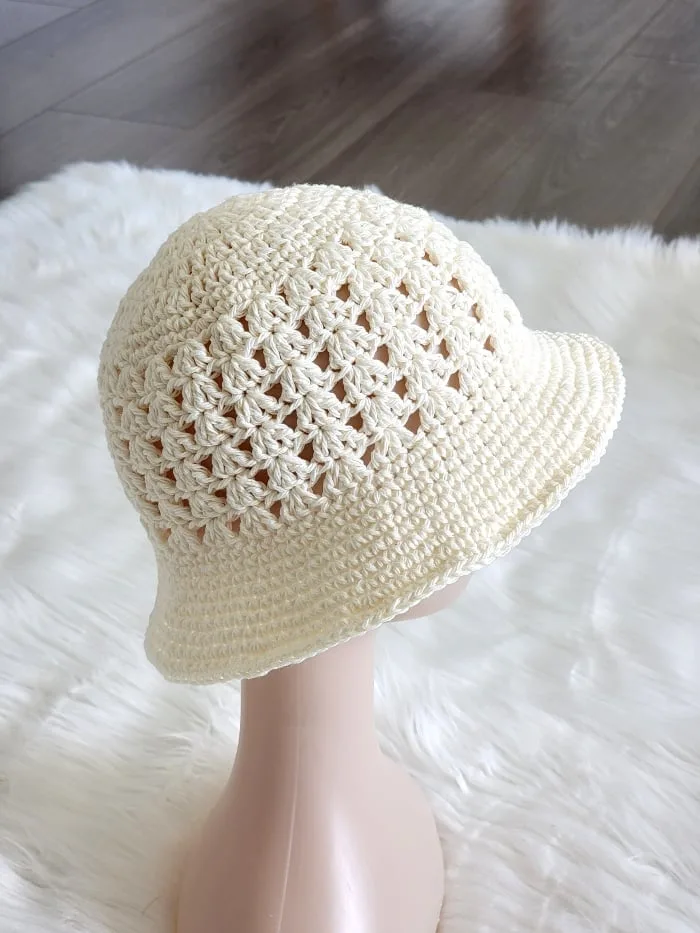
Lily in Crochet - Pattern

Creating a Crochet Bucket Hat- Pattern is one of the most rewarding projects for both beginners and seasoned crafters looking to blend vintage aesthetics with modern street style. This iconic accessory, which rose to fame in the 90s, has made a massive comeback, proving that handmade fashion is timeless. Whether you are looking to protect yourself from the sun or simply want to add a unique, personalized touch to your outfit, learning how to master a Crochet Bucket Hat- Pattern is the perfect way to sharpen your skills while producing something truly functional.
In the world of DIY fashion, the Crochet Bucket Hat- Pattern stands out because of its incredible versatility and the minimal supplies required to get started. You don’t need a fancy studio or expensive machinery; all it takes is a hook, some yarn, and a bit of patience to transform a simple ball of fiber into a trendy piece of headwear. This guide is designed to take you through the entire process, ensuring that your finished product looks professional and fits perfectly, regardless of your current experience level.
Understanding the structure of a Crochet Bucket Hat- Pattern is key to achieving that classic “bucket” shape without it looking too floppy or too stiff. We will dive deep into the specific techniques, from the initial magic ring to the final increase rounds that create the brim. By focusing on stitch consistency and choosing the right materials, you will be able to customize your hat in endless ways—using different colors, textures, and sizes to suit your personal brand or to give as a thoughtful, handmade gift.
Selecting the right yarn is the first and most crucial step when starting your Crochet Bucket Hat- Pattern. For a summer-ready hat, cotton yarn is generally the gold standard because it is breathable, holds its shape well, and handles moisture effectively. If you prefer something softer or for cooler weather, a cotton-acrylic blend offers a nice balance of durability and comfort without being too heavy.
The weight of the yarn, usually worsted weight (Level 4), determines the overall density of your Crochet Bucket Hat- Pattern. Using a yarn that is too thin might result in a hat that lacks structure, while yarn that is too thick could make the hat feel cumbersome. Always check the label for the recommended hook size to ensure your tension remains consistent throughout the project.
Your crochet hook choice is just as vital as the yarn itself. Most Crochet Bucket Hat- Pattern designs call for a 5.0mm (H/8) hook, which provides a tight enough weave to keep the sun out but stays flexible enough for comfort. Using an ergonomic hook can also prevent hand fatigue, especially since bucket hats require many repetitive single crochet or double crochet stitches.
Don’t forget the small but essential tools like stitch markers and a tapestry needle. Since a Crochet Bucket Hat- Pattern is often worked in a continuous spiral or joined rounds, stitch markers help you keep track of the beginning of each row. This prevents mistakes in your stitch count, which is the most common reason for a hat ending up lopsided or the wrong size.
Color selection allows you to put a personal spin on your Crochet Bucket Hat- Pattern. While solid colors are classic and show off stitch definition, using variegated yarn or changing colors every few rows can create a “granny square” or striped effect. If you are a beginner, starting with a lighter color is often easier so you can clearly see where to insert your hook.
Lastly, consider the “drape” of your finished piece. A Crochet Bucket Hat- Pattern needs to be firm enough to stay on your head but soft enough to be folded into a bag. Before starting the full project, it is a great idea to crochet a gauge swatch. This ensures that your personal tension matches the pattern specifications, saving you the frustration of having to “frog” (undo) your work later.
To begin your Crochet Bucket Hat- Pattern, you must be comfortable with the Magic Ring (or Magic Circle). This technique is preferred over a chain loop because it allows you to pull the center tight, leaving no hole at the top of the crown. It provides a clean, professional start to your circular crochet project and ensures the foundation is sturdy enough to hold the weight of the rest of the hat.
The most common stitch used in a Crochet Bucket Hat- Pattern is the Double Crochet (DC) or the Half Double Crochet (HDC). These stitches are favored because they work up quickly and provide a classic texture. If you want a more “closed” and structured look, you might opt for a Single Crochet (SC), though this will require more rounds and more time to complete the crown and sides.
Mastering increases is the secret to a well-fitting Crochet Bucket Hat- Pattern. Increasing involves placing two stitches into a single stitch from the previous row, which expands the diameter of the circle. To keep the top of the hat flat, these increases must be spaced out mathematically. If you increase too quickly, the hat will ruffle; if you don’t increase enough, it will turn into a cone.
Once the crown reaches the desired diameter, you will transition to the “sides” of the Crochet Bucket Hat- Pattern. This is the simplest part of the project because you stop increasing and simply work one stitch into every stitch from the previous row. This creates the vertical walls of the hat. This section determines the depth, so you can adjust it depending on how far down your forehead you want the hat to sit.
The Brim is where the Crochet Bucket Hat- Pattern gets its personality. By reintroducing increases at a specific frequency, you cause the work to flare outward. A gradual increase creates a subtle, modern brim, while a more aggressive increase schedule results in a wider, “floppy” sun hat style. Experimenting with the front loop only (FLO) technique here can also add a decorative ridge where the brim begins.
Finishing your Crochet Bucket Hat- Pattern requires a clean fasten off and weaving in ends. Using a tapestry needle, you should weave the yarn tails through the back of the stitches to hide them. This ensures the hat doesn’t unravel during washing. A final slip stitch border around the edge of the brim can provide extra stability and a “store-bought” polished look to your handmade creation.
Standardizing a Crochet Bucket Hat- Pattern for different head sizes is easy once you understand the math behind it. For an average adult, the flat crown of the hat should usually measure about 6.5 to 7 inches in diameter before you stop increasing. To make a child-sized version, you simply stop the increase rounds earlier, typically at a diameter of 5 or 5.5 inches, ensuring a snug fit.
Customizing the height of your Crochet Bucket Hat- Pattern is another way to make it your own. Some people prefer a “shallow” fit that sits above the ears, while others love a “deep” fit that can be pulled down low. You can achieve these variations by simply adding or subtracting the number of non-increase rounds in the middle section of the hat before you start the brim.
The Brim width is entirely up to your stylistic preference. In a typical Crochet Bucket Hat- Pattern, the brim is about 2 to 3 inches long. However, if you want a more dramatic “retro” look, you can continue the increase pattern for several more rows. Just keep in mind that a very wide brim may require a stiffer yarn or a smaller hook to prevent it from falling over your eyes.
Adding texture to your Crochet Bucket Hat- Pattern can elevate the design significantly. You can incorporate Post Stitches (FPDC/BPDC) to create a ribbed effect or use the Puff Stitch for a bohemian, chunky look. These variations don’t change the basic shape of the hat, but they do add visual interest and a unique tactile feel that sets your work apart from mass-produced items.
Color-blocking is a fantastic way to use up scrap yarn while following a Crochet Bucket Hat- Pattern. You can use one color for the crown, another for the sides, and a third for the brim. Alternatively, you can create a “checkerboard” pattern by carrying two colors of yarn (the Tapestry Crochet technique), which results in a very trendy, high-fashion aesthetic often seen on social media.
For those who want a more functional Crochet Bucket Hat- Pattern, adding a chin strap or a drawstring is a great modification. This is especially useful for kids’ hats or for wearing the hat on windy days at the beach. You can simply crochet a long chain and weave it through the stitches at the base of the crown, or attach two separate ties to the sides of the brim using a secure knot.
Maintaining the shape of your Crochet Bucket Hat- Pattern over time depends largely on how you care for it. If you used cotton yarn, your hat is likely machine washable, but it is always safer to hand wash in cool water with a mild detergent. Lay the hat flat to dry on a towel, shaping it while damp to ensure the brim doesn’t dry with unwanted creases or folds.
Blocking is a “pro-tip” for anyone following a Crochet Bucket Hat- Pattern. Steam blocking involves using a garment steamer or the steam setting on an iron (without touching the yarn) to relax the fibers. This helps even out your tension and makes the brim sit perfectly flat. It is a small step that makes a huge difference in the final appearance of your crochet project.
Checking your gauge frequently is vital if you are making multiple hats. Even if you use the same Crochet Bucket Hat- Pattern, your mood or environment can change your tension—stress often leads to tighter stitches, while relaxing can make them looser. Periodically measuring your work against a ruler ensures that your second hat will be the same size as your first.
If you find that the brim of your Crochet Bucket Hat- Pattern is too “wavy,” it means you have added too many increases too quickly. To fix this, you can try a row of regular stitches without increases between your increase rows. This “rest row” allows the fabric to settle and creates a smoother transition from the sides of the hat to the flare of the brim.
Sustainability is a great reason to love the Crochet Bucket Hat- Pattern. By choosing organic cotton or recycled yarns, you are contributing to a slower, more conscious fashion cycle. Furthermore, because these hats are so durable, they can last for years, eventually becoming “vintage” pieces themselves. It is a wonderful way to practice mindful crafting while staying on-trend.
Lastly, don’t be afraid to experiment and “frog” your work if it isn’t looking quite right. The beauty of a Crochet Bucket Hat- Pattern is that the yarn is reusable. If the crown is too big or the brim is too small, simply pull the yarn out and try again. Each mistake is a learning opportunity that makes you a better crocheter and ensures your final hat is something you are truly proud to wear.
Which yarn is best for a crochet bucket hat?
The best yarn for a Crochet Bucket Hat- Pattern is 100% cotton. It provides the necessary structure and breathability for a hat. If you want something with more stretch, a cotton/acrylic blend also works well.
How long does it take to crochet a bucket hat?
For an intermediate crocheter, a Crochet Bucket Hat- Pattern usually takes between 3 to 5 hours to complete. Beginners may take a bit longer, perhaps 6 to 8 hours, as they get used to the increase patterns and stitch counts.
Can I make a bucket hat with chunky yarn?
Yes! You can adapt a Crochet Bucket Hat- Pattern for chunky yarn by using a larger hook (6mm or 8mm) and doing fewer rounds for the crown. It creates a very cozy, winter-style hat that works up very quickly.
How do I make the brim stiffer?
If your brim is too floppy, you can try using a smaller hook size for the brim section only. Alternatively, you can crochet over a thin piece of fishing line or millinery wire in the final round to give it a permanent, firm shape.
Is this pattern suitable for beginners?
Absolutely. The Crochet Bucket Hat- Pattern is one of the best projects for beginners because it covers all the basics: working in the round, the magic circle, basic stitches, and increasing. It is a great way to build confidence.
How do I measure my head for a bucket hat?
Use a soft measuring tape to measure the circumference of your head just above your ears. For most adults, this is between 21 and 23 inches. Your Crochet Bucket Hat- Pattern crown should be roughly the circumference divided by 3.14 (Pi) to get the correct diameter.
In this article, we explored the wonderful world of the Crochet Bucket Hat- Pattern, covering everything from selecting the right cotton yarn and ergonomic hooks to mastering the magic ring and increase rounds.
We discussed how to customize your hat for different sizes and styles, ensuring that your finished piece is as unique as you are. By following these steps and focusing on stitch consistency and proper blocking techniques, you can create a high-quality accessory that rivals any store-bought version.


