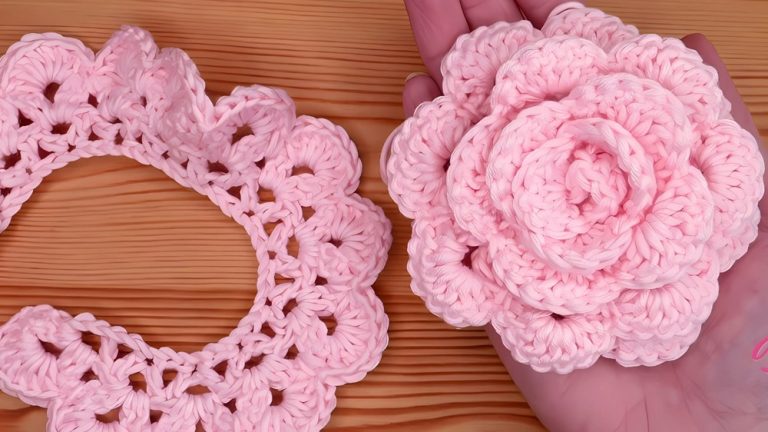
Pink Rose Crochet - Pattern

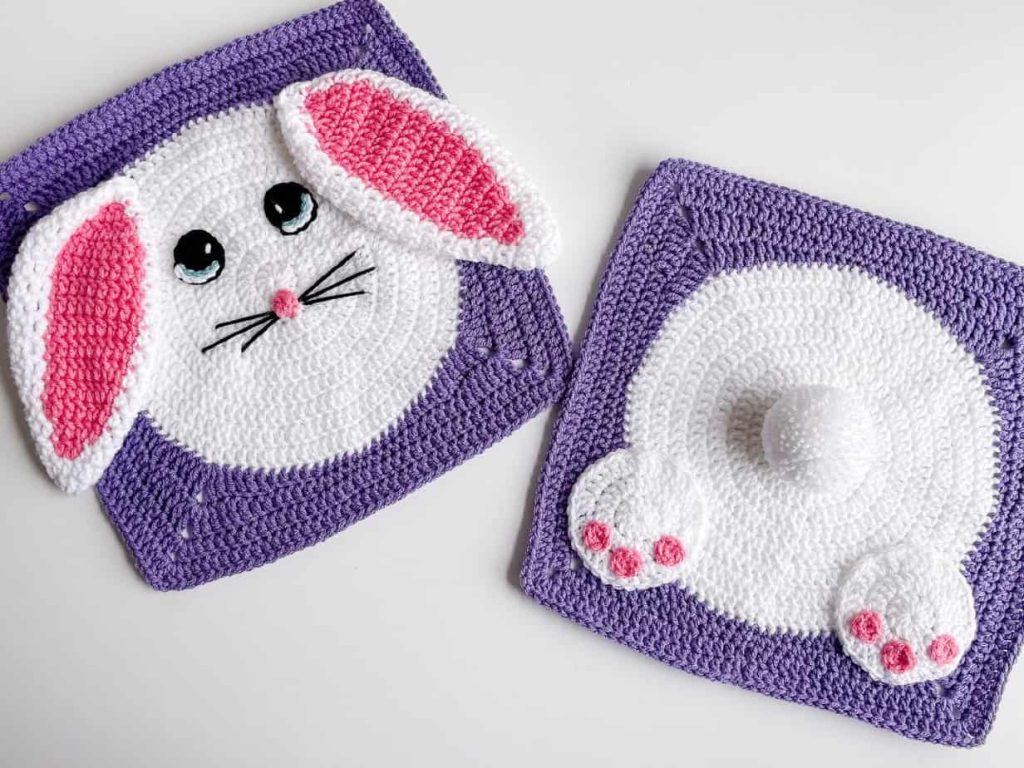
The Crochet Bunny Behind Square – Pattern is a whimsical and creative take on the traditional granny square, offering a playful three-dimensional element that captures the imagination of children and adults alike. This unique design features a cute rabbit that appears to be peeking out or hiding behind the geometric borders of a crochet block, making it an ideal choice for themed baby blankets, nursery decor, or even festive Easter projects. By combining standard stitches with clever appliqué or integrated shaping, this pattern breathes new life into the classic concept of a square-based afghan.
Working on a Crochet Bunny Behind Square – Pattern is an excellent way for intermediate crafters to practice their assembly skills and detail work, as the charm of the piece lies in the small features like the ears, tail, and facial expressions. Unlike a flat, two-dimensional motif, this pattern often utilizes layers to create depth, giving the bunny a “pop-out” effect that is highly tactile and engaging. It is a fantastic project for anyone looking to move beyond simple rows and into the world of character-based fiber arts where personality is stitched into every loop.
In this comprehensive guide, we will explore the essential steps, materials, and techniques required to master the Crochet Bunny Behind Square – Pattern. We will discuss how to choose the right yarn for a soft finish, the technical nuances of squaring off a circular animal shape, and the best ways to secure the bunny components so they withstand years of use. Whether you are a seasoned pro or a curious learner, this guide will provide you with the insights needed to create a stunning, professional-quality handmade crochet project that will be cherished for generations.
The foundation of the Crochet Bunny Behind Square – Pattern typically begins with a solid or decorative base square that serves as the “background” for our hiding rabbit. Most designers recommend using a neutral or pastel color for the square itself to ensure that the bunny remains the undisputed star of the show. You will need to master the art of the magic ring to start the bunny’s head, as this ensures a tight center without any visible gaps, providing a clean surface for later embroidery of the nose and eyes.
One of the defining features of this Crochet Bunny Behind Square – Pattern is the use of the “round-to-square” transition. This involves working the bunny’s head in a circular fashion and then using taller stitches like the treble crochet in the corners to create the four sides of a square. This architectural shift is what allows the organic, soft curves of the rabbit to merge seamlessly into a block that can be easily joined with others to form a larger blanket or pillow cover.
The ears are perhaps the most critical component of the Crochet Bunny Behind Square – Pattern, as their placement determines the “behind” effect. Usually, the ears are worked separately and then sewn to the top of the head so they appear to be flopping over the edge of the square. Using a slip stitch or a whip stitch to attach these ears ensures they remain upright and expressive, giving your bunny that inquisitive, peeking look that makes this pattern so beloved by parents and gift-givers.
When selecting yarn for your Crochet Bunny Behind Square – Pattern, softness should be your top priority, especially if the project is intended for an infant. A high-quality cotton-acrylic blend is often preferred because it offers the breathability of cotton with the durability and washability of acrylic. This ensures that the intricate details of the bunny don’t lose their shape after a few cycles in the laundry, preserving the “peeking” illusion for years to come.
Tension plays a significant role in the success of the Crochet Bunny Behind Square – Pattern, particularly when switching between the dense stitches of the bunny’s face and the more open stitches of the surrounding border. If your tension is too loose, the bunny might look saggy; if it is too tight, the square will curl and refuse to lay flat. Using a stitch marker to keep track of your corner increases will help you maintain a perfect geometric shape while managing the complex character details.
Finally, the “behind” aspect of the Crochet Bunny Behind Square – Pattern can be enhanced by adding a small “tail” on the back of the square or having the paws appear at the bottom edge. These small, thoughtful additions transform a simple motif into a 360-degree piece of art. It encourages the recipient to touch and explore the texture, making it a wonderful sensory crochet item for developing toddlers who love to discover hidden surprises in their toys.
To achieve the best results with the Crochet Bunny Behind Square – Pattern, you should gather a variety of hook sizes. A smaller hook is often used for the bunny’s facial features and ears to create a tight, stiff fabric that holds its shape, while a slightly larger hook is used for the surrounding square to give the blanket a soft, cozy drape. This dual-hook approach is a secret technique used by professional designers to balance structural integrity with comfort in character-based crochet projects.
Choosing the right color palette for your Crochet Bunny Behind Square – Pattern can completely change the mood of the finished piece. For a classic, timeless look, consider using creams, soft greys, and “bunny browns.” However, if you want something more modern, don’t be afraid to experiment with contrasting colors like a bright teal background with a snowy white bunny. The high contrast makes the silhouette of the rabbit much more visible from a distance, highlighting the cleverness of the pattern.
Don’t overlook the importance of embroidery floss for the bunny’s face. While some quilters and crocheters use plastic safety eyes, many prefer embroidered eyes for a baby-safe Crochet Bunny Behind Square – Pattern. A simple French knot for the eyes and a small V-shape for the nose can convey a wide range of emotions, from sleepy and peaceful to alert and curious. These finishing touches are where you truly “bring the bunny to life” and infuse your personality into the work.
In terms of yardage, the Crochet Bunny Behind Square – Pattern is surprisingly efficient, making it a great “scrap-buster” project. You can use leftover bits of white or beige yarn for the bunnies while keeping a consistent color for the squares to tie the whole blanket together. Using gradient yarn for the background can also create a beautiful “sky” or “meadow” effect, making it look as though the bunnies are hiding in a colorful outdoor landscape.
Starch or blocking spray can be an optional but helpful material when finishing your Crochet Bunny Behind Square – Pattern. Since the bunny head is a raised element, the corners of the square might naturally want to pull inward. A quick wet-blocking session on a foam board will set the stitches in place, ensuring that every square is exactly the same size before you begin the joining process. This step is essential for a professional, boutique-quality finish.
Lastly, consider adding a soft flannel backing if you are making a full blanket from these squares. While the back of a Crochet Bunny Behind Square – Pattern is usually neat, a fabric lining can hide the yarn tails and provide an extra layer of warmth. It also prevents little fingers from pulling on the back of the bunny’s ears, ensuring the structural longevity of your handmade heirloom for many years of snuggles and play.
The assembly of the Crochet Bunny Behind Square – Pattern requires a bit of planning to ensure the bunny looks like it is truly “behind” the square. This is often achieved by crocheting the bunny head as a separate circle and then working the square border around it, or by sewing the bunny onto a pre-made square using the appliqué technique. Each method has its benefits, but the integrated approach usually creates a flatter, more seamless transition between the animal and the geometry.
When working the ears for the Crochet Bunny Behind Square – Pattern, you will often use a combination of single, half-double, and double crochet stitches to create a tapered shape. To prevent the ears from flopping forward too much, you can crochet a “support row” or sew a small wire (only for decorative items, not for babies!) inside. For a baby-friendly version, simply sewing the ears down at a slight angle will maintain the 3D effect without any safety risks.
Joining multiple Crochet Bunny Behind Square – Pattern units together is where the project really starts to take shape. The “mattress stitch” is a favorite for this pattern because it creates an invisible seam that doesn’t distract from the character motifs. If you prefer a more decorative look, a flat-braid join can add an extra layer of texture between the squares, making the entire blanket look like a complex lattice of hidden bunnies.
If you encounter issues with the square looking “lumpy” around the bunny’s head, you may need to adjust your increase frequency. In a standard square, you increase at the four corners, but when an object is in the center, you may need to compensate for the bulk of the bunny. Checking your work against a flat surface every few rounds will help you catch any “warping” early on, ensuring your Crochet Bunny Behind Square – Pattern stays perfectly flat.
For those who want to add even more detail, you can crochet small “paws” that overlap the edge of the square. This makes it look like the bunny is actually gripping the frame and pulling itself up to peek over. This level of narrative detail is what makes a project stand out on platforms like Etsy or Pinterest, as it tells a story rather than just being a repetitive geometric pattern.
Finally, the border of the final quilt or blanket should be kept relatively simple. Since the Crochet Bunny Behind Square – Pattern is quite detailed, a busy border can make the overall design feel cluttered. A simple crab stitch (reverse single crochet) or a clean shell border in a neutral color provides the perfect frame, drawing the eye inward toward the charming bunnies peeking out from their colorful hiding spots.
The beauty of the Crochet Bunny Behind Square – Pattern is its incredible versatility across different seasons. While it is naturally a perfect fit for Easter, you can easily adapt it for winter by adding a tiny crocheted scarf to the bunny or using “icy” blue and silver yarn for the background. This adaptability makes it a year-round pattern that you can turn to whenever you need a heartfelt, customized gift for a new arrival or a young child.
For a “Woodland” themed nursery, you can modify the Crochet Bunny Behind Square – Pattern by changing the colors to deep greens, rust oranges, and mustard yellows. You could even use the same basic square structure but change the ears to create different animals like bears or foxes peeking from behind the square. This consistency in the block design allows you to create a diverse “forest” blanket while keeping the assembly process uniform.
Texture can be another way to customize the Crochet Bunny Behind Square – Pattern. Using a “fuzzy” or “eyelash” yarn for the bunny’s tail or the tips of the ears adds a delightful tactile experience for babies. Just be sure to use these specialty yarns sparingly, as they can be difficult to work with and may obscure your stitch definition if used for the entire rabbit motif.
If you are making a project for an older child, you can turn the Crochet Bunny Behind Square – Pattern into a “pocket square.” By only sewing down three sides of the bunny’s head, you create a small hidden pocket where a child can hide a “tooth fairy” coin or a small note. This transforms the crochet piece from a static blanket into an interactive toy, adding another layer of value to your handmade creation.
Scale is another factor you can play with. By using bulky yarn and a large hook, a single Crochet Bunny Behind Square – Pattern can become a standalone floor cushion or a decorative wall hanging. Conversely, using lace-weight thread and a tiny hook can result in miniature squares that are perfect for a personalized greeting card or a delicate bunting to hang in a window for springtime.
Lastly, think about the “hidden” details. You could embroider a tiny carrot or a flower on the corner of the square to complement the Crochet Bunny Behind Square – Pattern. These small, Easter-egg-style details show the recipient that you spent time thinking about the design, making the gift feel much more personal and “high-end” compared to a store-bought alternative.
1. Is the Crochet Bunny Behind Square – Pattern difficult for beginners?
It is best suited for an “adventurous beginner” or an intermediate crocheter. You need to be comfortable with working in the round and then transitioning to a square. If you have made a basic granny square before, this is a great next step!
2. How do I make sure the bunny’s ears stay up?
For the Crochet Bunny Behind Square – Pattern, the best way to keep ears upright is to use a smaller hook for a tighter gauge or to sew them to the square background at multiple points. This provides the structural support needed without using wires.
3. Can I machine wash a blanket made with these squares?
Yes, provided you use an appropriate yarn! If you use a cotton-acrylic blend, you can usually machine wash on a gentle cycle. Always recommend that the recipient air-dries the blanket to keep the bunny’s features from getting distorted in the heat.
4. How many squares do I need for a baby blanket?
Usually, a 5×6 or 6×6 grid of squares (30-36 total) makes a perfect-sized baby blanket. Each Crochet Bunny Behind Square – Pattern usually measures between 4 to 6 inches depending on your yarn weight and hook size.
5. What is the best way to attach the eyes for safety?
For items intended for babies under three years old, embroidered eyes are the safest option. Plastic safety eyes, while popular, can potentially become a choking hazard if they are not installed perfectly or if the yarn stretches over time.
6. Can I use a different animal with this square layout?
Absolutely! The “Behind the Square” logic works for bears, cats, and dogs too. Once you master the Crochet Bunny Behind Square – Pattern, you can easily swap out the ear shapes to create an entire menagerie of peeking animals.
The Crochet Bunny Behind Square – Pattern is more than just a craft project; it is a delightful way to merge the structured world of geometry with the soft, imaginative world of character design.
In this article, we’ve covered everything from the foundational stitch mechanics and material selection to advanced assembly tips and creative customizations. By focusing on the “peeking” effect and ensuring high-quality finishes like invisible joins and embroidered details, you can create a piece that is as durable as it is adorable.
