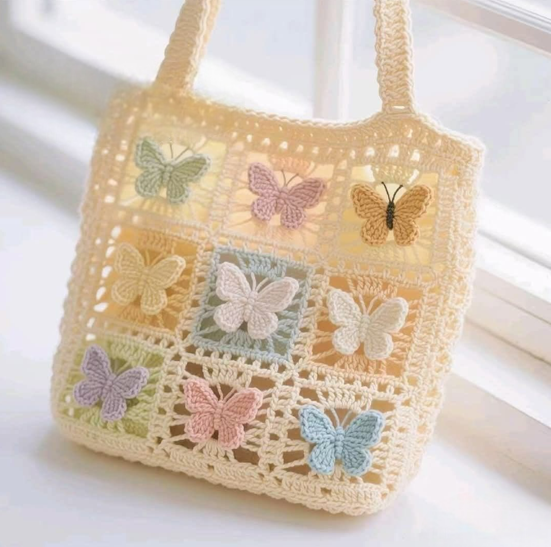
Crochet Butterfly Bag - Tutorial

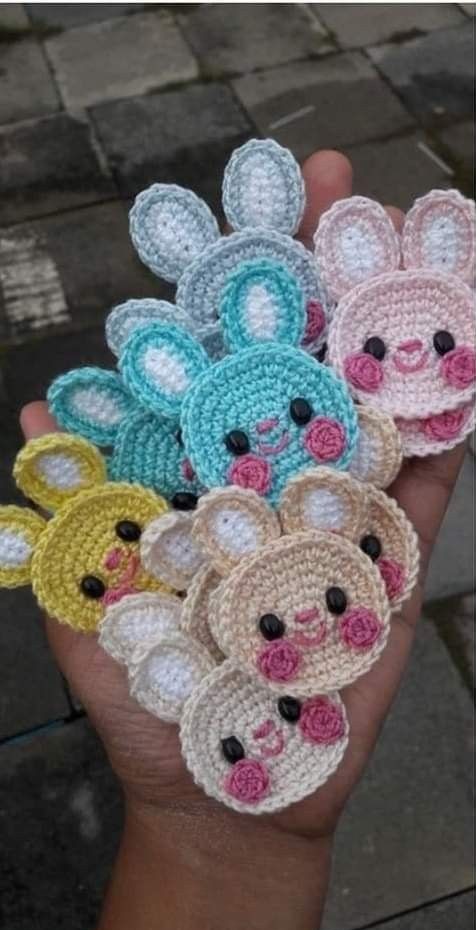
Creating a Crochet Bunny – Pattern is one of the most rewarding projects for any crafter, whether you are a seasoned expert or just picking up your hook for the first time. There is something truly magical about taking a simple ball of yarn and transforming it into a soft, cuddly companion that can be gifted to a newborn or kept as a charming piece of home decor. In this comprehensive guide, we will explore everything you need to know about mastering the Crochet Bunny – Pattern, ensuring your finished product is professional, durable, and absolutely adorable.
The beauty of a Crochet Bunny – Pattern lies in its versatility, as you can easily adjust the size, texture, and personality of your rabbit by simply changing your yarn weight or hook size. When we talk about a Crochet Bunny – Pattern, we are usually referring to the art of Amigurumi, which is the Japanese craft of knitting or crocheting small, stuffed yarn creatures. This specific niche of crochet requires a bit of patience and attention to detail, but the results are incredibly satisfying once you see those long ears and tiny tails come to life.
In the following sections, we will break down the essential components of a high-quality Crochet Bunny – Pattern, focusing on the materials you need, the basic stitches involved, and the assembly process. Understanding the terminology and techniques behind a Crochet Bunny – Pattern is crucial for success, especially if you want to avoid common mistakes like visible stuffing or uneven limbs. Let’s dive into the wonderful world of yarn and stitches to help you create your very own long-eared friend.
Before you begin your Crochet Bunny – Pattern, you must gather the right tools to ensure a smooth crafting experience. The most important choice you will make is the yarn type, as this dictates the “feel” of your bunny; cotton yarn provides great stitch definition, while chenille or velvet yarn makes for a super soft, plushie-style rabbit.
Choosing the correct crochet hook size is the next vital step in your Crochet Bunny – Pattern journey. For Amigurumi projects, it is standard practice to use a hook that is one or two sizes smaller than what the yarn label recommends, as this creates a tight fabric that prevents the polyester fiberfill from peeking through the stitches.
You will also need a pair of safety eyes, which give your Crochet Bunny – Pattern a professional and expressive look. However, if you are making this toy for a child under three years old, it is highly recommended to embroider the eyes with black yarn instead to prevent any potential choking hazards.
Don’t forget the smaller essentials like a stitch marker, which is indispensable when working in continuous rounds, a common feature in any Crochet Bunny – Pattern. Since you won’t be joining rounds with a slip stitch, the marker helps you keep track of where your new row begins, preventing lopsided ears or bodies.
A sharp pair of scissors and a yarn needle (or tapestry needle) are also mandatory for finishing your Crochet Bunny – Pattern. The needle is used for weaving in ends and, more importantly, for sewing the different body parts together, which is often the most challenging yet rewarding part of the entire process.
Finally, high-quality stuffing is what gives your Crochet Bunny – Pattern its shape and squishiness. You want to use a material that is washable and hypoallergenic, ensuring that your handmade creation remains clean and safe for years of hugs and play.
To successfully execute a Crochet Bunny – Pattern, you must be comfortable with a few foundational stitches, the most frequent being the single crochet (sc). This stitch is the “bread and butter” of Amigurumi because it creates a dense, sturdy fabric that holds its shape well once the stuffing is added inside.
Another critical technique is the Magic Ring (or Magic Circle), which is the preferred way to start almost every piece of a Crochet Bunny – Pattern. The magic ring allows you to pull the center hole tight, leaving no gap at the top of the head or the bottom of the feet, resulting in a much cleaner finish than a traditional chain-start.
Increasing and decreasing are the methods used to shape your Crochet Bunny – Pattern into rounds and curves. An increase (inc) involves placing two stitches into the same stitch from the previous row, while an invisible decrease (inv dec) is a specialized technique that reduces the stitch count without creating unsightly bumps or holes in the fabric.
Most Crochet Bunny – Pattern instructions are written in continuous rounds, meaning you spiral upward rather than finishing each row with a join. This creates a seamless look that is aesthetically pleasing and makes the shaping of complex parts, like the bunny’s muzzle or rounded belly, much easier to manage visually.
Tension control is a subtle but vital skill when working on a Crochet Bunny – Pattern. If your tension is too loose, the stuffing will show; if it is too tight, your hands will tire quickly, and the hook may be difficult to insert. Consistency is the goal to ensure that both ears and all four limbs match perfectly in size.
Lastly, learning how to read a Crochet Bunny – Pattern chart or written abbreviation list is essential. Terms like BLO (Back Loop Only) or FLO (Front Loop Only) might appear, which are used to create ridges or specific angles in the bunny’s design, such as a flat bottom so the bunny can sit upright on a shelf.
Once you have crocheted all the individual parts—head, body, ears, arms, and legs—the assembly phase of your Crochet Bunny – Pattern begins. This is where your bunny truly gains its personality, and taking your time to pin the parts in place before sewing is a tip that every pro crafter follows religiously.
When sewing the ears onto your Crochet Bunny – Pattern, placement is everything; positioning them high and close together creates a classic look, while placing them lower on the sides can give the rabbit a “floppy-eared” or “lop” appearance. Use sewing pins to test different spots until you find the expression you like best.
The body and head connection is the “spine” of your Crochet Bunny – Pattern. It needs to be sewn securely using a whip stitch or a ladder stitch to ensure the head doesn’t wobble. Adding a little extra stuffing into the neck area right before you close the seam can provide much-needed structural support.
Embroidery is the secret sauce that adds charm to a Crochet Bunny – Pattern. Using a small amount of pink yarn or embroidery floss, you can stitch a “Y” shape for the nose and mouth. This simple detail transforms a faceless doll into a character with a sweet, gentle expression.
For the limbs, you can choose to make your Crochet Bunny – Pattern “posable” by using button joints or simply sewing them flat against the body. If you want the bunny to be able to sit, sew the legs to the front-bottom of the body; for a standing look, sew them directly to the base.
Final touches might include adding a tiny pom-pom for a tail or a crochet bow around the neck. These small additions make your version of the Crochet Bunny – Pattern unique and can even be used to color-coordinate the toy with a nursery theme or a specific holiday like Easter.
After spending hours on your Crochet Bunny – Pattern, you want to ensure it lasts a lifetime. The first rule of care is knowing the fiber content of your yarn; while cotton and acrylic can usually handle a gentle wash, wool might felt and ruin the shape of your hard work.
If your Crochet Bunny – Pattern gets a little dusty, a simple spot clean with a damp cloth and mild soap is usually enough. For a deeper clean, place the bunny inside a lingerie bag or a pillowcase and use the “delicate” or “hand wash” cycle on your washing machine with cold water.
Never put your Crochet Bunny – Pattern in the dryer, as the high heat can melt synthetic fibers (like acrylic) or cause the stuffing to clump together. Instead, reshape the bunny by hand while it is damp and let it air dry in a well-ventilated area away from direct sunlight to prevent color fading.
Over time, you might notice “pilling” on your Crochet Bunny – Pattern, especially if it is a favorite toy that gets carried everywhere. You can easily remove these small fuzz balls using a fabric shaver or carefully trimming them with embroidery scissors to restore the bunny to its original glory.
If a seam starts to come loose on your Crochet Bunny – Pattern, don’t panic. Since you made it yourself, you have the skills to fix it! Simply use a matching piece of yarn and your tapestry needle to reinforce the area, ensuring the bunny is “surgery-ready” for more years of companionship.
Handmade gifts like a Crochet Bunny – Pattern are heirlooms in the making. By teaching the recipient how to care for it—or including a small “care card” with the gift—you ensure that your labor of love remains a cherished part of their life for a very long time.
1. What is the best yarn for a Crochet Bunny – Pattern?
The “best” yarn depends on the desired outcome. For a crisp, durable look, mercerized cotton is excellent. For a soft, cuddly toy, chenille or blanket yarn is the most popular choice.
2. How long does it take to finish a Crochet Bunny – Pattern?
For an intermediate crocheter, a standard 10-inch bunny usually takes between 4 to 8 hours of active work, including assembly and detailing.
3. Can a beginner try a Crochet Bunny – Pattern?
Absolutely! As long as you know the single crochet, increase, and decrease, you can complete a basic bunny. It is recommended to start with a pattern that uses thicker yarn so you can see your stitches clearly.
4. Why is my Crochet Bunny – Pattern showing holes?
This usually happens if your hook size is too large for your yarn or if your tension is too loose. Try dropping down a hook size (e.g., from 4.0mm to 3.25mm) to tighten the fabric.
5. How do I make the bunny’s ears stand up?
To make ears stand up in a Crochet Bunny – Pattern, you can crochet them with a tighter tension, use a pipe cleaner inside (for adult collectors only), or simply sew them in a folded “pinched” shape at the base to provide more rigidity.
6. Can I sell the bunnies I make from a Crochet Bunny – Pattern?
Usually, yes! Most designers allow you to sell the physical items made from their patterns, provided you give credit to the pattern designer. However, always check the specific copyright notice included in your Crochet Bunny – Pattern.
In this article, we have explored the intricate and joyful process of creating a Crochet Bunny – Pattern. We covered the essential materials needed to get started, the fundamental stitches that form the building blocks of Amigurumi, the delicate art of assembly and embroidery, and how to properly care for your finished creation.
Creating a handmade toy is a journey of patience and creativity, resulting in a unique piece that carries the heart of the maker in every stitch.


