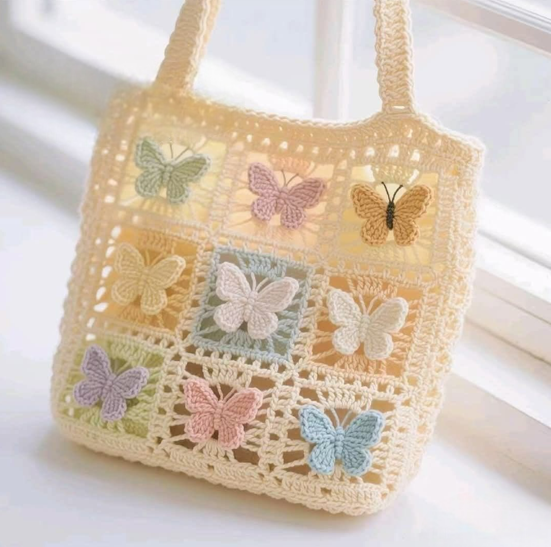
Crochet Butterfly Bag - Tutorial

This Crochet Butterfly Bag – Tutorial is your gateway to creating a whimsical, functional, and fashionable accessory that captures the delicate beauty of nature. If you have been looking for a project that combines intricate stitchwork with a practical outcome, this butterfly-shaped crochet purse is the perfect choice for your next creative endeavor. Handcrafted bags have become a staple in modern wardrobes, offering a unique alternative to mass-produced fashion, and this specific design allows you to showcase your personality through vibrant yarn colors and artistic textures.
In this comprehensive Crochet Butterfly Bag – Tutorial, we will guide you through the process of constructing a sturdy base, shaping the symmetrical wings, and adding the finishing touches that bring the butterfly to life. The beauty of a handmade crochet bag lies in its versatility; it can serve as a charming gift for a child, a boho-style accessory for a summer festival, or even a decorative storage pouch for your crafting supplies. By mastering the techniques shared in this guide, you will be able to transform simple strands of fiber into a sculptural piece of wearable art.
As you follow along with this Crochet Butterfly Bag – Tutorial, you will learn how to use gradient yarns to mimic the natural patterns found on a monarch or swallowtail butterfly. We will focus on the importance of gauge consistency and structural integrity, ensuring that your bag doesn’t just look beautiful but is also durable enough to carry your essentials. Whether you are an experienced crocheter or an ambitious beginner, this tutorial provides the structured steps and SEO-optimized crochet tips needed to achieve a professional-quality finish that you can be proud of.
The foundation of a successful Crochet Butterfly Bag – Tutorial starts with selecting a yarn that offers both beauty and durability. For a bag that holds its shape, a mercerized cotton yarn or a high-quality cotton-acrylic blend is highly recommended. Cotton provides the stitch definition necessary for the butterfly’s wing patterns to stand out, while the blend can offer a bit more flexibility and lightness, making it comfortable to carry throughout the day.
To accompany your yarn, a 3.5mm or 4.0mm crochet hook (E/4 or G/6) is usually the best fit for standard worsted weight yarn. Using a slightly smaller hook than recommended on the yarn label is a great trick for bags; it creates a denser fabric that prevents small items from slipping through the stitches. This is a vital step in any Crochet Butterfly Bag – Tutorial to ensure the bag is practical for daily use and doesn’t require a fabric lining unless you prefer one.
Color selection is where your creativity truly shines when working on a Crochet Butterfly Bag – Tutorial. You might choose a classic monochrome look for a sophisticated vibe, or go with a variegated yarn that changes colors automatically as you stitch, creating a natural butterfly effect. Many crafters prefer using a solid color for the wing borders and a contrasting, bright hue for the “spots” on the wings to make the crochet design pop and catch the eye.
In addition to your hook and yarn, you will need several locking stitch markers to keep track of your increases and decreases. When creating the wings in this Crochet Butterfly Bag – Tutorial, symmetry is essential, and markers will help you ensure that the left wing is a perfect mirror image of the right. Having a sharp pair of yarn snips and a sturdy tapestry needle is also necessary for weaving in the numerous ends that come with multi-colored projects.
If you plan on making your bag a permanent part of your outfit, consider adding a metal zipper or a decorative wooden button for the closure. These small hardware additions not only improve the functionality of your butterfly purse but also elevate the overall aesthetic, making it look like a high-end boutique find. Some crocheters even use fabric glue to secure the knots of their yarn tails for extra security in high-use areas like the straps.
Finally, prepare a comfortable workspace with good lighting. This Crochet Butterfly Bag – Tutorial involves some complex stitch counting, and being able to clearly see your stitches will prevent errors. A well-organized craft space allows you to focus on the rhythm of the crochet stitches, turning your project into a relaxing and meditative experience. Proper preparation is the first step toward a masterpiece that will turn heads wherever you go.
The heart of the Crochet Butterfly Bag – Tutorial is the construction of the wings, which usually serve as the front and back panels of the bag. You will start by creating a central “body” strip using single crochet or half-double crochet stitches to create a firm, vertical pillar. This represents the thorax of the butterfly and serves as the anchor point where all the wing sections will eventually be attached.
Once the body is complete, you will work outward to create the upper and lower wings. This part of the Crochet Butterfly Bag – Tutorial utilizes short-row shaping or a series of stair-step increases to achieve that iconic butterfly silhouette. By varying the height of your stitches—moving from a double crochet to a treble crochet—you can create the sweeping curves and points that define different butterfly species.
Symmetry is the most challenging but rewarding part of this Crochet Butterfly Bag – Tutorial. You must be diligent in following the stitch count for each row. A helpful tip is to write down your counts as you go so that when you start the second wing, you can replicate the process exactly. This ensures that your butterfly bag looks balanced and professional once the two panels are joined together.
To add visual interest to the wings, you can incorporate openwork lace patterns or mesh stitches within the wing panels. This doesn’t just save yarn; it also gives the bag a light, airy feel that is perfect for springtime. In this Crochet Butterfly Bag – Tutorial, we recommend using chain spaces to create “windows” in the wings, which can then be outlined with a contrasting color for a dramatic, stained-glass effect.
Don’t forget the “antennae” of your butterfly! These can be made using simple i-cords or a chain stitch reinforced with slip stitches. These small details are what make a Crochet Butterfly Bag – Tutorial stand out from a standard square bag. They add a touch of whimsy and character, making the butterfly look like it’s ready to take flight from your shoulder.
As you finish the panels, you will have two identical butterfly shapes. Before moving on to assembly, it is a good idea to lay them flat and check for any inconsistencies. If one wing looks slightly larger, you may need to adjust your tension. Consistency in your crochet technique is the key to a high-quality finished product that maintains its shape even when filled with your phone, wallet, and keys.
Assembly is where the pieces from your Crochet Butterfly Bag – Tutorial finally come together into a functional object. You will join the front and back panels by crocheting a side gusset or a long, narrow strip of fabric that runs along the bottom and sides of the wings. This strip determines the depth of your bag; a wider gusset means more storage space, while a thinner one keeps the bag sleek and flat.
The best way to join the pieces in this Crochet Butterfly Bag – Tutorial is using the slip stitch join or the single crochet join on the wrong side for a hidden seam. If you prefer a more decorative look, you can join them on the right side using a contrasting color, which creates a bold outline around the butterfly’s shape. This technique adds a level of “pop” that is very popular in modern crochet patterns.
Once the main body is assembled, it is time to focus on the crochet straps. For a crossbody bag, a long strap of about 40 to 45 inches is standard. We recommend using a thermal stitch or a linked double crochet for the strap. These stitches are less prone to stretching over time, ensuring that your butterfly bag stays at the correct height even when carrying heavier items.
If you find that your straps are still stretching, a clever trick in this Crochet Butterfly Bag – Tutorial is to “line” the strap with a piece of grosgrain ribbon. You simply sew the ribbon to the underside of the crocheted strap. This prevents the yarn from elongating and adds a professional touch that is often seen in commercial crochet accessories. It’s a simple step that significantly increases the lifespan of your bag.
Attaching the straps securely is vital. Instead of just sewing the ends to the top of the bag, try to “sandwich” the strap between the wing panels or reinforce the attachment point with a cross-stitch pattern using a yarn needle. This distributes the weight more evenly and prevents the yarn from tearing at the connection points. Strength and beauty go hand-in-hand in a well-made handmade purse.
At this stage of the Crochet Butterfly Bag – Tutorial, you should have a nearly finished bag. Take a moment to inspect the interior for any loose ends and make sure the opening is wide enough for your needs. If the opening feels too loose, you can add a final round of slip stitches or reverse single crochet around the mouth of the bag to tighten the edge and give it a clean finish.
The final chapter of our Crochet Butterfly Bag – Tutorial is all about the “wow” factor. Embellishments like surface crochet, embroidery, or even small crochet flowers can be added to the wings to give them more detail. You can use a yarn needle to embroider “veins” onto the wings, which adds a realistic touch and emphasizes the butterfly’s structure. This is where your unique artistic style can truly shine.
Many people skip blocking, but in a Crochet Butterfly Bag – Tutorial, it is a step you shouldn’t miss. Blocking involves pinning your finished bag to a foam board and lightly steaming it. This process “sets” the stitches, flattens any curling edges, and ensures the butterfly wings are perfectly crisp. It transforms a slightly lumpy project into a high-end crochet accessory that looks store-bought.
If your bag isn’t lined, you might consider adding a magnetic snap for security. In this Crochet Butterfly Bag – Tutorial, we suggest sewing the snap onto a small circle of felt and then sewing that felt into the bag. This provides a stable base for the metal hardware and prevents the weight of the snap from pulling on your crochet stitches, which could cause unsightly holes over time.
For those who want extra sparkle, sewing seed beads or small sequins onto the wings can mimic the shimmering scales of a real butterfly. This is particularly effective if you are making a butterfly bag for a special occasion or as a gift for someone who loves “glam” accessories. Just be sure to use a strong nylon thread to ensure the beads don’t fall off with regular use.
Care for your handmade bag is just as important as the making process. Because cotton can be heavy when wet, we recommend spot cleaning with a damp cloth whenever possible. If the bag needs a full wash, hand-wash it in cool water and lay it flat to dry. Following the care tips in this Crochet Butterfly Bag – Tutorial will keep your colors vibrant and your bag’s shape intact for years to come.
Congratulations! You have completed your Crochet Butterfly Bag – Tutorial. You now possess a one-of-a-kind accessory that is a testament to your patience and skill. Whether you’re carrying it on a sunny afternoon walk or displaying it in your home, your butterfly purse is a beautiful reminder of the magic that can be created with just a hook and some yarn.
1. How long does it take to complete the Crochet Butterfly Bag – Tutorial?
For an intermediate crocheter, this project typically takes between 8 to 12 hours. This includes the time for crocheting both panels, the gusset, the strap, and the final assembly and blocking.
2. Can I make this bag bigger or smaller?
Yes! You can scale the butterfly bag by changing your yarn weight and hook size. Using a bulky yarn and a 6.0mm hook will create a large tote bag, while using embroidery floss and a 1.5mm hook will create a tiny coin purse.
3. Do I need to line the bag with fabric?
While not strictly necessary if you use a small hook to create tight stitches, a fabric lining will prevent the bag from stretching and protect the crochet from sharp objects like keys. It is a recommended addition for maximum durability.
4. What is the best stitch for the butterfly antennae?
The i-cord technique is usually the best because it creates a 3D, rounded tube that looks very realistic. If that’s too difficult, a simple foundation chain with a row of slip stitches worked back down it works perfectly well.
5. How do I prevent the straps from stretching?
Using a non-stretch stitch like the thermal stitch is helpful. Additionally, lining the strap with ribbon or fabric is the most effective way to ensure the bag stays at the desired length regardless of the weight inside.
6. Is this Crochet Butterfly Bag – Tutorial suitable for beginners?
It is best suited for an ambidextrous or adventurous beginner. If you know how to increase, decrease, and work with different stitch heights, you can certainly complete this project with a bit of patience!
In this Crochet Butterfly Bag – Tutorial, we have explored the journey of creating a stunning, nature-inspired accessory from the first stitch to the final block. We covered the essential materials, the technical aspects of wing symmetry, the assembly of the gusset and straps, and the artistic flourishes that make each bag unique.
This project is more than just a way to carry your belongings; it is a celebration of crochet craftsmanship and personal expression. By following the structured steps provided, you have learned how to manage stitch counts, maintain tension, and finish a complex 3D project with a professional look.


