
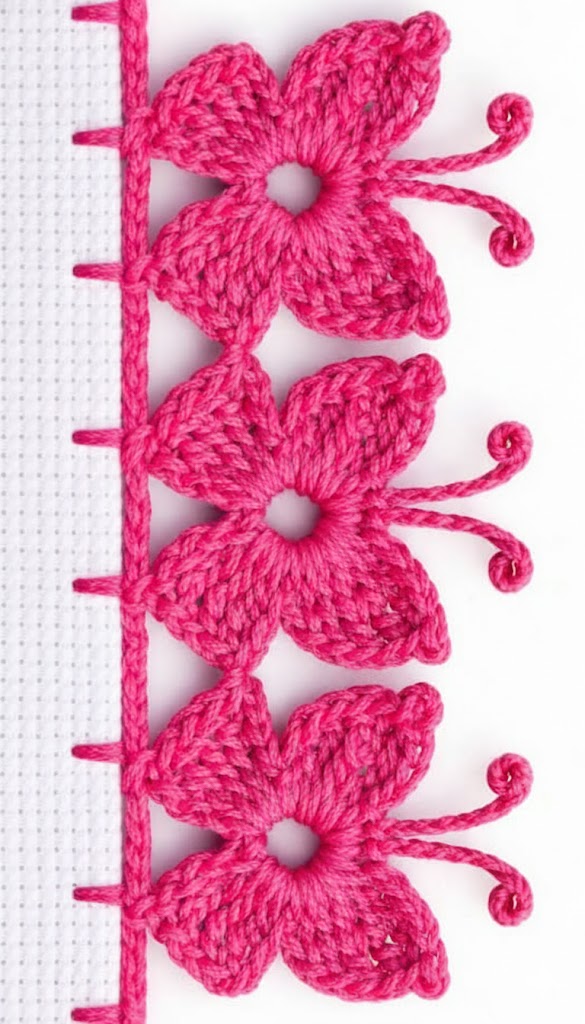
Lily in Crochet - Pattern

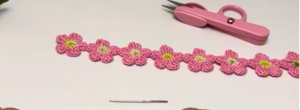
A Crochet butterfly border – Pattern is one of the most charming ways to add a touch of whimsy and elegance to your handmade projects, turning a simple blanket or towel into a work of art. Many crafters find that adding a decorative edge is the perfect finishing touch, and this specific design captures the delicate beauty of nature in every stitch. Whether you are looking to spruce up a nursery gift or add a bohemian flair to a shawl, mastering a Crochet butterfly border – Pattern will significantly expand your creative repertoire and give your work a professional, high-end feel.
When you begin working with a Crochet butterfly border – Pattern, you are not just adding a fringe; you are creating a rhythmic sequence of stitches that mimic the wings and antennae of one of the world’s most beloved insects. This type of border is particularly popular because it creates a 3D effect that stands out much more than traditional shell or picot edges. By following a well-structured Crochet butterfly border – Pattern, even intermediate beginners can achieve stunning results that look far more complex than they actually are to execute.
In this comprehensive guide, we will dive deep into everything you need to know about the Crochet butterfly border – Pattern, ensuring you have all the tips and tricks at your disposal. We will discuss the best types of yarn to ensure your butterflies don’t lose their shape, the specific hook sizes that provide the best stitch definition, and how to troubleshoot common issues like curling or bunching. By the end of this tutorial, you will feel confident in your ability to apply a Crochet butterfly border – Pattern to any edge, creating timeless pieces that will be cherished for years to come.
The first step in achieving a flawless Crochet butterfly border – Pattern is choosing the right materials for the job. Since this border is intricate, using a mercerized cotton yarn is often the best choice because it offers excellent stitch definition and a slight sheen that highlights the butterfly’s wings. If you use a yarn that is too fuzzy, the delicate details of the Crochet butterfly border – Pattern might get lost in the fibers, making the finished result look less defined.
In addition to yarn choice, selecting the correct hook size is paramount for a successful Crochet butterfly border – Pattern. Typically, you want to use a hook that creates a slightly tighter tension than you used for the main body of your project. This ensures that the butterflies hold their shape and stand upright rather than flopping over. A well-executed Crochet butterfly border – Pattern relies on this structural integrity to truly look like a row of butterflies in flight.
Before you jump into the Crochet butterfly border – Pattern, it is essential to prepare the edge of your fabric or crochet piece. Most patterns recommend working a base row of single crochet or a “foundation row” around your project first. This provides a clean, even surface for the Crochet butterfly border – Pattern to attach to, ensuring that the butterflies are spaced perfectly and don’t pull the fabric in odd directions.
Planning the spacing is a critical part of the Crochet butterfly border – Pattern process. Butterflies usually take up a specific number of stitches, such as a multiple of 6 or 8 plus 1. If you don’t calculate your stitches beforehand, you might find yourself at the end of a row with only half a butterfly left. Taking a moment to count your stitches before starting the Crochet butterfly border – Pattern will save you from the frustration of having to frog your work later.
Color selection plays a huge role in how your Crochet butterfly border – Pattern will appear. Some crafters prefer a solid color that matches the main project for a subtle, sophisticated look. Others choose a vibrant, contrasting color to make the Crochet butterfly border – Pattern the star of the show. You can even use variegated yarn to give each butterfly a unique, multi-colored appearance, which is a fantastic way to add visual interest to a simple white baby blanket.
Lastly, make sure you have your basic notions ready, including sharp scissors and a sturdy tapestry needle. Finishing a Crochet butterfly border – Pattern requires weaving in ends carefully so they don’t peek through the lace-like structure of the butterfly wings. Having these tools on hand allows you to maintain your flow and complete the Crochet butterfly border – Pattern with a sense of accomplishment and professional polish.
The magic of a Crochet butterfly border – Pattern often lies in the combination of chains and tall stitches, such as the treble or double treble crochet. These long stitches create the height needed for the wings, while chain spaces provide the “airiness” associated with a butterfly’s delicate nature. When you follow a Crochet butterfly border – Pattern, you will likely notice that the wings are worked in clusters, creating a beautiful fan-like shape that tapers at the bottom.
One of the most distinctive features of a Crochet butterfly border – Pattern is the antenna. This is usually created using a small chain that is slip-stitched back down, or a picot stitch placed strategically at the top of the wing. Mastering this small detail is what truly brings the Crochet butterfly border – Pattern to life, transforming a generic scalloped edge into a recognizable and charming insect motif.
Tension is your best friend when working through a Crochet butterfly border – Pattern. If your chains are too loose, the butterfly will look “leggy” and lose its iconic silhouette. If they are too tight, the border will pull at the edges of your blanket, causing the corners to curl. Finding the “Goldilocks” zone of tension is the key to a perfect Crochet butterfly border – Pattern, and it often comes with just a bit of practice on a small swatch.
Another common stitch used in the Crochet butterfly border – Pattern is the slip stitch, which is used to move the yarn across the work without adding height. This allows you to position your hook in the right spot to start the next wing or the body of the butterfly. Understanding how to use the slip stitch invisibly within the Crochet butterfly border – Pattern is a hallmark of an advanced crafter and ensures a seamless transition between each motif.
The body of the butterfly in a Crochet butterfly border – Pattern is often represented by a tight cluster of stitches or a single long stitch that cinches the wings together. This “waist” is what gives the butterfly its shape. When working this part of the Crochet butterfly border – Pattern, it is important to pull the yarn firmly to create a clear distinction between the left and right wings, enhancing the 3D effect of the design.
As you progress through the Crochet butterfly border – Pattern, you will start to see a rhythm emerge. Most borders are repetitive, meaning once you have successfully completed two or three butterflies, you will likely have the pattern memorized. This makes the Crochet butterfly border – Pattern a very meditative project, perfect for relaxing in the evening while still producing something intricately beautiful and complex in appearance.
For those who want to take their Crochet butterfly border – Pattern to the next level, considering bead integration is a wonderful option. You can slide small glass beads onto your yarn before you start and then pull them into place while working the antennae or the centers of the wings. This adds a bit of weight and a lot of sparkle to your Crochet butterfly border – Pattern, making it ideal for high-end decorative items or wedding gifts.
Layering is another advanced way to use the Crochet butterfly border – Pattern. Some designers work a row of butterflies and then work a second row of a different color behind them to create a “shadow” effect. This gives the Crochet butterfly border – Pattern incredible depth and makes the butterflies look like they are truly fluttering off the edge of the fabric. It requires a bit more yarn and time, but the visual impact is undeniable.
Corner turns are often the trickiest part of applying a Crochet butterfly border – Pattern to a square or rectangular project. To keep the corner flat, you usually need to work extra stitches or even an entire extra butterfly into the corner stitch. A well-written Crochet butterfly border – Pattern will provide specific instructions for the corners, but a good rule of thumb is to increase the number of “bridge” chains between the butterflies to allow for the 90-degree turn.
If you are working the Crochet butterfly border – Pattern onto a fabric that isn’t crocheted, such as a fleece blanket or a linen towel, you will need to use a sharp crochet hook or a blanket stitch base. This allows you to anchor the Crochet butterfly border – Pattern directly into the fabric. It’s a popular technique for “edging” store-bought items to give them a personalized, handmade touch using your favorite Crochet butterfly border – Pattern.
Blocking is absolutely essential for an advanced Crochet butterfly border – Pattern result. Because the wings are made of loops and chains, they can often look a bit crumpled right off the hook. By pinning each wing into its ideal position and lightly steaming or misting them with water, you “set” the Crochet butterfly border – Pattern. This ensures that the butterflies remain open and visible, rather than curling into themselves over time.
Don’t be afraid to experiment with the “wingspan” of your Crochet butterfly border – Pattern. You can make the wings larger by adding more chains or using taller stitches like the triple treble. Customizing the Crochet butterfly border – Pattern to fit the scale of your project is a great way to show off your skill. A tiny baby bib might need small, delicate butterflies, while a large bedspread can handle a bold, oversized Crochet butterfly border – Pattern.
One common issue when working a Crochet butterfly border – Pattern is the border waving or “ruffling.” This usually happens if you have too many stitches for the length of the edge. To fix this in your Crochet butterfly border – Pattern, try skipping an extra stitch between butterflies or using a smaller hook for the border than you used for the main body. A flat, smooth edge is the goal for any high-quality Crochet butterfly border – Pattern.
Conversely, if the edge is pulling or causing the project to pucker, you likely need more stitches in your Crochet butterfly border – Pattern. This can be solved by adding an extra chain stitch between the butterflies or working your stitches more loosely. Since every crocheter’s tension is different, you might need to adjust the Crochet butterfly border – Pattern slightly to suit your personal style.
When you reach the end of your Crochet butterfly border – Pattern, joining the last butterfly to the first one is a crucial step for projects worked in the round. Use a slip stitch to join the two ends, making sure the spacing matches the rest of the border. In a Crochet butterfly border – Pattern, a seamless join makes the entire edge look like one continuous piece of lace, which is the mark of a skilled maker.
Weaving in ends on a lace-heavy design like the Crochet butterfly border – Pattern requires a bit of finesse. You want to hide the yarn tails inside the densest part of the butterfly’s body or wings. Avoid weaving through the open chain spaces, as the tail will be visible and might come loose. Taking the time to secure your ends properly ensures that your Crochet butterfly border – Pattern stays beautiful even after multiple washes.
If you find that the antennae of your Crochet butterfly border – Pattern are drooping, you can use a tiny bit of fabric stiffener or even a sugar-water solution to help them stand up. While not necessary for all projects, this “stiffening” technique can be very helpful for wall hangings or ornaments where the structural look of the Crochet butterfly border – Pattern is the main focus.
Finally, take a moment to admire your completed Crochet butterfly border – Pattern. It is a labor of love that adds significant value and beauty to any project. Whether you share your finished work on social media or give it to a loved one, the Crochet butterfly border – Pattern is sure to draw compliments and questions about how you achieved such a delicate and intricate look.
Is the Crochet butterfly border – Pattern suitable for blankets?
Yes, it is one of the most popular choices for baby blankets and throws. The Crochet butterfly border – Pattern adds a soft, decorative touch that is both beautiful and durable enough for daily use.
How much extra yarn do I need for a Crochet butterfly border – Pattern?
Because butterflies are “hungry” for yarn due to the clusters and tall stitches, it is recommended to have at least one full extra skein of yarn dedicated solely to the Crochet butterfly border – Pattern to ensure you don’t run out mid-row.
Can I use a variegated yarn for this pattern?
Absolutely! Using variegated yarn with a Crochet butterfly border – Pattern can create a stunning effect where each butterfly appears in a different shade, mimicking the natural variety found in real butterflies.
What do I do if my butterflies are curling?
Curling usually happens due to tight tension. You can try using a larger hook for the Crochet butterfly border – Pattern or gently blocking the finished edge with steam to relax the fibers and flatten the wings.
How do I count the stitches for a Crochet butterfly border – Pattern?
Most patterns will specify a multiple (e.g., “Multiple of 8”). You should count the stitches on your base row and either increase or decrease slightly on that final base row to ensure you have the perfect number for the Crochet butterfly border – Pattern.
Is this border reversible?
While the Crochet butterfly border – Pattern has a definite “right side” where the stitches look most defined, the “wrong side” usually looks like a pretty abstract fan shape, making it perfectly acceptable for items like scarves or blankets where both sides are seen.
In this article, we have journeyed through the intricate and rewarding process of creating a Crochet butterfly border – Pattern. We discussed the importance of material selection, mastered the essential stitches like the treble crochet and picot, and explored advanced techniques like blocking and bead integration.
We also touched on troubleshooting tips to ensure your border lies flat and beautiful. A Crochet butterfly border – Pattern is more than just a technique; it is a way to infuse your projects with personality and grace.


