
Lily in Crochet - Pattern

Finding the perfect Crochet Butterfly – Pattern is like capturing a little bit of spring magic with just a hook and some yarn. Whether you are a seasoned crafter or someone who just picked up their first crochet hook, creating these delicate winged creatures is a rewarding way to practice your stitches while making something truly beautiful. A Crochet Butterfly – Pattern is incredibly versatile, serving as a charming applique for hats, a whimsical addition to a nursery mobile, or even a standalone piece of fiber art that brightens up any room.
When you dive into a Crochet Butterfly – Pattern, you aren’t just following instructions; you are engaging in a meditative process that transforms a simple strand of fiber into a complex, symmetrical work of art. The beauty of these patterns lies in their adaptability, allowing you to experiment with different yarn weights, from chunky wools for a 3D effect to fine lace threads for an elegant, vintage look. Many enthusiasts find that mastering a Crochet Butterfly – Pattern is a rite of passage in the crafting world because it teaches essential skills like working in the round, creating picots, and managing color changes effectively.
To get the best results from your Crochet Butterfly – Pattern, it is essential to focus on the details that make the wings pop, such as stitch definition and tension. In this guide, we will explore everything you need to know about crafting these fluttering beauties, ensuring your project is both fun to make and professional in appearance. By following a well-structured Crochet Butterfly – Pattern, you can create a whole kaleidoscope of butterflies to decorate your home or give as heartfelt, handmade gifts to friends and family.
Starting your project begins with selecting the right crochet hook size, which dictates the scale and “tightness” of your butterfly. Most patterns recommend a hook that matches your yarn weight, but for a Crochet Butterfly – Pattern, using a slightly smaller hook can create a stiffer fabric that holds its shape better.
The choice of yarn fiber is equally important for a successful outcome. Cotton yarn is often the preferred choice for a Crochet Butterfly – Pattern because it provides excellent stitch definition and isn’t too stretchy, ensuring the wings don’t sag over time.
You will also need a sharp pair of craft scissors and a yarn needle (tapestry needle) to weave in those pesky ends. Since butterflies often involve multiple color changes, having a reliable needle makes the finishing process much smoother and more professional.
Don’t forget about stitch markers, especially if the Crochet Butterfly – Pattern you are following involves complex rounds or specific placement for the antennae. Markers help you keep track of your progress without having to recount every single stitch constantly.
Optional but helpful items include blocking mats and pins. Once you finish your Crochet Butterfly – Pattern, blocking the wings ensures they are perfectly symmetrical and flat, which is vital if you plan to frame the piece or use it as an applique.
Lastly, consider having some beads or floral wire on hand. While many patterns crochet the antennae, using wire or adding small beads to the tips can give your Crochet Butterfly – Pattern a more realistic and whimsical touch that stands out.
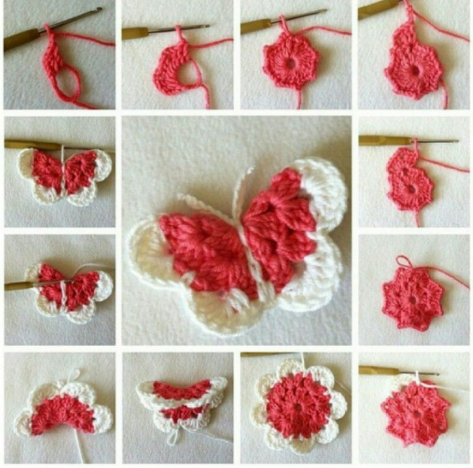
The foundation of almost any Crochet Butterfly – Pattern is the magic ring (or magic circle). This technique allows you to start crocheting in the round without leaving a hole in the center, which is crucial for the body of the butterfly where the wings attach.
Most wings are constructed using a combination of double crochet (dc) and treble crochet (tr) stitches. These taller stitches provide the height and span needed to create the expansive look of a wing within the Crochet Butterfly – Pattern structure.
To create the pointed tips often seen on butterfly wings, the picot stitch is frequently used. This small, decorative loop is a staple in any advanced Crochet Butterfly – Pattern, adding a touch of elegance and detail that mimics the natural jagged edges of real wings.
The slip stitch (sl st) plays a vital role in shaping and moving your yarn to the next section without adding height. In a Crochet Butterfly – Pattern, slip stitches are used to navigate between the upper and lower wings, ensuring the transition is seamless and sturdy.
Increasing and decreasing are also key components of a Crochet Butterfly – Pattern. By placing multiple stitches into one base stitch (increase), you create the flare of the wing, while decreasing helps taper the body or the base of the wings for a more anatomical shape.
Understanding stitch height is the secret to a beautiful Crochet Butterfly – Pattern. By graduated heights—starting with a single crochet, moving to half-double, then double, and finally treble—you create the natural curve and slope that makes the crochet piece look like it’s ready to fly.
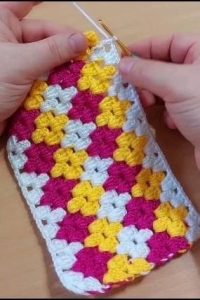
Choosing a color palette is perhaps the most exciting part of starting a Crochet Butterfly – Pattern. You can go for realistic styles, like the iconic orange and black of a Monarch, or let your imagination run wild with variegated yarns that change colors automatically.
The technique of color pooling can be applied to a Crochet Butterfly – Pattern if you are using multi-colored yarn. This creates unique spots and stripes on the wings that look organic, making every butterfly you crochet one-of-a-kind.
For a more structured look, try tapestry crochet or carrying yarn. This allows you to switch colors mid-row in your Crochet Butterfly – Pattern, enabling you to create intricate spots or borders on the wing edges for a high-contrast, striking visual effect.
Many crafters enjoy using ombré yarn for their Crochet Butterfly – Pattern. The gradual shift from light to dark can mimic the way light hits a butterfly’s wings in nature, providing a sophisticated depth that is hard to achieve with solid colors alone.
If you want a bit of sparkle, consider mixing in a metallic thread with your yarn. A Crochet Butterfly – Pattern worked with a hint of gold or silver can look magical, especially when used for holiday decorations or as accessories for special occasions.
Remember to consider contrast when selecting your colors. A dark border around a light-colored wing in your Crochet Butterfly – Pattern makes the shape “pop” against any background, ensuring the hard work you put into your stitches is clearly visible.
Once you have mastered the Crochet Butterfly – Pattern, you can use these pieces as garment embellishments. Sewing a small butterfly onto a denim jacket, a plain t-shirt, or even a child’s headband instantly adds a personalized, handmade charm.
Another popular idea is creating butterfly bunting or garlands. By stringing several pieces made from your Crochet Butterfly – Pattern together, you can create a beautiful decoration for birthday parties, baby showers, or even garden-themed bedrooms.
You can also turn your Crochet Butterfly – Pattern into functional accessories. By attaching a metal clip or a safety pin to the back, your crochet creation becomes a brooch or a hair clip that serves as a great conversation starter.
For home decor, try mounting your Crochet Butterfly – Pattern inside a shadow box. Using different sizes and colors of butterflies can create a “specimen” display that is animal-friendly and adds a touch of cottagecore aesthetic to your living space.
If you enjoy making gifts, a Crochet Butterfly – Pattern makes for a wonderful bookmark. Simply extend the body or attach a long chain of stitches to the bottom of the butterfly, and you have a practical gift for the book lovers in your life.
Finally, consider using your Crochet Butterfly – Pattern for seasonal wreaths. A grapevine wreath covered in colorful crochet butterflies and faux flowers is a perfect way to welcome spring to your front door and showcase your crafting skills to the neighborhood.
What is the best yarn for a Crochet Butterfly – Pattern?
The best yarn is typically 100% cotton or a cotton blend. It provides the necessary stiffness and stitch clarity needed for the intricate wing shapes. Acrylic can work, but it may be too “fuzzy” for fine details.
Can a beginner finish a Crochet Butterfly – Pattern?
Yes! While some patterns are complex, there are many beginner-friendly versions that use basic stitches like the double crochet. It’s a great project for learning how to work in rounds.
How do I make the wings of my Crochet Butterfly stay stiff?
You can use a fabric stiffener spray, a mixture of water and white glue, or even starch. Applying these to your finished project helps the wings maintain their shape and prevents them from curling.
How long does it take to complete a Crochet Butterfly – Pattern?
Small butterflies can be completed in as little as 15 to 30 minutes, making them the perfect “quick-win” project for busy crafters or for using up scrap yarn.
Is it possible to resize a Crochet Butterfly – Pattern?
Absolutely. To make a larger butterfly, use thicker yarn and a larger hook. To make a tiny one, use embroidery floss and a very small steel hook. The pattern instructions usually remain the same.
In this article, we have explored the wonderful world of the Crochet Butterfly – Pattern, covering everything from the essential tools and specialized stitches to color customization and creative ways to use your finished projects. We’ve seen how these small motifs can serve as a bridge between simple crafting and true artistic expression, offering endless possibilities for personalization.
Whether you are using them for home decor, fashion, or gifts, the Crochet Butterfly – Pattern is a timeless staple in the crochet community that never goes out of style. We hope this guide has inspired you to pick up your hook and start creating your own colorful flock.


