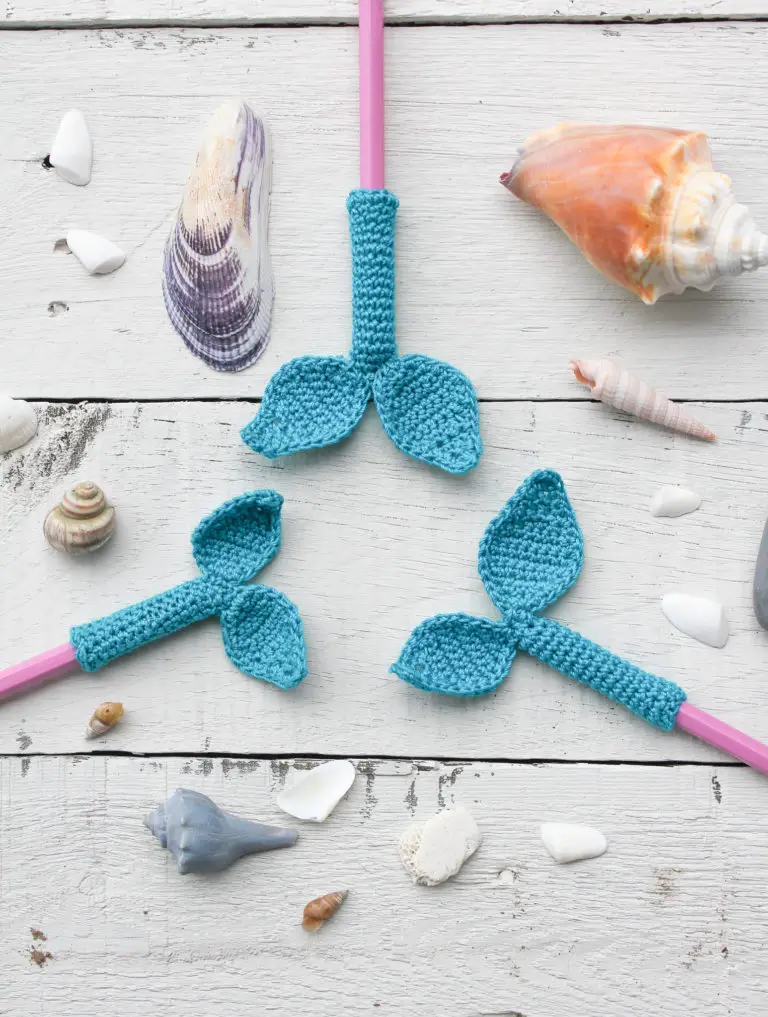
Mermaid Tail Pencil Topper Crochet - Pattern

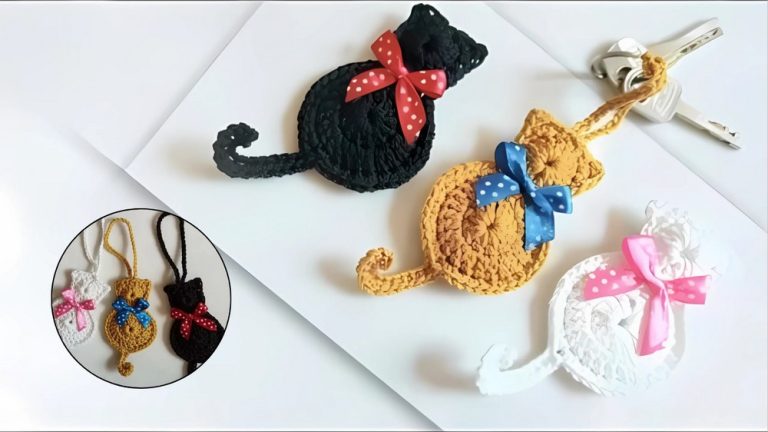
Creating a Crochet cat keychain – Pattern is one of the most rewarding quick projects you can dive into, whether you are a seasoned pro or a complete beginner. These miniature feline companions are not only incredibly cute but also serve as the perfect handmade gift or a profitable item for your craft stall. By following a well-structured Crochet cat keychain – Pattern, you can transform a small amount of yarn into a charming accessory that adds a touch of personality to your keys, backpack, or purse.
When searching for the ideal Crochet cat keychain – Pattern, it is essential to look for designs that balance simplicity with character. The beauty of amigurumi (the Japanese art of knitting or crocheting small, stuffed yarn creatures) is that even the slightest change in eye placement or ear shape can give your crochet cat a completely different expression. Many crafters prefer a low-sew or no-sew approach to ensure the final product is durable enough to handle the daily wear and tear that comes with being a functional keychain.
To get started with your Crochet cat keychain – Pattern, you will need to gather a few basic supplies: cotton or acrylic yarn, a matching crochet hook, safety eyes, fiberfill stuffing, and, of course, the metal keychain ring. Choosing the right yarn weight is crucial; for instance, using a sport weight or DK yarn will result in a delicate, petite cat, while velvet yarn can create a chunky, “kawaii” aesthetic. In the following sections, we will break down the essential steps and techniques to master this project.
Before you begin working on your Crochet cat keychain – Pattern, you must select the right materials to ensure a high-quality finish. Most designers recommend 100% mercerized cotton yarn because it provides excellent stitch definition and doesn’t pill easily over time. Since a keychain is handled frequently, choosing a sturdy yarn ensures your crochet cat stays looking fresh and clean for a long time.
The size of your crochet hook is the next most important factor in your Crochet cat keychain – Pattern. Generally, you should use a hook that is one or two sizes smaller than what the yarn label suggests. This creates a tight tension, which is vital in amigurumi to prevent the fiberfill stuffing from peaking through the stitches. A 2.0mm or 2.5mm hook is usually the “sweet spot” for standard keychain sizes.
Safety eyes are what truly bring your Crochet cat keychain – Pattern to life. These plastic components come with a washer that snaps onto the back, securing them firmly in place. For a standard mini cat, 6mm or 8mm safety eyes are typically the most proportional. If you are making this for a very small child, consider embroidering the eyes with black embroidery floss instead to avoid any choking hazards.
Don’t forget the structural elements that make it a functional accessory. You will need a metal split ring or a lobster clasp to attach to the top of the cat’s head. Some crafters prefer to use a small length of braided yarn to attach the ring, while others use a thin metal chain. Having a tapestry needle on hand is also mandatory for weaving in ends and embroidering the tiny nose and whiskers.
The stuffing process is a skill in itself when following a Crochet cat keychain – Pattern. Use high-quality polyester fiberfill and add it in small clumps rather than one large ball. This prevents the cat from looking lumpy. You want the body to be firm enough to hold its shape but soft enough to be pleasant to the touch. A pair of sharp embroidery scissors will also be needed for clean yarn cuts.
Lastly, consider adding some stitch markers to your toolkit. Since most amigurumi patterns are worked in a continuous spiral (without joining rounds), it is very easy to lose track of where a new row begins. A simple plastic clip or even a scrap piece of contrasting yarn can save you from the frustration of having to frog (unravel) your work because of a counting error in your Crochet cat keychain – Pattern.
The foundation of any successful Crochet cat keychain – Pattern is the magic ring (or magic circle). This technique allows you to pull the center of your work tight, leaving no hole at the top of the cat’s head. If you struggle with the magic ring, you can substitute it by chaining two and working your first round of single crochet stitches into the second chain from the hook, though the result may be slightly less “clean.”
The primary stitch used throughout a Crochet cat keychain – Pattern is the single crochet (sc). In the world of amigurumi, many experts recommend using the “yarn under” (X-stitch) technique instead of the traditional “yarn over” (V-stitch). This creates a tighter, more square-shaped stitch that minimizes gaps and gives the crochet cat a more professional, manufactured look that is highly sought after in the handmade market.
To give your cat its shape, you will need to master increases (inc) and invisible decreases (dec). An increase involves placing two stitches into one, while an invisible decrease involves working through the front loops only of two consecutive stitches. Using the invisible version of the decrease is a game-changer for your Crochet cat keychain – Pattern, as it makes the shaping transitions virtually undetectable to the naked eye.
Color changes are another way to customize your Crochet cat keychain – Pattern. Whether you want a tuxedo cat, a calico, or a simple striped tabby, learning how to change yarn colors mid-row is essential. The cleanest way to do this is to pull the new color through the last two loops of the previous stitch. This ensures a sharp line between colors, making your keychain look much more detailed and intricate.
The ears of the cat are usually made using a combination of half-double crochets (hdc) or double crochets (dc) to create a pointed, triangular shape. In a well-designed Crochet cat keychain – Pattern, the ears might be crocheted directly onto the head, or made separately and sewn on. If sewing, use a whip stitch to ensure the ears are symmetrical; improper ear placement is the most common reason a crochet cat looks “off.”
Finally, the finishing touches involve embroidery and assembly. Using a tapestry needle, you can add a tiny pink “V” for the nose and long straight lines for the whiskers. The Crochet cat keychain – Pattern usually concludes with closing the final hole of the body by weaving the yarn tail through the front loops of the last round. This creates a neat, cinched finish that mirrors the start of the project.
Most Crochet cat keychain – Pattern designs begin at the top of the head and work their way down. You start with 6 stitches in a magic ring and gradually increase until the head reaches the desired diameter. This “top-down” approach is popular because it allows you to place the safety eyes and embroider the face while the piece is still open at the bottom, making it much easier to secure the backings.
Once the head is shaped, the Crochet cat keychain – Pattern typically moves into the body section. Some patterns treat the head and body as one continuous piece (the “egg” shape), which is excellent for beginners. If your pattern has a distinct neck, you will perform a series of decreases to narrow the work before increasing again to create a plump belly. This gives the cat a more “chibi” or stylized appearance.
The limbs—arms and legs—are often the smallest parts of the Crochet cat keychain – Pattern. Because they are so tiny, they can be a bit fiddly to crochet. Many modern patterns use the Bobble Stitch to create little paws directly on the body, which saves you from the tedious task of sewing on four separate pieces. If your pattern does require separate limbs, keep your stitches very tight to maintain their tiny cylindrical shape.
A cat isn’t complete without its tail! In your Crochet cat keychain – Pattern, the tail can be a long, thin cord made of a simple chain and slip stitches, or a stuffed tube. For a keychain, a shorter, sturdier tail is often better so it doesn’t get caught on other items in a bag. Positioning the tail at the back-bottom of the body can also help the crochet cat sit upright if you choose to set it on a desk.
Attaching the keychain hardware is the penultimate step in the Crochet cat keychain – Pattern. You should identify the center-top of the head (the magic ring area) and securely fasten the metal ring. It is a good idea to reinforce this area with a few extra stitches using a stronger thread or a double strand of the project yarn. You want to ensure the cat won’t easily break off the ring during daily use.
The final pargraph of construction involves a “quality check.” Look at your Crochet cat keychain – Pattern from all angles. Are the ears level? Are the eyes aligned? Use your tapestry needle to hide any stray yarn tails inside the body. If you want to add a bit of “blush” to your cat’s cheeks, you can even use a tiny bit of real makeup or a pink fabric marker to give it an extra layer of cuteness.
One of the best things about a Crochet cat keychain – Pattern is how easily it can be customized to match a specific pet. If you are making these for friends or customers, ask for a photo of their cat. You can mimic the spots of a Calico or the “socks” of a Tuxedo cat by strategically changing yarn colors. This level of personalization makes your handcrafted keychain much more valuable than a generic store-bought one.
Think about the “theme” of your Crochet cat keychain – Pattern. You can add tiny accessories like a crochet hat, a little fish, or a collar with a small bell. During holidays, you could make a black cat for Halloween or a cat with a tiny red scarf for Christmas. These small additions take very little time but significantly increase the “wow factor” and the marketability of your finished crochet keychain.
If you are planning to sell items made from this Crochet cat keychain – Pattern, presentation is key. Attach your cats to a branded backing card that includes your social media handles and care instructions (like “Hand wash only”). Taking high-quality photos in natural light will help your listings stand out on platforms like Etsy or Instagram, where visual appeal is everything for handmade crafts.
Pricing your work can be tricky. Even though a Crochet cat keychain – Pattern is small, it still requires skill and time. A good formula is to calculate the cost of materials plus an hourly wage. Many crafters find that they can finish one of these in 45 to 90 minutes. Don’t undersell yourself; people are often willing to pay a premium for a unique, handmade item that they can’t find in a big-box store.
SEO (Search Engine Optimization) isn’t just for articles; it’s for your shop too! When listing your finished product, use keywords like “Handmade Cat Gift,” “Amigurumi Keychain,” and “Custom Pet Crochet.” This ensures that people looking for exactly what you’ve made with your Crochet cat keychain – Pattern can find you easily. Engagement is also vital—respond to comments and share “behind the scenes” videos of you crocheting.
Finally, always keep learning. The world of crochet is vast, and there are always new stitches or assembly methods to discover. Once you’ve mastered this Crochet cat keychain – Pattern, try experimenting with different yarn textures like chenille or bouclé to see how it changes the look. The more you experiment, the more you will develop your own unique “designer style” that makes your work instantly recognizable.
1. How long does it take to finish a Crochet cat keychain – Pattern?
For an intermediate crocheter, it usually takes between 1 to 2 hours. Beginners might take a bit longer as they get used to working with small hooks and tight stitches. It is a perfect “one-sitting” project!
2. What is the best yarn for an amigurumi keychain?
Cotton yarn is widely considered the best choice. It is durable, has great stitch definition, and doesn’t get “fuzzy” or “hairy” like wool or some acrylics can. This keeps the facial details of your crochet cat sharp and clear.
3. Can I wash my crochet cat keychain?
Yes, but you should do so carefully. It is best to hand wash the item with mild soap and let it air dry. If you used safety eyes or metal parts, avoid the washing machine to prevent scratching the plastic or rusting the metal.
4. How do I prevent holes in my amigurumi?
The secret is to downsize your hook and maintain a tight tension. If you see stuffing through your stitches, try a hook that is 0.5mm smaller. Also, using the invisible decrease technique significantly reduces gaps in the fabric.
5. Is this pattern suitable for complete beginners?
Yes! As long as you know the basic single crochet stitch and how to increase, you can follow a Crochet cat keychain – Pattern. There are many video tutorials available online to help you master the magic ring if you get stuck.
6. Where can I sell the cats I make from this pattern?
Popular outlets include Etsy, Shopify, local craft fairs, and even Facebook Marketplace. They also make excellent “add-on” items for a larger gift basket or as party favors for a cat-themed birthday.
In this article, we explored the wonderful world of the Crochet cat keychain – Pattern, covering everything from the essential tools like safety eyes and mercerized cotton to advanced techniques like the invisible decrease and yarn-under stitches.
We learned that the secret to a great amigurumi project lies in the details—the tension, the stuffing, and the tiny embroidered expressions that give each cat its own soul. Whether you are making these for yourself, as gifts, or for your small business, the versatility of a crochet cat keychain makes it a staple project for any yarn enthusiast.


