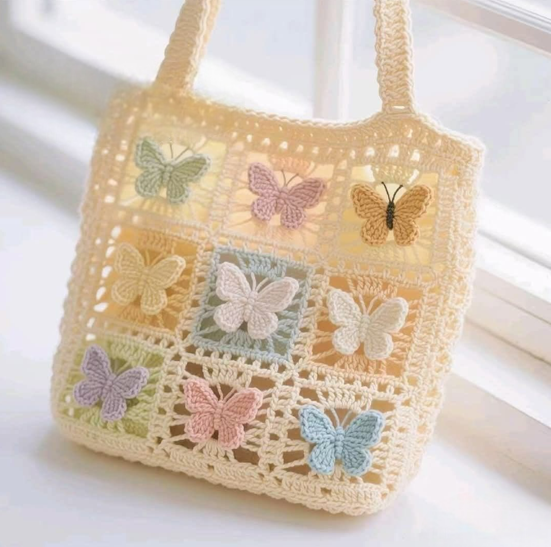
Crochet Butterfly Bag - Tutorial

The Crochet cat-shaped tissue holder – Pattern is one of the most charming and functional projects a fiber artist can undertake to add a touch of whimsy to their home decor. Whether you are a seasoned pro or just starting your journey into the world of amigurumi and practical crafts, creating a tissue box cover that looks like a feline friend is a rewarding experience. This project blends the utility of a household item with the undeniable cuteness of a pet, making it a perfect conversation piece for your living room or a thoughtful handmade gift for a cat lover.
When you decide to follow a Crochet cat-shaped tissue holder – Pattern, you are engaging in a creative process that allows for immense customization. You can choose colors that match your own pet, experiment with different yarn textures, and adjust the facial expressions to give your crochet cat a unique personality. Beyond its aesthetic appeal, a crochet cover provides a soft, tactile alternative to cold plastic or cardboard tissue boxes, instantly cozying up any space it occupies. It is an excellent way to practice shaping, increasing, and decreasing stitches in a structured yet forgiving format.
In this comprehensive guide, we are going to break down every aspect of working with a Crochet cat-shaped tissue holder – Pattern. We will look at the best materials to ensure durability, the specific stitches required to achieve that perfect kitty silhouette, and tips for finishing your project with professional-looking details. By the end of this article, you will have all the knowledge needed to transform a simple ball of yarn into a delightful feline protector for your tissues. Let’s dive into the technical and artistic steps of this wonderful DIY crochet project.
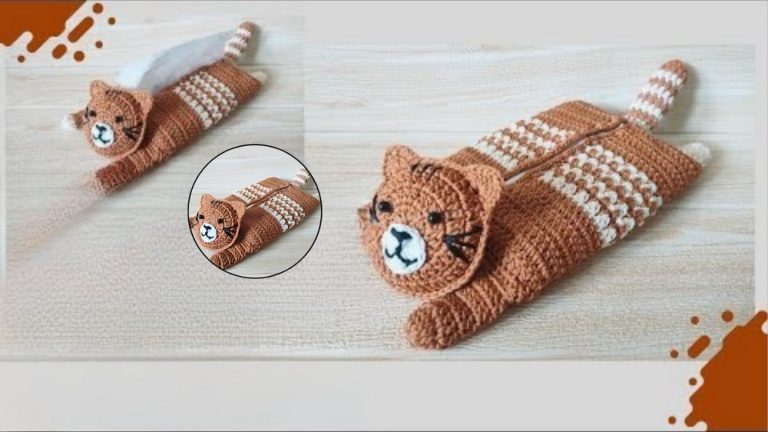
The success of your Crochet cat-shaped tissue holder – Pattern starts with choosing the right yarn. For a project like this, a medium-weight (worsted) cotton or acrylic yarn is usually the best choice. Cotton provides excellent stitch definition and holds its shape well, which is vital for a structured item like a tissue holder. Acrylic is also a popular choice because it is soft, affordable, and comes in an endless array of “cat-like” colors, from calico oranges to sleek midnight blacks.
You will also need to consider the hook size mentioned in your Crochet cat-shaped tissue holder – Pattern. Typically, using a slightly smaller hook than the yarn label recommends—such as a 3.5mm or 4.0mm (G) hook—is a smart move. This creates a tighter tension, which ensures the unsightly cardboard of the tissue box doesn’t peek through the stitches. A dense fabric is key to making the crochet animal cover look solid and professionally finished.
Safety eyes or embroidery floss are essential components for the facial features of your Crochet cat-shaped tissue holder – Pattern. If the holder will be in a home with small children or pets, embroidering the eyes and nose is the safest route to prevent choking hazards. However, if it’s purely for adult decor, plastic safety eyes can add a realistic, glinting look to your cat’s face, giving it that “alive” and soulful expression that many crafters adore.
Don’t forget the stuffing! While the main body of the Crochet cat-shaped tissue holder – Pattern fits over the box, the head, paws, and tail usually require a bit of polyester fiberfill. You want to stuff these parts firmly enough to maintain their shape but not so much that the stitches stretch and show the white fluff inside. High-quality stuffing ensures that your cat’s ears stay pointy and its tail remains jaunty over years of use.
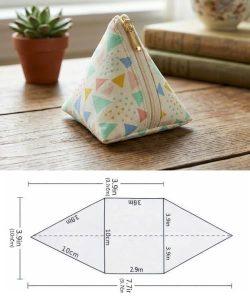
Measuring your tissue box is a step that many beginners skip, but it is crucial for a perfect fit. Standard rectangular boxes vary slightly by brand, so check the dimensions before you start your Crochet cat-shaped tissue holder – Pattern. Most patterns are designed for a standard boutique (square) or long rectangular box, so you may need to add or subtract a few rows of single crochet to accommodate the specific brand of tissues you buy at your local supermarket.
Lastly, you will need a yarn needle and sharp scissors. The assembly phase of the Crochet cat-shaped tissue holder – Pattern involves sewing the limbs and head onto the body. Using a blunt-tipped yarn needle makes it much easier to weave in your ends and join pieces without splitting the yarn fibers. Having these crochet tools ready before you begin will make the entire crafting process smoother and more enjoyable from start to finish.
Most variations of the Crochet cat-shaped tissue holder – Pattern rely heavily on the single crochet stitch (sc). This stitch is the backbone of amigurumi because it creates a thick, sturdy fabric that stands up well to being handled. If you can master the single crochet, you can easily complete the main body of the holder. It’s a repetitive, meditative process that allows you to see the yarn cat take shape row by row.
Increasing and decreasing are the “magic” techniques that give your Crochet cat-shaped tissue holder – Pattern its three-dimensional form. To create the rounded head or the curve of a paw, you will perform “inc” (two stitches in one) or “dec” (joining two stitches into one). Learning the invisible decrease technique is particularly helpful here, as it prevents small gaps from forming in the fabric where the stuffing might show through, keeping your kitty looking sleek.
Working in the round is another core skill for this Crochet cat-shaped tissue holder – Pattern. While the body of a rectangular tissue cover might be worked in flat rows and then joined, the head, tail, and legs are almost always worked in a continuous spiral. Using a stitch marker is a lifesaver in this scenario; it helps you keep track of the beginning of each round so you don’t lose your place in the count and end up with a lopsided feline.
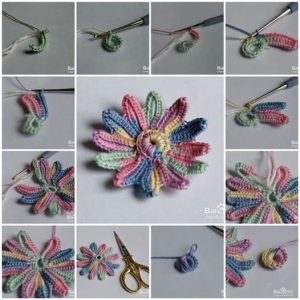
The “Magic Ring” or “Magic Circle” is the preferred way to start the circular parts of the Crochet cat-shaped tissue holder – Pattern. This technique allows you to pull the center hole tight, leaving no gap at the top of the cat’s head or at the tip of the tail. It provides a much cleaner look than the traditional “chain 2 and work into the first chain” method. If you are new to the magic ring, this project is the perfect opportunity to practice this essential amigurumi skill.
Texture can be added to your Crochet cat-shaped tissue holder – Pattern by using the back loop only (BLO) technique. Sometimes, patterns use BLO to create a sharp 90-degree turn, which is perfect for the edges of a square tissue box. This creates a decorative ridge that mimics the corners of the box, helping the crochet fabric sit snugly and preventing it from sliding around when you pull a tissue out of the cat’s “back.”
Finally, let’s talk about the opening for the tissues. In any Crochet cat-shaped tissue holder – Pattern, there will be a specific row where you create a slit. This is usually done by chaining a certain number of stitches and skipping the same number of stitches in the previous row. This creates a reinforced window. Some clever patterns even position this opening so the tissues come out of the cat’s mouth or a “furry” slit on the back, adding to the humor of the piece.
One of the best parts of following a Crochet cat-shaped tissue holder – Pattern is the ability to play with colorwork. If you want to create a striped tabby, you can use a technique called “tapestry crochet” or simply change colors every two rows. This adds a layer of complexity to the crochet pattern that makes the finished product look like a high-end designer item. Choosing variegated yarns can also create a beautiful, “marbled” fur effect with very little extra effort.
Personalizing the face is where your Crochet cat-shaped tissue holder – Pattern truly comes to life. You can give your cat long, elegant whiskers using thin black embroidery thread or even fishing line for a more realistic touch. The placement of the ears—whether they are high and alert or slightly tilted to the side—can change the cat’s “mood” from curious to sleepy. These small hand-stitched details make all the difference in the world.
Don’t feel limited to the standard cat anatomy! You can adapt the Crochet cat-shaped tissue holder – Pattern to create different breeds. For a Persian cat, you might use a “mohair” or “fuzzy” yarn to simulate long fur. For a Siamese cat, you can use a cream-colored yarn for the body and a dark chocolate brown for the “points” (the face, paws, and tail). The versatility of yarn crafts means you can recreate almost any breed imaginable.
Adding accessories to your crochet cat can make it even more festive. Since this is a Crochet cat-shaped tissue holder – Pattern, why not make a tiny crochet collar with a real bell? Or, if it’s the holiday season, you could crochet a small Santa hat to perch between its ears. These seasonal additions turn a simple household object into a part of your holiday decor, showcasing your creative crochet skills to everyone who visits.
If you are making the holder for a child’s room, you might want to use bright, non-traditional colors. A purple or neon green Crochet cat-shaped tissue holder – Pattern can be a fun, psychedelic addition to a playroom. Children often find the “tissue-dispensing cat” hilarious, and it might even encourage them to use a tissue when they have a cold! Using soft, washable yarn ensures that the holder can stay clean even in a messy environment.
The final customization tip involves the base of the holder. Some versions of the Crochet cat-shaped tissue holder – Pattern include a bottom flap that buttons shut, while others are open at the bottom to simply slide over the box. Adding a button closure or a bit of elastic at the bottom helps keep the tissue box securely inside, which is particularly useful if you find yourself moving the holder from room to room frequently.
If you find that your Crochet cat-shaped tissue holder – Pattern is looking a bit “lumpy,” the issue is usually related to tension or stuffing. Ensure your stitches are consistent in size. if one row is tight and the next is loose, the fabric will ripple. If the lumpy areas are in the stuffed parts like the head, try pulling the stuffing apart into small tufts before inserting it. This prevents large clumps from forming and creates a smoother surface for your crochet feline.
Tension issues can also cause the holder to be too tight or too loose for the box. If your Crochet cat-shaped tissue holder – Pattern is too small, don’t try to stretch it over the box, as this will distort the stitches and make the gaps larger. Instead, move up half a hook size. Conversely, if it’s baggy, move down a hook size. It’s always better to do a small “gauge swatch” or a test fit after the first few rows to save time in the long run.
Weaving in ends is the part of the Crochet cat-shaped tissue holder – Pattern that many people dislike, but it is essential for durability. Because a tissue holder is handled often, you need to ensure your yarn tails are woven in securely. Go back and forth at least three times in different directions. This “locking” method ensures that the ends won’t pop out after the holder has been washed or when a box is being replaced.
Blocking your finished project can take it from “homemade” to “handmade professional.” For a Crochet cat-shaped tissue holder – Pattern, you can lightly steam the flat parts of the body (if using cotton or a high-quality acrylic) to help the stitches settle and the corners look sharper. Be careful not to “kill” acrylic yarn with too much heat, as it will melt the plastic fibers. A gentle steam is usually all that’s needed to make the tissue box cover look perfect.
If your cat’s head is drooping forward, it might be too heavy for the neck. You can fix this by sewing a wider area of the head onto the body or by adding a small “pillar” of stuffed crochet inside the neck for support. A well-constructed Crochet cat-shaped tissue holder – Pattern should have a head that sits proudly and stays upright, even when the tissue box is nearly empty and the cover loses some of its internal support.
Lastly, consider the “fuzz factor.” Over time, some yarns may pill or become fuzzy. You can use a small fabric shaver or a pair of scissors to carefully trim away any pills that form on your Crochet cat-shaped tissue holder – Pattern. This keeps your cat looking fresh and new. Taking pride in the maintenance of your work ensures that the hours you spent following the pattern continue to bring joy for many years to come.
Yes, most patterns for this project are beginner-friendly because they rely on basic stitches like the single crochet. If you know how to increase, decrease, and work in the round, you can successfully complete this project. It is a great way to learn amigurumi techniques while making something useful.
A worsted-weight cotton or cotton-blend yarn is ideal. Cotton is durable, has great stitch definition, and won’t stretch out as much as wool or some cheap acrylics. However, high-quality acrylic is also a great choice if you want more color options and ease of washing.
Most cotton and acrylic crochet items can be hand-washed in cool water with a gentle detergent. Lay it flat to dry to maintain the shape. If you used safety eyes or a bell, be extra careful during the washing process to ensure they don’t get damaged or caught in the machine.
Absolutely! The Crochet cat-shaped tissue holder – Pattern can easily be adapted. You simply need to adjust the number of stitches in your starting chain and the number of rows for the sides. The head, tail, and paws can remain the same size regardless of the box shape.
Embroidering eyes is a fantastic alternative. You can use a “satin stitch” for a solid eye or a “French knot” for a small, round eye. This is actually preferred if the item is for a household with small children, as it eliminates any risk of a plastic part coming loose.
This usually happens if you miss a stitch or accidentally add an extra one when working in the round. Always use a stitch marker to mark the start of your round and count your stitches at the end of every row to ensure you are following the Crochet cat-shaped tissue holder – Pattern exactly.
The Crochet cat-shaped tissue holder – Pattern is more than just a craft project; it is a way to infuse personality and warmth into your home. Throughout this article, we have covered the essential materials, the core stitches, and the creative ways you can customize your cat to make it truly yours.
We also looked at troubleshooting tips to ensure your finished product has a professional look and fits your tissue box perfectly. Crocheting is a wonderful skill that allows you to create beauty from a simple string, and this feline-themed project is a shining example of how art and utility can go hand-in-hand.


