Crochet shorts - Tutorial

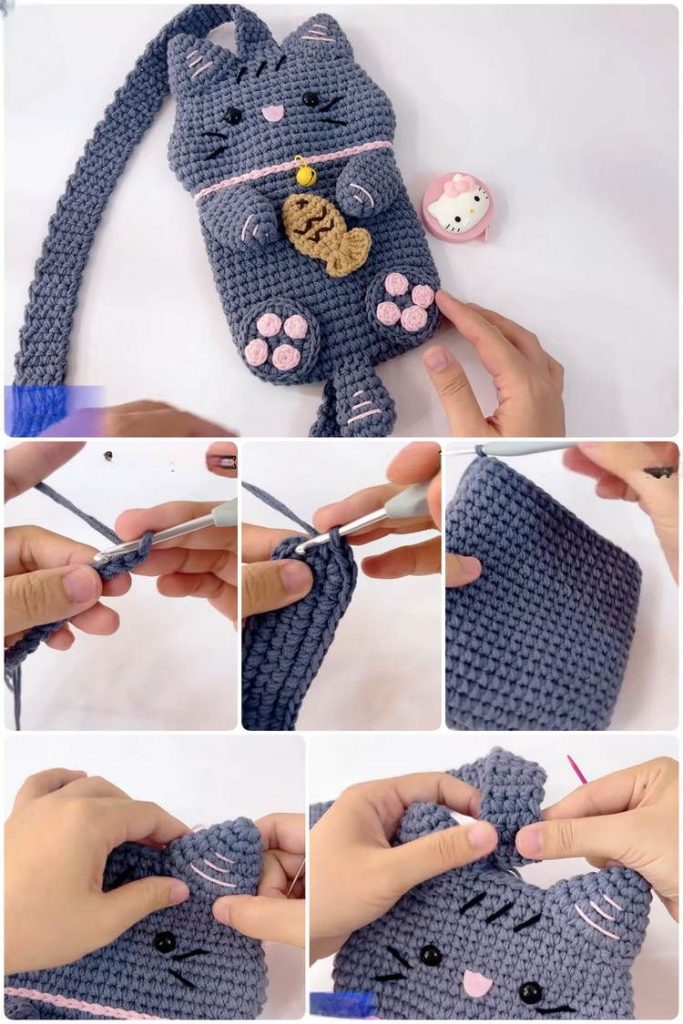
The Crochet Chest Bag- Pattern has surged in popularity as a quintessential accessory for modern adventurers, commuters, and festival-goers who value both style and hands-free functionality. Often referred to as a sling bag or a crossbody pack, this specific design sits snugly against the torso, providing a secure and accessible way to carry your daily essentials like phones, wallets, and keys. Crafting your own bag using a specialized pattern allows you to bypass mass-produced plastic alternatives in favor of a sustainable, personalized, and highly durable textile piece that reflects your unique aesthetic.
Working with a Crochet Chest Bag- Pattern is an incredibly rewarding experience for intermediate crafters because it combines the structural demands of bag-making with the artistic freedom of crochet textures. Unlike a simple flat scarf or a basic blanket, a chest bag requires careful attention to shaping, strap reinforcement, and hardware integration to ensure the final product can handle the weight of your belongings. Whether you prefer a minimalist monochrome look or a vibrant bohemian vibe, the versatility of this pattern ensures that you can create a piece of “slow fashion” that stands the test of time.
In this comprehensive guide, we will dive deep into every aspect of the Crochet Chest Bag- Pattern, from selecting the most resilient fibers to mastering the assembly techniques that ensure a professional finish. We will explore how to adjust the dimensions for a perfect fit, how to add secure closures like zippers or magnets, and how to reinforce the strap to prevent the dreaded “yarn stretch.” By the end of this article, you will have all the knowledge necessary to embark on your own crochet accessories journey and produce a high-quality chest bag that rivals any designer accessory found in a high-end boutique.
When you begin a Crochet Chest Bag- Pattern, the most critical decision you will make is the choice of yarn, as the durability of the bag depends entirely on fiber strength. For a functional accessory like a chest bag, you should avoid delicate or fuzzy yarns and instead opt for mercerized cotton, nylon cord, or even recycled t-shirt yarn. These materials offer the structural integrity needed to maintain the bag’s shape when filled with heavy items, ensuring your stitches don’t pull apart or lose their definition over weeks of constant use.
The hook size you choose for your Crochet Chest Bag- Pattern should ideally be one or two sizes smaller than what is recommended on the yarn label. By using a smaller hook, you create a much denser, tighter fabric that prevents small items like coins or pens from slipping through the gaps between stitches. This “tight-gauge” technique is a hallmark of professional-level crochet bag construction, providing a sturdy foundation that mimics the look and feel of woven canvas while retaining the charm of handmade work.
Hardware is another essential component of a successful Crochet Chest Bag- Pattern. To make your bag truly functional, you will need to source high-quality “D-rings,” swivel hooks, and adjustable sliders, which allow you to customize the strap length for different body types. Many modern patterns also incorporate a heavy-duty zipper or a magnetic snap closure. Integrating these metal elements not only increases the security of your belongings but also gives the finished piece a polished, “ready-to-wear” appearance that looks professionally manufactured.
Don’t overlook the importance of a fabric liner when following a chest bag pattern. Even the tightest crochet stitches can stretch over time, but a simple cotton or canvas lining sewn into the interior will act as a structural skeleton, bearing the load of your items. This step is often the difference between a bag that lasts one season and one that lasts a decade. Choosing a fun, patterned fabric for the lining can also add a delightful “hidden” design element to your Crochet Chest Bag- Pattern project.
Colors and aesthetics are where your creativity can truly shine. Since the chest bag is worn close to the body, consider a palette that complements your existing wardrobe. Neutral tones like beige, charcoal, or olive green are popular for a “tactical” or urban look, while bright neons or variegated yarns are perfect for festival season. When working through the Crochet Chest Bag- Pattern, you can also experiment with different stitch textures, such as the waffle stitch or thermal stitch, to add extra padding and visual interest to the exterior.
Lastly, you must consider the weight of the finished product. While a thick, bulky yarn might make the project go faster, a Crochet Chest Bag- Pattern executed in a very heavy material can become uncomfortable to wear across the chest for long periods. Aim for a yarn that provides a balance between lightness and durability. Synthetic blends often work well here, as they provide the strength of plastic fibers with the soft touch of natural materials, making the bag a pleasure to wear throughout the day.
The architecture of a Crochet Chest Bag- Pattern usually begins with a flat base or a central panel that determines the overall capacity of the bag. Most designs utilize a series of increases and decreases to create a curved, ergonomic shape that sits comfortably against the natural contours of the ribcage. Understanding how to read crochet schematics is very helpful here, as it allows you to visualize how a flat piece of fabric will eventually fold and join to create a three-dimensional pocket.
One of the most used techniques in this pattern is the “Thermal Stitch” or “Waistcoat Stitch,” which creates a thick, double-layered fabric that is exceptionally strong. If your Crochet Chest Bag- Pattern calls for these stitches, be prepared to work a bit more slowly, as they require more effort to pull the hook through the dense layers. The payoff, however, is a bag that feels incredibly sturdy and provides a natural cushion for fragile items like your smartphone screen or sunglasses.
The strap of the bag is arguably the most important part of the Crochet Chest Bag- Pattern regarding comfort. To prevent the strap from stretching out and becoming too long, many designers recommend the “I-cord” method or the “Romanian Point Lace” cord. These techniques create a non-stretch, rope-like structure that is much more reliable than a simple row of double crochets. A well-made strap ensures that your bag stays exactly where you positioned it on your body, preventing it from bouncing or sliding as you walk.
Integrating the zipper is often the most intimidating part of the Crochet Chest Bag- Pattern for many crafters. The secret is to use a “surface slip stitch” or a sharp darning needle to attach the zipper tape directly to the crochet fabric before doing the final sew. This stabilizes the zipper and ensures it doesn’t pucker or wave. Taking your time with this step is crucial; a smooth-gliding zipper is the hallmark of a high-quality handmade accessory and significantly improves the daily user experience.
Side gussets are another feature often found in a premium Crochet Chest Bag- Pattern. These are the side panels that give the bag depth, allowing it to expand slightly to hold bulkier items like a power bank or a small water bottle. When sewing the gussets to the front and back panels, using a “slip stitch join” on the outside can create a decorative ridge that mimics the piping found on leather bags, adding a high-end, structured look to your crochet work.
Finally, you should consider adding a “hidden pocket” on the back panel of your bag. This is a common feature in many Crochet Chest Bag- Pattern designs because it sits directly against your chest, making it the perfect place to store a passport or credit cards while traveling. It adds an extra layer of security and demonstrates the thoughtful engineering that goes into a well-designed crochet pattern. Small details like this elevate the bag from a simple craft project to a functional tool for modern living.
One of the greatest advantages of using a Crochet Chest Bag- Pattern is the ability to tailor the bag to your specific body measurements. A chest bag that is too large can feel cumbersome and overwhelm your frame, while one that is too small won’t hold your modern essentials. Before starting, take a moment to measure your most-used items and adjust the starting chain of the pattern accordingly. This level of bespoke tailoring is something you simply cannot get from a store-bought bag.
Adjusting the strap length is the second most important customization. When following a Crochet Chest Bag- Pattern, you should aim for the bag to sit roughly at the center of your chest or just below the collarbone. This position provides the best weight distribution and easy access. If you are taller or have a broader chest, simply add more rows to your strap section. Using an adjustable slider buckle is highly recommended, as it allows you to wear the bag over a thin t-shirt in summer or a bulky puffer jacket in winter.
For those who carry specific gear, such as a small camera or a handheld gaming console, you can add internal dividers to your Crochet Chest Bag- Pattern. These are simple rectangular panels sewn into the lining that keep your items from banging against each other. This customization turns the bag into a dedicated “tech pouch,” providing protection and organization that is tailored specifically to your lifestyle. It’s a great way to use up scrap yarn while adding immense value to the final project.
Weight distribution is key to avoiding neck strain. If you plan on carrying heavier items, look for a Crochet Chest Bag- Pattern that features a wider strap. A thin strap can “dig in” to the shoulder over time, whereas a wide, flat strap (about 1.5 to 2 inches) spreads the weight across a larger surface area. You can even crochet a separate “shoulder pad” that slides onto the strap for extra cushioning, a small addition that makes a huge difference during a long day of hiking or city sightseeing.
Aesthetics can also be customized through the use of “patches” or embroidery. Once you have finished the main body of your Crochet Chest Bag- Pattern, you can add personality by sewing on embroidered patches, adding a fringe, or even using a surface crochet technique to add your initials. This turns the bag into a conversation starter and a true reflection of your personality. The “chest bag” silhouette is a perfect canvas for showing off your stitch-work skills to the world.
Lastly, consider the “handedness” of the wearer. Most Crochet Chest Bag- Pattern designs are symmetrical, but some feature an angled strap meant to go over one specific shoulder. If you are left-handed, you might want to mirror the pattern so that the zipper pulls and pockets are easily accessible to your dominant hand. This subtle tweak is a pro-level adjustment that ensures your handmade bag is as ergonomic and user-friendly as possible.
The way you finish your Crochet Chest Bag- Pattern will determine its longevity and professional appearance. Weaving in your ends is not just about aesthetics; it’s about structural integrity. In a bag that will be opened, closed, and moved constantly, loose ends can quickly turn into holes. Use a sharp yarn needle to weave the tails through the densest part of the stitches, changing direction at least three times to “lock” the yarn in place, ensuring your crochet project stays together for years.
Blocking is a step many people skip, but it is vital for a Crochet Chest Bag- Pattern. By pinning your panels to a blocking board and applying light steam, you can correct any slight wonkiness in the shape and ensure that the front and back panels match perfectly. This makes the assembly process much easier and results in a bag that looks crisp and intentional. Blocking also helps “set” the stitches, reducing the amount of initial stretch the bag will experience when you first put your items inside.
To protect your Crochet Chest Bag- Pattern from the elements, you might consider using a fabric protector spray. There are several non-toxic sprays available that make the yarn water-resistant and help repel dirt. This is particularly useful if you have used a light-colored yarn or if you plan to use the bag for outdoor activities. A quick spray can prevent stains from setting in, keeping your hand-crocheted bag looking brand new even after months of use.
Washing your chest bag requires a gentle touch. Since it likely contains hardware like zippers and metal rings, you should avoid throwing it in a washing machine. Instead, spot-clean the yarn with a damp cloth and mild detergent. If the bag needs a full wash, hand-wash it in cool water and lay it flat to dry. This prevents the hardware from banging against the machine drum and ensures the yarn fibers don’t felt or pill, maintaining the bag’s original texture.
If you find that your strap has stretched over time—a common occurrence with crochet—don’t worry! You can easily “shorten” it by removing the slider and re-sewing the connection point, or by adding a decorative knot. This is the beauty of the Crochet Chest Bag- Pattern; because you made it, you know exactly how to fix it. This “repairability” is a key pillar of sustainable fashion, allowing you to extend the life of your accessories indefinitely through simple DIY maintenance.
Finally, always keep a small “repair kit” with a bit of the original yarn and a needle. If a stitch ever snags on a sharp object, you can quickly mend it before it becomes a larger issue. Taking pride in the maintenance of your Crochet Chest Bag- Pattern project is part of the joy of being a maker. You aren’t just creating a product; you are creating a lasting companion for your daily adventures, built with love and maintained with care.
1. Is a Crochet Chest Bag- Pattern difficult for beginners?
It is best suited for “confident beginners” or intermediate crocheters. You need to be comfortable with increasing, decreasing, and working with a tight tension. If you have made a few hats or amigurumi, you will find the techniques very similar and manageable.
2. How long does it take to finish the whole bag?
Depending on the complexity of the Crochet Chest Bag- Pattern and your speed, it typically takes between 8 to 15 hours of active crochet time. The assembly (lining and zipper) usually adds another 2 to 3 hours to the project.
3. Do I really need to line the bag?
While not strictly “mandatory,” it is highly recommended. Crochet fabric is naturally stretchy; without a lining, a heavy phone will cause the bag to sag and lose its ergonomic shape. A liner ensures your Crochet Chest Bag- Pattern remains functional and attractive for a long time.
4. What is the best stitch for a sturdy bag?
The Single Crochet (SC) worked tightly is the gold standard. For extra durability, the “Thermal Stitch” or “Waistcoat Stitch” (Center Single Crochet) provides a leather-like thickness that is perfect for bags meant to carry weight.
5. Can I sell the bags I make from a Crochet Chest Bag- Pattern?
Usually, yes! Most designers allow you to sell finished items as long as you give credit to the pattern creator. Check the specific terms of the Crochet Chest Bag- Pattern you purchased to be sure. Handmade chest bags are very popular at craft fairs and on platforms like Etsy.
6. How do I choose the right zipper size?
It is better to buy a zipper that is slightly longer than your bag opening. You can always trim a plastic zipper to size, but you cannot make a short one longer. A “chunky” plastic or metal zipper usually looks best with the texture of a Crochet Chest Bag- Pattern.
Creating a Crochet Chest Bag- Pattern is more than just a craft project; it is an exploration of functional design and personal expression. Throughout this article, we have covered the essential materials needed for durability, the technical steps required for ergonomic shaping, and the many ways you can customize your bag for a perfect fit. We also discussed the importance of hardware and lining to ensure your bag functions as a reliable everyday tool. By following these steps, you transform simple yarn into a high-utility accessory that is both trendy and timeless.
The beauty of the Crochet Chest Bag- Pattern lies in its adaptability. It is a project that grows with your skills, allowing you to experiment with new stitches and construction methods while producing something genuinely useful. We hope this guide has given you the confidence to start your own project and enjoy the satisfaction of wearing something you made with your own two hands.


