
Lily in Crochet - Pattern

A Crochet Crucifix – Pattern is more than just a simple crafting project; it is a profound way to blend artistic expression with spiritual devotion. Whether you are looking to create a meaningful gift for a religious milestone, such as a baptism or confirmation, or you simply want to add a handmade touch to your prayer space, this guide provides everything you need to succeed. Using a Crochet Crucifix – Pattern allows for a level of customization that store-bought items simply cannot match, giving you the freedom to choose your favorite yarns, weights, and textures.
When you start working on a Crochet Crucifix – Pattern, you are engaging in a meditative process that requires patience and focus. The intricate details of the cross and the symbolic representation of the corpus require a steady hand and a clear understanding of basic and advanced crochet stitches. This article is designed to walk you through the nuances of selecting materials, mastering the necessary techniques, and finishing your work with a professional touch that honors the significance of the piece.
Many crafters find that a Crochet Crucifix – Pattern serves as a bridge between generations, as these items often become cherished family heirlooms. By following a well-structured crochet tutorial, you can ensure that your finished product is durable and aesthetically pleasing. In the following sections, we will dive deep into the specific terms and methods required to bring your vision to life, ensuring that your handmade religious art stands out for its quality and craftsmanship.
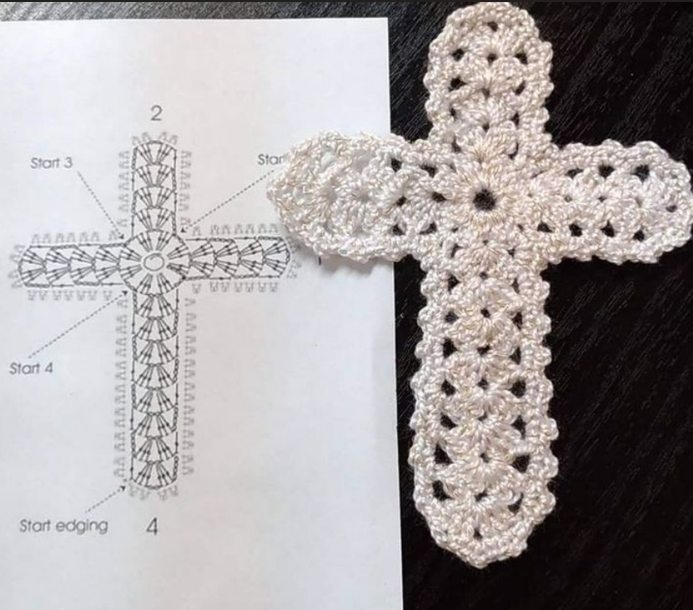
The foundation of any successful project begins with a high-quality Crochet Crucifix – Pattern. This term refers to the set of written instructions or diagrams that guide a crafter through the process of creating a three-dimensional or flat representation of a crucifix. A good pattern will specify the exact yarn weight, hook size, and stitch counts needed to achieve the desired proportions.
For a Crochet Crucifix – Pattern, the “crucifix” distinction is vital; unlike a plain cross, a crucifix includes the figure of Christ (the corpus). This adds a layer of complexity to the crochet design, as it involves shaping small limbs and a torso. Precision is key here to ensure the figure scales correctly with the size of the cross itself.
Selecting the right crochet hook size is the next step in interpreting your pattern. Typically, for religious items intended to be delicate, a smaller steel hook and lace-weight thread are preferred. However, if you are making a wall hanging, you might opt for a standard aluminum hook and worsted weight yarn to give the piece more structure and presence.
The term pattern also encompasses the “gauge” or tension of your stitches. In a Crochet Crucifix – Pattern, maintaining a tight tension is often necessary to prevent the stuffing (if using any) from showing through. This ensures that the sacred art piece looks polished and professional rather than loose or sloppy.
A comprehensive Crochet Crucifix – Pattern will often include a list of abbreviations for stitches like the double crochet (dc), half-double crochet (hdc), and slip stitch (sl st). Familiarizing yourself with these terms before you pick up your hook will save you time and reduce the likelihood of errors during the construction phase.
Lastly, uniqueness in a Crochet Crucifix – Pattern can be achieved through embellishments. Some patterns call for the addition of metallic threads or “halo” effects using specialty yarns. Understanding the flexibility within the written instructions allows you to adapt the project to your personal style while staying true to the traditional iconography.
Choosing the right yarn is perhaps the most critical decision when working on a Crochet Crucifix – Pattern. Most artisans prefer mercerized cotton because it has a slight sheen and excellent stitch definition, which is perfect for highlighting the intricate details of the crochet stitches. Cotton also holds its shape well over time, which is important for items that may be handled frequently.
The color palette for a Crochet Crucifix – Pattern usually leans toward traditional tones like cream, white, wood-brown, or even metallic gold and silver. Using a neutral color scheme allows the texture of the crochet work to be the star of the show. If you are creating a modern interpretation, soft pastels or even deep liturgical purples can be used effectively.
In addition to yarn, you will need stitch markers to keep track of your rows, especially when working on the corpus of the Crochet Crucifix – Pattern. Because the pieces are often small, it is very easy to lose your place. Markers help you identify where the arms of the cross begin and where the shaping for the figure needs to occur.
Another essential material is a tapestry needle for weaving in ends and assembling the different parts. A Crochet Crucifix – Pattern often involves creating the cross and the figure separately and then joining them. A sharp needle ensures that your seams are invisible, maintaining the illusion of a single, cohesive piece of handmade lace.
For those following a Crochet Crucifix – Pattern that results in a 3D figure, high-quality polyester fiberfill is necessary. You only need a small amount, but it should be packed firmly to give the corpus a solid feel. Be careful not to overstuff, as this can stretch the stitches and distort the appearance of the sacred iconography.
Finally, consider the use of blocking mats and pins. Once your Crochet Crucifix – Pattern is complete, blocking is the process of wetting the piece and pinning it into the perfect shape. This is especially important for the cross beams, ensuring they are perfectly horizontal and vertical, giving your crochet project a high-end, gallery-quality finish.
To truly excel at a Crochet Crucifix – Pattern, one must master the art of shaping and increases. Unlike a simple scarf, a crucifix requires frequent increases and decreases to create the contours of the body. Learning the invisible decrease (inv dec) technique is highly recommended to keep the surface of the corpus smooth and realistic.
The “Magic Ring” or magic circle is another indispensable technique for starting the various elements of a Crochet Crucifix – Pattern. This method allows you to pull the center hole completely shut, which is vital for the top of the head or the ends of the cross beams. It creates a much cleaner look than the traditional “chain and join” method.
Working in the back loops only (BLO) is a common instruction in a Crochet Crucifix – Pattern to create ridges or sharp corners. This technique is often used at the base of the cross or to define the transition from the front to the sides of the piece. It adds a structural integrity that helps the crochet crucifix stand or hang properly.
Understanding stitch height is also crucial. A Crochet Crucifix – Pattern might use a combination of treble crochet (tr) and single crochet to create a tapered effect on the arms of the cross. By varying the height of your stitches, you can create a sense of movement and depth within the fiber art that a flat stitch pattern cannot achieve.
Joining techniques, such as the whip stitch or the invisible join, are what separate amateurs from experts. When assembling your Crochet Crucifix – Pattern, how you attach the figure to the cross determines the durability of the item. It is important to secure the pieces firmly so that the corpus does not sag over time, preserving the spiritual integrity of the work.
Don’t be afraid to practice surface crochet or embroidery on top of your finished piece. Some Crochet Crucifix – Pattern designers suggest adding embroidered details for the eyes or the “INRI” sign at the top of the cross. These tiny touches require a steady hand but add an immense amount of character and value to your religious crochet gift.
Once you have finished your Crochet Crucifix – Pattern, protecting your hard work is the next priority. If the item is intended for a wall display, you might consider using a fabric stiffener. Applying a solution of glue and water or a commercial stiffening spray ensures that the crochet cross remains rigid and does not curl at the edges over time.
Cleaning is another factor to consider for any crochet item. Because a Crochet Crucifix – Pattern is often made of delicate cotton, it should only be hand-washed in cool water with a mild detergent. Avoid wringing the piece; instead, pat it dry with a towel to maintain the shape of the intricate lacework.
Storage of your handmade crucifix should be handled with care. If it is not on display, wrap it in acid-free tissue paper and store it in a cool, dry place. This prevents the yarn from yellowing—a common issue with white or cream crochet thread—and protects it from dust and pests that can damage natural fibers.
If you are selling your work based on a Crochet Crucifix – Pattern, presentation is everything. Adding a small care tag that explains the handmade nature of the item and the cleaning instructions adds a professional touch. High-quality photography that highlights the texture and detail of the stitches will also help your work stand out on platforms like Etsy or Pinterest.
For those who enjoy the process, creating a series of items from the same Crochet Crucifix – Pattern can be a great way to refine your skills. Each time you repeat the pattern, you will find ways to improve your stitch consistency and speed. This “assembly line” approach is perfect for preparing items for church bazaars or holiday craft fairs.
Ultimately, a Crochet Crucifix – Pattern is a labor of love. Whether you are making it for yourself or someone else, the time and effort invested in every single crochet and slip stitch reflect a deep respect for the craft and the subject matter. Enjoy the journey of creation, and let your artistic expression shine through every loop.
1. What is the best yarn for a Crochet Crucifix – Pattern?
The best yarn is typically a size 10 mercerized cotton thread. It provides the best stitch definition and durability for small, detailed religious items.
2. Can a beginner attempt a Crochet Crucifix – Pattern?
Yes, but it is helpful to have a basic understanding of amigurumi techniques (working in the round) and shaping. Beginners should look for a pattern that is labeled “easy” or “intermediate.”
3. How big is a finished Crochet Crucifix?
The size depends entirely on the yarn weight and hook size used. Using thread results in a 3-5 inch piece, while using worsted weight yarn can result in a crucifix 10 inches or larger.
4. Do I need to stuff the figure on the crucifix?
Most Crochet Crucifix – Patterns require a small amount of stuffing for the corpus to give it a 3D effect, though some flat lace designs do not require any stuffing at all.
5. How do I make the cross arms stay straight?
Using a fabric stiffener or inserting a plastic or wooden support (like a popsicle stick or wire) inside the crochet work can help keep the arms of the cross perfectly straight.
6. Is it okay to sell items made from a Crochet Crucifix – Pattern?
Usually, yes, provided you give credit to the pattern designer. Always check the specific copyright terms included with the pattern you purchased or downloaded.
In this article, we have explored the beautiful world of the Crochet Crucifix – Pattern, covering everything from the initial selection of high-quality cotton yarn to the advanced shaping techniques required for a professional finish.
We discussed how to interpret crochet instructions, the importance of proper tension, and the final steps of blocking and stiffening to ensure your sacred art lasts for generations. This project is a wonderful way to combine your passion for fiber arts with a meaningful, spiritual purpose.


