
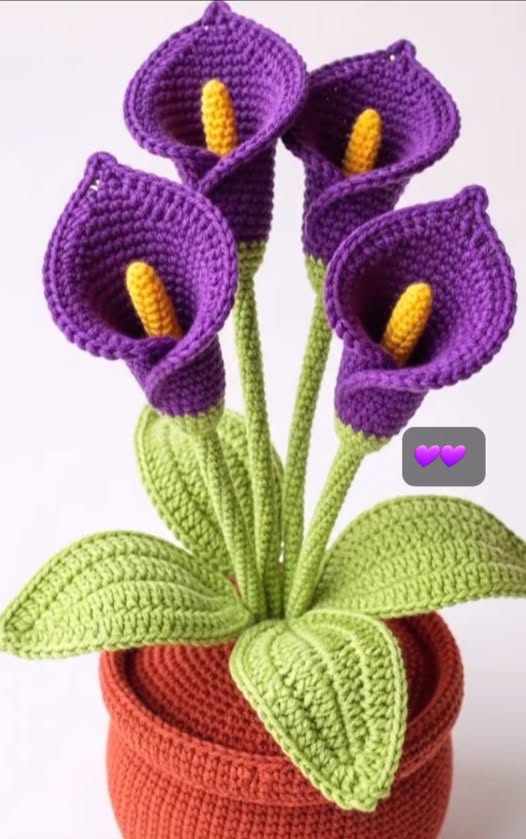
Lily in Crochet - Pattern

The Crochet Flower Bouquet – Pattern is one of the most rewarding and visually stunning projects a fiber artist can undertake, offering a way to capture the fleeting beauty of nature in a form that lasts forever. Unlike real flowers that wither within a week, a bouquet created from a well-designed Crochet Flower Bouquet – Pattern remains vibrant and colorful for years, making it an ideal gift for weddings, anniversaries, or home decor. Many crafters find that following a Crochet Flower Bouquet – Pattern is not just a hobby but a meditative practice, allowing them to focus on the intricate details of petals, leaves, and stems while creating a personalized arrangement that reflects their unique style.
When you dive into a Crochet Flower Bouquet – Pattern, you are essentially learning how to sculpt with yarn, using various stitches to mimic the organic shapes found in a garden. The versatility of this craft means you can recreate anything from delicate lavender sprigs to bold, dramatic roses, all within the same Crochet Flower Bouquet – Pattern. This project is particularly popular in the “slow fashion” and sustainable decor movements because it encourages the use of high-quality natural fibers and reduces the environmental impact associated with the commercial floral industry.
In this comprehensive guide, we will explore the technical and creative aspects of completing a Crochet Flower Bouquet – Pattern. We will discuss the best types of yarn for achieving realistic textures, the essential tools required for structural integrity, and the assembly techniques that turn individual blossoms into a cohesive masterpiece. By mastering the fundamentals of a Crochet Flower Bouquet – Pattern, you gain the ability to customize your environment with “blooms” that never fade, providing a sense of cheer and handmade warmth to any room in your home or as a heartfelt token for someone special.
The success of your Crochet Flower Bouquet – Pattern begins with choosing the right fiber, as the texture and weight of the yarn determine how realistic your flowers will look. For most floral projects, mercerized cotton yarn is the preferred choice because it has a subtle sheen that mimics the natural waxy coating of real petals. Cotton is also sturdy and holds its shape well, which is essential when you want your Crochet Flower Bouquet – Pattern to stand upright in a vase without drooping or losing its definition over time.
While cotton is the standard, you can also experiment with different weights within your Crochet Flower Bouquet – Pattern to create variety. Using a “lace weight” or “size 10 crochet thread” results in delicate, airy blossoms like baby’s breath or jasmine. On the other hand, using a “sport weight” or “DK weight” yarn allows you to create larger, more substantial flowers like sunflowers or peonies. A diverse Crochet Flower Bouquet – Pattern often mixes these different weights to add visual depth and interest to the final arrangement.
The crochet hook size is equally important when working on a Crochet Flower Bouquet – Pattern. To ensure the stitches are tight and the stuffing or wire doesn’t show through, it is often recommended to use a hook that is one or two sizes smaller than what the yarn label suggests. This creates a dense fabric texture that helps the petals maintain their curvature. Most crafters find that a 2.0mm to 3.0mm hook is the “sweet spot” for most elements of a standard Crochet Flower Bouquet – Pattern.
Structural support is what truly brings a Crochet Flower Bouquet – Pattern to life. You will need high-quality florist wire (usually 18 to 22 gauge) to create the stems and provide internal support for larger leaves. Without wire, your crochet flowers would simply be flat motifs; with it, they become three-dimensional sculptures. Integrating wire into your Crochet Flower Bouquet – Pattern requires a bit of patience, but it allows you to bend and pose the flowers just like real ones in a professional florist’s arrangement.
Color selection is the most creative part of preparing for your Crochet Flower Bouquet – Pattern. While realistic colors like “dusty rose,” “sage green,” and “buttercup yellow” are classic, don’t be afraid to go for a modern aesthetic with “terracotta,” “mustard,” or even “gradient yarns.” A well-thought-out Crochet Flower Bouquet – Pattern uses a cohesive color palette that ties the different species of flowers together. Using variegated yarn can also add natural-looking color transitions to your petals without the need for frequent yarn changes.
Lastly, you will need some basic finishing tools to complete your Crochet Flower Bouquet – Pattern. A sharp pair of scissors, a tapestry needle for weaving in ends, and some fabric stiffener or a light starch spray can be very helpful. Some advanced patterns also suggest using “floral tape” to wrap the wire stems, giving them a smooth, green finish that looks exactly like a natural plant. Having these tools ready before you start your Crochet Flower Bouquet – Pattern ensures a smooth and enjoyable crafting experience.
The most common way to start a blossom in a Crochet Flower Bouquet – Pattern is by using the “Magic Ring” or “Magic Circle.” This technique allows you to pull the center of the flower completely tight, leaving no hole, which is crucial for a professional look. Whether you are making a simple five-petal daisy or a complex layered carnation, the magic ring foundation provides the stability needed for the petals to radiate outward symmetrically. Mastering this is the first hurdle for any beginner following a Crochet Flower Bouquet – Pattern.
Petals in a Crochet Flower Bouquet – Pattern are usually formed by varying the height of your stitches within a single loop or chain space. For example, moving from a single crochet to a double crochet and back to a single crochet creates a rounded, leaf-like curve. This gradient stitch technique is used repeatedly in floral crochet to mimic the organic shapes of nature. The more you practice these transitions within your Crochet Flower Bouquet – Pattern, the more fluid and lifelike your flowers will appear.
Texture can be added to your Crochet Flower Bouquet – Pattern by using “Post Stitches” or working in the “Front Loops Only” (FLO). This creates ridges and layers that give the flower a 3D effect. In a rose Crochet Flower Bouquet – Pattern, you might crochet a long, scalloped strip and then roll it up to create the spiraling center of the bud. This “roll and sew” method is a classic technique that turns flat crochet into a voluminous, realistic flower head that is sure to impress.
Leaves are just as important as the flowers in a Crochet Flower Bouquet – Pattern. A leaf usually begins with a central chain, and you work around both sides of that chain to create an oval or pointed shape. To make them even more realistic, many Crochet Flower Bouquet – Pattern designs incorporate a thin wire along the edge or down the center vein. This allows you to “ruffle” or bend the leaves, giving your handmade bouquet a sense of movement and life that flat leaves simply cannot achieve.
In some sophisticated Crochet Flower Bouquet – Pattern designs, you might encounter “Popcorn Stitches” or “Bullion Stitches” to represent the center of the flower where the pollen sits. These highly textured stitches add a tactile element that makes the viewer want to reach out and touch the bouquet. Learning these specialty crochet stitches expands your repertoire and allows you to tackle more advanced floral patterns that feature high-detail botanical accuracy, such as anemones or poppies.
Don’t forget the “Sepals”—the small green leaves at the base of the flower head. In a high-quality Crochet Flower Bouquet – Pattern, the sepal acts as the bridge between the heavy flower head and the thin wire stem. It provides a neat way to hide the messy ends where the petals are joined. A well-constructed sepal in your Crochet Flower Bouquet – Pattern not only adds a touch of green but also ensures that the flower head stays securely attached to the stem throughout the life of the bouquet.
Once you have crocheted all the individual components of your Crochet Flower Bouquet – Pattern, the assembly phase begins. This is where you transform the loose blossoms into a structured bouquet. Start by attaching the flower heads to the wire stems using a bit of hot glue or by sewing them through the sepal. In a professional Crochet Flower Bouquet – Pattern, you want the connection to be invisible and strong. Ensuring the stem-to-flower connection is secure is the most important part of the assembly process.
Wrapping the stems is the next step in your Crochet Flower Bouquet – Pattern. You can use floral tape, which is tacky and sticks to itself, or you can “yarn-wrap” the stems. To yarn-wrap, you apply a tiny bit of glue at the top and spirally wrap the green yarn all the way down the wire. This yarn-wrapping technique gives the stems a soft, cohesive look that matches the texture of the flowers. It is a signature finish for many high-end crocheted floral arrangements.
The “Leaves Attachment” is where you decide the silhouette of your Crochet Flower Bouquet – Pattern. Typically, you attach two or three leaves to each main stem at different heights. When following your Crochet Flower Bouquet – Pattern, try to vary the placement of the leaves to avoid a look that is too “perfect” or mechanical. Natural plants are slightly asymmetrical, so adding a little randomness to your leaf placement actually makes the crochet bouquet look more realistic and artisanal.
Grouping the flowers is an art form in itself. When arranging your Crochet Flower Bouquet – Pattern, follow the “Rule of Three” or use an odd number of large focal flowers. Place the largest, brightest flowers in the center and fill in the gaps with smaller “filler” flowers like lavender or sprigs of greenery. This floral composition strategy ensures that the eye is drawn to the center of the bouquet and then moves outward to appreciate the smaller details of your handmade crochet work.
To keep the bouquet together, you can bind the stems with a rubber band or a piece of floral wire. For a wedding or a gift, wrapping the “handle” of the bouquet in a beautiful lace or satin ribbon adds a final touch of elegance. If your Crochet Flower Bouquet – Pattern is intended for a vase, you can even add some “floral foam” or decorative stones to the bottom of the container to hold the stems exactly where you want them, ensuring your crochet centerpiece stays perfect.
Finally, consider the “Pose” of your flowers. Because you used wire in your Crochet Flower Bouquet – Pattern, you can bend the stems so some flowers are “peeking” over the others. You can open up the petals of some flowers while keeping others in a tighter, “budding” shape. This dynamic posing is what separates a static crochet project from a true piece of botanical art. Take your time with this final step; it is the moment your Crochet Flower Bouquet – Pattern truly comes to life.
One of the best things about the Crochet Flower Bouquet – Pattern is how easily it can be customized for specific events. For a bridal bouquet, you can incorporate “pearl beads” into the center of the flowers or use a thin metallic thread to add a bit of sparkle to the petals. A bridal Crochet Flower Bouquet – Pattern often focuses on whites, creams, and soft blushes, providing a lightweight and durable alternative to real flowers that the bride can keep as a memento of her special day.
For a “Mother’s Day” or “Birthday” gift, you can choose the recipient’s favorite flowers and colors. If they love wildflowers, your Crochet Flower Bouquet – Pattern could feature poppies, cornflowers, and daisies. If they prefer something more classic, a dozen red roses is always a winner. Personalizing the species of flowers within the Crochet Flower Bouquet – Pattern shows a deep level of thoughtfulness and effort that makes the gift much more meaningful than a store-bought arrangement.
The Crochet Flower Bouquet – Pattern is also perfect for seasonal home decor. You can make a “Spring Bouquet” with tulips and daffodils, a “Summer Bouquet” with sunflowers and lavender, or a “Fall Bouquet” with marigolds and dried-look leaves in oranges and browns. Because they don’t require water or light, these everlasting crochet flowers are ideal for brightening up dark corners of a room or for people with allergies who cannot have real plants in the house.
If you are an advanced crafter, you can scale the Crochet Flower Bouquet – Pattern up or down. You can make “Giant Crochet Flowers” to be used as photo props or wall decor, or “Miniature Crochet Flowers” to be used as brooches or hair accessories. The geometric logic of the pattern stays the same; you simply change the yarn weight and hook size to achieve the desired scale. This flexibility makes the Crochet Flower Bouquet – Pattern one of the most versatile tools in a crafter’s library.
Sustainability is a major benefit of the Crochet Flower Bouquet – Pattern. Many makers use organic cotton or recycled yarns to create their bouquets, further reducing their environmental footprint. By choosing a sustainable Crochet Flower Bouquet – Pattern, you are creating a long-lasting product that doesn’t contribute to the waste of the cut-flower industry. It is a beautiful way to enjoy “botany” while respecting the planet and promoting the value of handmade craftsmanship.
Lastly, consider teaching the Crochet Flower Bouquet – Pattern to others! Floral crochet is a great way to introduce beginners to the craft because the results are so immediately rewarding. Hosting a “crochet-along” where everyone makes one type of flower to contribute to a larger community bouquet is a wonderful way to build social connections. Whether you are making them for yourself, for profit, or for charity, the Crochet Flower Bouquet – Pattern is a project that truly brings joy to everyone involved.
Is a Crochet Flower Bouquet – Pattern too difficult for a beginner?
Not at all! While some flowers are complex, many parts of a Crochet Flower Bouquet – Pattern, like daisies or lavender, only require basic stitches like single and double crochet. It’s a great project to grow with; you can start with simple blossoms and gradually add more difficult species to your bouquet as your skills improve.
How do I clean my crochet flowers if they get dusty?
Since most Crochet Flower Bouquet – Pattern items are made of cotton, they can be gently spot-cleaned with a damp cloth. For general dust, a quick blast from a hair dryer on the “cool” setting or a gentle brush with a soft makeup brush usually does the trick. Avoid soaking them in water if you used wire or glue during assembly.
What is the best way to make the stems look realistic?
The best way is to use green floral tape or to tightly wrap the wire in a green yarn that matches the leaves. In your Crochet Flower Bouquet – Pattern, make sure the wrapping is smooth and covers the wire completely. Adding a few leaves at varying heights on the stem also adds to the realistic botanical look.
Can I use any type of yarn for this pattern?
While you can use any yarn, 100% cotton is highly recommended for a Crochet Flower Bouquet – Pattern. It provides the best “stitch definition,” meaning the shape of the petals will be sharp and clear. Fuzzier yarns like wool or acrylic can make the flowers look “blurry” and less like real botanical specimens.
How many flowers do I need for a full bouquet?
A standard medium-sized bouquet usually requires about 10 to 15 main flowers and several sprigs of “filler” greenery. However, the beauty of the Crochet Flower Bouquet – Pattern is that you can make as many or as few as you like. Even three long-stemmed roses can look elegant on their own in a bud vase.
How do I make the petals stay curved?
The “secret” is to use a smaller hook to create a tight fabric, and in some cases, to sew a very thin wire into the edge of the petal. You can also use a light application of fabric stiffener or a mixture of water and craft glue to “set” the petals in their desired position once the flower is finished.
The Crochet Flower Bouquet – Pattern is a magnificent journey into the world of “everlasting” fiber art, combining technical skill with the beauty of the natural world. Throughout this guide, we have explored the foundational steps of selecting the right mercerized cotton yarn and hook sizes to ensure your blossoms are crisp and durable.
We delved into the anatomy of a flower, highlighting how the “Magic Ring” and “gradient stitches” create lifelike petals and textured centers. We also discussed the essential role of florist wire and assembly techniques like stem-wrapping and composition to turn individual units into a professional-grade arrangement.
Beyond the technicality, the Crochet Flower Bouquet – Pattern offers endless opportunities for customization, from bridal themes to seasonal home decor, all while promoting a sustainable and thoughtful approach to gift-giving. By following this pattern, you are creating a piece of art that will bring color and joy to any space for years to come.


