
Lily in Crochet - Pattern

Finding the perfect Crochet Flower – Pattern is often the gateway to a lifelong obsession with fiber arts, as these small yet intricate designs allow crafters to mimic the natural beauty of a garden with just a simple hook and a bit of yarn. There is an undeniable joy in watching a colorful blossom emerge from a series of loops, providing an instant sense of accomplishment that larger projects like sweaters or blankets sometimes take weeks to deliver. Whether you are looking to create a single daisy to adorn a hat or a bouquet of roses for a home decor arrangement, a high-quality Crochet Flower – Pattern serves as the essential blueprint for your creative success.
One of the most appealing aspects of working with a Crochet Flower – Pattern is its extreme versatility and the minimal amount of materials required to get started. These designs are the ultimate “stash-busters,” allowing you to transform small, leftover scraps of cotton yarn or mercerized thread into stunning accessories that can be used as brooches, hair clips, or embellishments for other handmade items. Because each flower is a self-contained unit, you can experiment with bold color theory and complex stitch textures without the commitment of a massive project, making it the perfect playground for artistic exploration and skill-building.
To truly master the art of the Crochet Flower – Pattern, one must pay close attention to the small details that elevate a simple craft into a professional-looking piece of botanical art. From choosing the correct hook size to maintain the right tension, to understanding how to properly “block” your finished petals so they hold their shape, every step is a learning opportunity. In this comprehensive guide, we will dive deep into the essential components of floral crochet, exploring various techniques, material choices, and finishing touches that will help you bring your vision of a Crochet Flower – Pattern to life with confidence and flair.
The success of your Crochet Flower – Pattern begins with selecting a yarn that offers excellent stitch definition. For floral work, mercerized cotton is often the preferred choice because the treatment gives the fiber a subtle sheen and prevents it from fraying, which keeps the edges of your petals looking crisp and sharp. If you are aiming for a softer, more vintage aesthetic, a high-quality acrylic or a wool-silk blend can provide a lovely “halo” effect that mimics the delicate texture of real flower petals in nature.
Your crochet hook size is the second most important factor in determining the final look of your Crochet Flower – Pattern. Most patterns will recommend a hook slightly smaller than what is listed on the yarn label to ensure the fabric is dense enough to stand up on its own. Using a smaller hook prevents the “gaps” between stitches that can make a flower look floppy, ensuring that your rose, lily, or sunflower maintains its structural integrity even after it has been handled or washed several times.
Don’t overlook the impact of yarn weight on the scale of your finished project. A Crochet Flower – Pattern worked in lace-weight thread will result in a dainty, elegant blossom perfect for jewelry or bridal accessories. Conversely, using the same pattern with bulky weight yarn will create a large, statement-making flower that works beautifully as a decorative pillow accent or a playful addition to a child’s backpack. This scalability is what makes floral patterns so addictive for makers of all skill levels.
Color selection is where your personality truly shines through in a Crochet Flower – Pattern. While natural tones like blush pink, sunflower yellow, and forest green are traditional favorites, don’t be afraid to experiment with variegated yarns that change colors automatically. This can create a stunning “watercolor” effect on the petals, giving each flower a unique look that is impossible to replicate. Think about the season or the specific outfit you want to match when curating your color palette for the project.
In addition to your main supplies, you will need a few essential notions to finish your Crochet Flower – Pattern professionally. A sharp pair of embroidery scissors is necessary for clean cuts, and a set of tapestry needles will help you weave in those many yarn ends that floral motifs inevitably produce. If you plan on turning your flowers into brooches or hair clips, having a supply of alligator clips, safety pins, and a reliable fabric glue or hot glue gun is also a must for assembly.
Lastly, consider the use of stiffening agents if your Crochet Flower – Pattern involves long, thin petals that might droop over time. A simple solution of water and white glue, or a commercial fabric stiffener spray, can be applied to the finished flower to lock the fibers in place. This is especially helpful for 3D designs or architectural flowers like orchids, ensuring that the “wings” of the blossom stay perfectly poised and elegant for as long as you choose to display them.
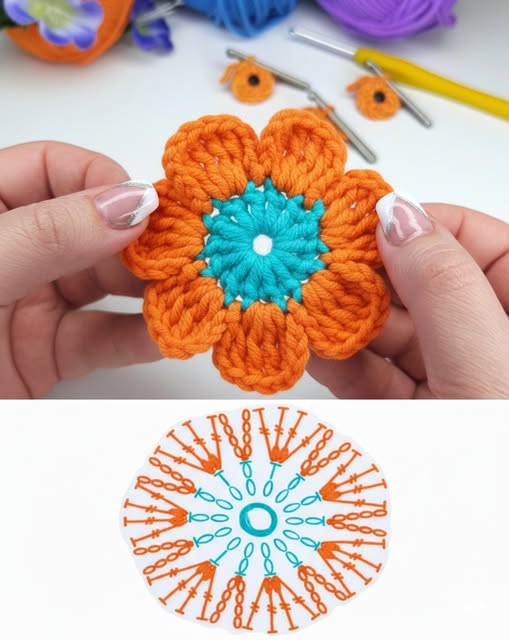
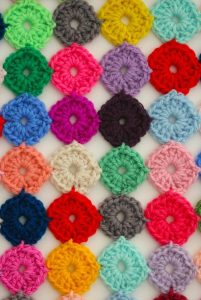
Most Crochet Flower – Pattern designs start with a Magic Ring (also known as a magic circle). This technique is superior to the “chain and join” method because it allows you to pull the center of the flower completely closed, leaving no visible hole in the middle. A tight center is crucial for flowers like daisies or pansies, as it provides a professional, polished foundation upon which the rest of the floral layers are built during the construction process.
The Puff Stitch and the Popcorn Stitch are frequently used in a Crochet Flower – Pattern to create the “bumpy” texture found in the centers of many real-world flowers. These stitches involve working several loops into one stitch and then pulling them together to create volume. By using a contrasting color for these textured centers—such as a dark brown for a sunflower or a bright yellow for a daisy—you add a level of realism and depth that makes the crochet work pop.
Layering is a common technique in a more advanced Crochet Flower – Pattern, where you work in the back loops only (BLO) or front loops only (FLO) of a previous round. By leaving one loop free, you create a ledge where you can attach a second or third row of petals. This “stacked” approach is how intricate flowers like carnations or multi-layered roses are created, allowing for a lush, full appearance that mimics the complex biology of a garden bloom.
To achieve pointed petals, such as those on a poinsettia or a star-shaped flower, the Picot Stitch is often incorporated into the Crochet Flower – Pattern. A picot is a small loop of chains that creates a tiny point at the tip of a stitch. This subtle detail can completely change the silhouette of a flower, moving it from a soft, rounded appearance to a more dramatic and geometric one, demonstrating the versatility of basic crochet techniques in floral art.
Understanding stitch height is also vital when following a Crochet Flower – Pattern. Most petals use a combination of single crochet, half-double crochet, and treble crochet in a single row to create a curved shape. By starting with short stitches at the base of the petal and increasing the height toward the middle before decreasing again, you create the natural “arch” of a leaf or petal, giving your work a graceful and organic flow.
Finally, the “joining” stage of a Crochet Flower – Pattern is where the individual pieces come together. If your pattern involves separate petals that must be sewn to a central disk, using a whipstitch or an invisible join is essential. Taking the time to secure these pieces properly ensures that the flower doesn’t fall apart with use, and it allows you to adjust the “angle” of each petal to create a more dynamic and lifelike three-dimensional arrangement.
A Crochet Flower – Pattern is not just a spring project; it can be adapted for any time of year through clever color selection and yarn choices. For the winter months, you might use a pattern to create poinsettias or holly leaves using deep reds and hunter greens. Adding a bit of metallic thread or tiny white beads to represent snow can turn a simple floral motif into a festive holiday ornament or a unique gift topper for a loved one.
As autumn arrives, your Crochet Flower – Pattern can transition into warm, earthy tones like burnt orange, mustard yellow, and chocolate brown. Flowers like mums or marigolds are perfect for fall-themed wreaths or as decorations for a Thanksgiving table setting. You can even pair these flowers with crochet leaves or small pumpkins to create a “harvest” aesthetic that brings the cozy feelings of the season into your home decor in a handcrafted way.
For those who love the “boho-chic” style, a Crochet Flower – Pattern can be used to create flower crowns or decorative fringes for summer music festivals. Using light, breathable cotton yarn in vibrant neon colors or soft pastels allows the wearer to stay cool while making a bold fashion statement. These crowns are also a popular choice for flower girls at weddings, providing a soft and comfortable alternative to traditional floral headpieces that won’t wilt in the heat.
Personalization is another great benefit of the Crochet Flower – Pattern. You can add small charms, pearls, or sequins to the center of your flowers to add a touch of glamour. If you are making a gift for a child, using “googly eyes” or bright, mismatched colors can turn a simple flower into a whimsical character. The ability to “mix and match” elements from different patterns allows you to create a completely unique botanical collection that reflects your personal artistic vision.
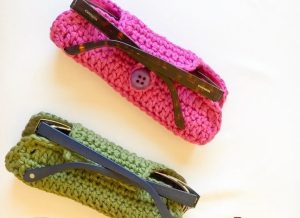
The Crochet Flower – Pattern can also be adapted for functional uses, such as coasters, bookmarks, or scrunchies. A large, flat-bottomed flower like a hibiscus makes an excellent coaster for tea or coffee, protecting your furniture while adding a touch of charm. Similarly, attaching a small flower to a long chain of stitches creates a beautiful floral bookmark that makes a thoughtful and practical gift for any book lover in your life.
Lastly, consider the emotional impact of a Crochet Flower – Pattern. Many people use these patterns to create memorial bouquets or “everlasting” flowers for hospital rooms where real plants may not be allowed. Because these flowers never fade or lose their petals, they serve as a lasting reminder of care and affection. Crafting a bouquet for someone going through a difficult time is a powerful way to use your skills to bring comfort and a touch of permanent color to their world.
The difference between an amateur flower and one that looks “boutique-quality” often lies in the finishing techniques applied after the Crochet Flower – Pattern is complete. Once you’ve fastened off your yarn, you must weave in your ends with extreme care. Because floral motifs are often small, there is less space to hide the yarn tails. Using a sharp tapestry needle to weave the tail back and forth through the densest part of the flower ensures it stays hidden and secure.
Blocking is an essential step that many crafters skip, but it is vital for any Crochet Flower – Pattern. Blocking involves pinning your finished flowers to a foam board and applying steam or moisture to “set” the shape. This process evens out your tension, opens up the petals, and ensures that every flower in a set is the exact same size. For delicate lace flowers, blocking is what reveals the intricate details that might look “scrunchy” or messy immediately after coming off the hook.
If your Crochet Flower – Pattern is intended to be a 3D object, like a rosebud, you may need to use a bit of fabric glue to hold the shape in place. A tiny dot of clear-drying glue on the underside of a petal can prevent it from unrolling or shifting during wear. This is a common trick used by professional designers to ensure their handmade accessories maintain their perfect, “camera-ready” appearance through a long event or daily use in a busy household.
Surface decoration can also elevate your Crochet Flower – Pattern to the next level. Using a contrasting color of embroidery floss, you can add small “veins” to the petals or “speckles” to the center of the flower. This level of detail adds a layer of artistry and realism that is highly sought after. It shows that you have gone beyond the basic pattern to add your own creative touch, making the finished piece feel like a true work of art rather than just a simple craft.
For those who plan on selling their work, proper packaging and presentation of your Crochet Flower – Pattern creations is key. Mounting a flower on a pretty cardstock backing with a “handmade with love” stamp can significantly increase its perceived value. It also protects the delicate petals during shipping or handling at a craft fair. Think of your packaging as the “vase” for your crochet flowers—it should be just as thoughtful and beautiful as the blossoms themselves.
Finally, remember that the Crochet Flower – Pattern you choose is just the starting point. As you become more confident with your hook, you will find yourself “improvising” and adjusting the stitch counts to create new varieties of flora. This evolution from following a guide to freestyle crochet is one of the most rewarding parts of the hobby. Every flower you make is a stepping stone to a deeper understanding of fiber art, allowing you to grow your skills alongside your beautiful, yarn-based garden.
What is the best yarn for a Crochet Flower – Pattern?
The most popular choice is mercerized cotton (especially Size 10 thread or Sport weight yarn). It offers excellent stitch definition, a lovely sheen, and doesn’t pill, making it perfect for the intricate details required in floral work.
How long does it take to crochet a single flower?
A simple Crochet Flower – Pattern can often be completed in 10 to 20 minutes. More complex, multi-layered designs like a full-bloom rose might take 45 minutes to an hour. This makes them excellent “quick-win” projects.
Can a beginner successfully follow a floral pattern?
Absolutely! Most floral patterns rely on basic stitches like the double crochet and single crochet. If you can make a circle and work into a chain, you can make a flower. It’s a great way to practice new techniques on a small, manageable scale.
How do I attach my crochet flowers to a garment?
The most secure method is to sew them on using a tapestry needle and a matching color of yarn or thread. If you want the flower to be removable, you can sew it onto a safety pin or use a small piece of velcro to attach it to the clothing.
Do I need to block my crochet flowers?
While not strictly mandatory, blocking is highly recommended. It helps the petals lie flat and ensures the flower looks symmetrical. For 3D flowers, blocking may be less necessary, but for flat motifs like daisies, it makes a world of difference.
Why does my flower look different from the pattern photo?
The most common reasons are yarn weight and hook size. If your yarn is thicker or your hook is larger than what the pattern suggests, your flower will be bigger and may have a different “drape.” Always check your gauge before starting a large set!
In this comprehensive guide, we have explored the beautiful and rewarding world of the Crochet Flower – Pattern, from the initial selection of high-quality fibers and the correct hook sizes to the mastery of 3D textures and layering techniques. We discussed how these small projects can be adapted for any season using clever color palettes, and the essential role that blocking and finishing play in creating a professional, boutique-quality result.
Whether you are using your flowers as simple embellishments or building complex botanical bouquets, the Crochet Flower – Pattern offers a unique combination of relaxation and creative expression that is accessible to crafters of all skill levels.


