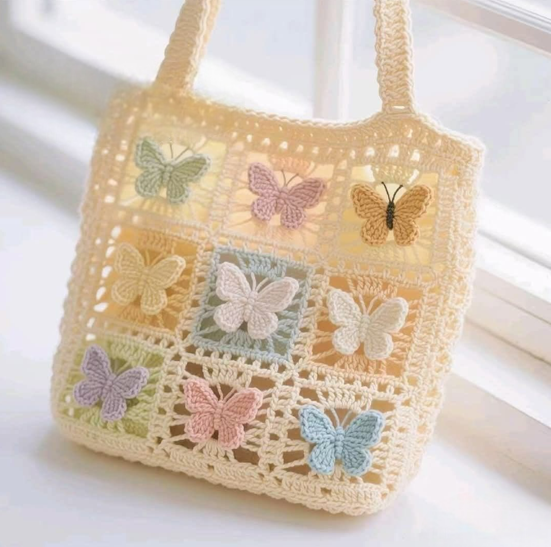
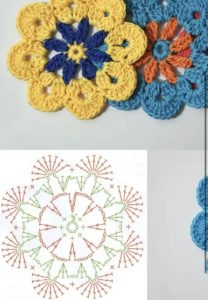
Crochet Butterfly Bag - Tutorial

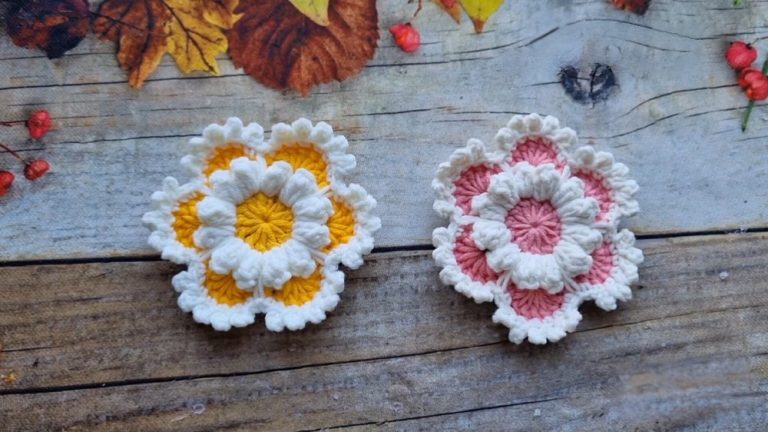
The Crochet Flower – Pattern is one of the most versatile and joyful projects any fiber artist can undertake, offering a perfect blend of creativity and relaxation. Whether you are a seasoned expert looking to use up leftover yarn scraps or a complete beginner picking up a hook for the first time, learning how to construct these botanical beauties is a rewarding endeavor. These handmade blossoms can be used to embellish hats, blankets, and sweaters, or even grouped together to create stunning home decor like wreaths and wall hangings that never fade or wilt.
When you dive into a Crochet Flower – Pattern, you are essentially learning the art of working in the round to create layers of texture and color. The beauty of this specific craft lies in its infinite variety; you can create everything from tiny, delicate daisies to large, multi-layered roses just by slightly altering your stitch count or hook size. Beyond the physical product, the process of following a floral crochet guide is known to be therapeutic, providing a rhythmic escape from the digital noise of everyday life while resulting in a tangible piece of art.
In this comprehensive guide, we will explore the essential elements of a high-quality Crochet Flower – Pattern, including material selection, core techniques, and creative applications. We will break down the technical jargon into easy-to-understand steps, ensuring that your experience with the Crochet Flower – Pattern is successful and stress-free. By mastering a few basic shapes, you will unlock the ability to design your own garden of yarn, adding a personalized, “handmade with love” touch to every gift or fashion accessory you create.
The foundation of any beautiful Crochet Flower – Pattern starts with selecting the right yarn weight and fiber content. For beginners, a medium-weight cotton yarn is highly recommended because it offers excellent stitch definition, making it easier to see exactly where to insert your hook. Cotton also provides the necessary stiffness to help the petals hold their shape without drooping, which is vital for 3D crochet flowers that need to stand out.
Choosing the correct hook size is the next critical step in executing your Crochet Flower – Pattern with precision. If your stitches are too loose, the flower may look floppy and lose its structural integrity; if they are too tight, the flower might curl unnaturally. Most crochet blossom patterns suggest a hook that is slightly smaller than what the yarn label recommends to ensure the petals are dense and vibrant, preventing any “gaps” in the floral design.
Color theory plays a massive role in the visual impact of your Crochet Flower – Pattern. You can choose to use a single solid color for a modern, minimalist look, or experiment with variegated yarns that change hue automatically to mimic the natural gradients found in real gardens. Many crafters enjoy using a contrasting color for the center of the flower (the stamen) to create a “pop” that draws the eye toward the intricate handmade stitching.
Don’t overlook the importance of finishing tools like a sharp pair of scissors and a sturdy yarn needle when working on a Crochet Flower – Pattern. Since flowers are often small, you will have several yarn ends to weave in, especially if you change colors between the center and the petals. A high-quality tapestry needle allows you to hide these ends seamlessly, ensuring your crochet project looks professional from both the front and the back.
Stitch markers can be incredibly helpful when following a complex Crochet Flower – Pattern that involves multiple rounds. Because you are often working in small circles, it is easy to lose track of where a round begins or ends. Placing a marker in the first stitch of each round saves you the frustration of constant counting and ensures your petals are symmetrical and perfectly aligned according to the pattern instructions.
Lastly, consider the final application of your Crochet Flower – Pattern before you finish your work. If you plan to turn your flower into a brooch or hair clip, you will need floral wire or metal findings. If the flower is destined for a garment, leave a long “tail” of yarn after your final knot. This extra length makes it much easier to sew the finished crochet applique onto your fabric without needing to attach extra thread later.
The most common stitch you will encounter in a Crochet Flower – Pattern is the chain stitch, which serves as the starting point for almost every petal. Chains are used to create the “height” of a petal or to bridge the gap between different sections of the flower. Mastering the tension of your chains is essential, as tight chains can cause your yarn petals to pucker, while loose chains may make the flower look unfinished.
Slip stitches are the secret weapon of any Crochet Flower – Pattern, primarily used to join rounds or to move the yarn across the work without adding height. In floral designs, the slip stitch is often used at the end of a petal to pull the yarn back down to the center ring. This creates the characteristic “dip” between petals that gives the crochet rose or daisy its recognizable and organic silhouette.
To add volume and length to your petals, a Crochet Flower – Pattern will often call for double crochet (dc) or treble crochet (tr) stitches. These taller stitches allow you to create fan-shaped petals that fan out from the center. By placing multiple tall stitches into a single space—a technique known as a “shell”—you can create the lush, ruffled effect seen in more advanced layered crochet patterns.
The “Magic Ring” or “Magic Circle” is a game-changing technique for starting any Crochet Flower – Pattern. Unlike the traditional method of chaining and joining into a ring, the magic circle can be pulled tight to completely close the hole in the center of your flower. This results in a much cleaner, more professional-looking crochet center that is perfect for flowers where you want a solid, dense middle section.
Single crochet (sc) stitches are frequently used in the outer rounds of a Crochet Flower – Pattern to provide a sturdy border. Some patterns use the single crochet to create “points” on the ends of petals, such as those found on a crochet lily or star-shaped blossom. Understanding how to transition between short and tall stitches is the key to mastering the geometry of crochet flowers and achieving a natural look.
Finally, many variations of the Crochet Flower – Pattern utilize the “Picot Stitch” for a decorative, lacy finish. A picot is a small loop made of chains that sits on top of a stitch, mimicking the tiny jagged edges or “teeth” found on the petals of certain wildflowers. Adding this small detail can elevate a simple beginner crochet pattern into something that looks intricate, high-end, and expertly crafted.
One of the most popular ways to utilize a completed Crochet Flower – Pattern is as a fashion accessory. You can easily attach a finished flower to a plain headband, hat, or scarf to instantly add a touch of “Boho-chic” style. These crochet embellishments are particularly popular for children’s clothing, providing a soft, safe, and colorful decoration that is much more durable than store-bought plastic ornaments.
Home decor is another fantastic outlet for your Crochet Flower – Pattern creations. Imagine a set of crochet sunflowers used as napkin rings for a summer dinner party, or a collection of lavender sprigs placed in a vase. Because these everlasting yarn flowers don’t require water or sunlight, they are perfect for brightening up dark corners of a room or adding a cozy, “cottagecore” vibe to a bookshelf.
If you enjoy making larger projects, the Crochet Flower – Pattern can be the building block for a spectacular floral blanket. By sewing dozens of individual flowers onto a mesh background or joining them together “join-as-you-go” style, you can create a 3D garden afghan. This type of textural crochet work is highly prized in the crafting community for its complexity and the sheer amount of effort and love poured into every stitch.
Giving a gift adorned with a Crochet Flower – Pattern makes the occasion even more special. Instead of using a disposable plastic bow, you can tie a handmade crochet flower onto the ribbon of a birthday or wedding gift. This gives the recipient a “gift on top of a gift” that they can keep and reuse as a keychain or ornament, showcasing the thoughtfulness behind your DIY gift wrapping.
Jewelry making is a sophisticated way to apply the Crochet Flower – Pattern. By using very thin lace weight yarn or embroidery floss and a tiny hook, you can create miniature blossoms that work beautifully as earrings or delicate necklaces. These micro-crochet flowers are incredibly trendy and allow you to wear your hobby in a subtle, elegant way that often leaves people wondering if the flowers are actually real.
Lastly, you can use the Crochet Flower – Pattern to support charitable causes. Many organizations collect crochet flowers to create “comfort blankets” for hospitals or to sell at fundraisers. Participating in these community projects allows you to use your crochet skills for a good cause, proving that a simple yarn blossom can have a significant positive impact on someone’s life while you enjoy your favorite hobby.
A common issue when working through a Crochet Flower – Pattern is the flower “cupping” or “rippling” unintentionally. If your flower looks like a bowl, you likely have too few stitches in your outer rounds; if it ripples like a wave, you probably have too many. Checking your stitch count against the pattern guide at the end of every round is the best way to ensure your flower stays flat and symmetrical.
If your petals look “gappy” or loose, it might be time to check your tension. In a Crochet Flower – Pattern, consistent tension is what gives the flower its professional finish. If you find you are a naturally loose crocheter, try using a smaller hook size than the pattern recommends. This will pull the stitches closer together, resulting in a dense crochet fabric that looks much more like a real, solid flower petal.
Changing colors can sometimes leave unsightly “steps” in a Crochet Flower – Pattern. To avoid this, use the “invisible join” method or finish your last stitch of one color with the first loop of the new color. This technique creates a seamless transition that is vital for multi-colored crochet flowers, ensuring that the color changes look intentional and smooth rather than jagged or messy.
Sometimes, the center of the flower can bulge outward. This often happens if the initial ring of your Crochet Flower – Pattern is too crowded with stitches. If this occurs, try starting with a slightly larger magic ring or reducing the number of stitches in the first round. Finding the right balance in the crochet foundation is key to making sure the rest of the petals lie in a beautiful, flat plane.
Blocking is a secret step that can transform a “good” Crochet Flower – Pattern into a “great” one. Blocking involves lightly wetting your finished flower and pinning it into the desired shape until it dries. For flowers with pointed petals, blocking is essential to “set” those points so they don’t curl back. Using a bit of fabric stiffener during the blocking process can also help ornamental crochet flowers maintain their shape forever.
If you ever feel frustrated by a specific Crochet Flower – Pattern, remember that practice is part of the process. Every “mistake” is actually a learning opportunity that improves your hand-eye coordination and your understanding of stitch anatomy. The joy of floral crochet is that even an imperfect flower has a certain natural charm—after all, no two flowers in nature are exactly alike, and your handmade version shouldn’t have to be either.
Yes! Many Crochet Flower – Pattern variations are designed specifically for beginners. They usually involve basic stitches like the single crochet and double crochet. Starting with a simple five-petal daisy is a fantastic way to build confidence before moving on to more complex, multi-layered floral designs.
100% cotton yarn is generally considered the best choice for a Crochet Flower – Pattern. It has no “fuzz,” which makes the stitches look very crisp and clear. It also provides a sturdy structure that helps the petals maintain their shape better than wool or acrylic blends.
The easiest way to attach a flower from a Crochet Flower – Pattern is to leave a long yarn tail when you finish. You can then use a yarn needle to sew the flower onto a hat, bag, or blanket. For non-fabric items like hair clips, a small amount of hot glue or fabric glue works perfectly.
Absolutely! You can scale a Crochet Flower – Pattern simply by changing your yarn weight and hook size. To make a larger flower, use bulky yarn and a large hook; to make a tiny miniature, use embroidery thread and a very small steel hook. The pattern logic remains the same.
Curling often happens if your tension is too tight or if the Crochet Flower – Pattern has too many stitches for the space available. Try relaxing your grip or lightly “blocking” the flower with steam once it is finished to flatten the petals out and reveal the true shape of the design.
Depending on the complexity of the Crochet Flower – Pattern, a single flower can take anywhere from 5 to 20 minutes. This makes them the perfect “quick-win” project for busy crafters who want to see immediate results or for those who want to crochet while watching a movie.
In this article, we have journeyed through the enchanting world of the Crochet Flower – Pattern, exploring everything from the essential materials and fundamental stitches to creative uses and troubleshooting tips. We learned that while the process is simple enough for beginners, the possibilities for customization and application are truly endless.
By mastering the Crochet Flower – Pattern, you have gained a valuable skill that allows you to add a touch of handmade beauty to your wardrobe, your home, and your gifts. Whether you are creating a single rose or an entire bouquet, the art of crochet allows you to capture the essence of nature in a way that lasts a lifetime.


