Crochet Hat With Cat - Pattern

Crochet Flower – Pattern is one of the most rewarding projects you can undertake, whether you are a seasoned crafter or a curious beginner looking to add a splash of color to your life. There is something profoundly satisfying about taking a simple ball of yarn and a single metal hook and transforming them into a delicate, blooming piece of art that never wilts. These handmade blossoms serve as the perfect introduction to the world of fiber arts, allowing you to practice essential stitches while creating something beautiful in a very short amount of time.
In the world of modern DIY decor, the Crochet Flower – Pattern has seen a massive resurgence in popularity because of its incredible versatility and the “cottagecore” aesthetic that many find comforting. You can use these floral creations to embellish hats, scarves, and sweaters, or even string them together to create stunning home garlands and wall hangings. Because they require very little yarn, they are also the ultimate “scrap-buster” project, ensuring that none of your precious materials go to waste while you hone your craft.
Understanding a Crochet Flower – Pattern is about more than just following steps; it is about learning the language of texture and geometry. Each petal is a series of increases and decreases that mimic the organic flow of nature, translated into loops of thread. As we dive into this guide, we will explore the fundamental terms, the tools you need, and the step-by-step logic required to master this timeless craft. By the end of this article, you will have the confidence to create an entire garden of yarn-based delights.

When you first look at a Crochet Flower – Pattern, the terminology might seem a bit like a secret code, but it is actually quite logical once you break it down. The primary term, Crochet, refers to the process of creating textiles by using a hook to interlock loops of yarn, thread, or strands of other materials. Unlike knitting, which uses two needles, this craft focuses on one active loop at a time, making it exceptionally easy to “sculpt” 3D shapes like flowers.
The second half of our focus, the Flower, represents the specific botanical shape we are aiming to replicate using various stitch heights. In the context of a Crochet Flower – Pattern, a flower is usually constructed in rounds, starting from a central point (the pistil) and working outward to create the petals. Different types of yarn, such as cotton or acrylic, can drastically change the look of your flower, from rustic and matte to shiny and elegant.
A Pattern is essentially the blueprint or the set of instructions that guides you through the creation process from start to finish. It acts as a map, telling you exactly which stitches to place where, ensuring that your finished product looks exactly like the design intended. For a Crochet Flower – Pattern, this includes a list of required materials, a key for abbreviations, and a step-by-step breakdown of each round of stitching.
The beauty of following a professional Crochet Flower – Pattern is the consistency it provides for your projects. If you want to make ten identical daisies for a blanket, the pattern ensures that each one is the same size and tension. It also introduces you to specialized techniques like the “Magic Ring,” which allows you to start your flower with a center that can be pulled tight, leaving no hole in the middle.
Mastering a Crochet Flower – Pattern also involves understanding stitch height, which is what gives petals their rounded or pointed shapes. By transitioning from a short stitch like a single crochet to a taller stitch like a double or triple crochet, you create the natural curve of a petal. This manipulation of height is the “secret sauce” that makes yarn look like a delicate organic bloom rather than just a flat circle.
Finally, keep in mind that a Crochet Flower – Pattern is often highly customizable depending on your personal style and intended use. Once you understand the base instructions, you can change the yarn weight or hook size to scale the flower up for a pillow or down for a pair of dainty earrings. This flexibility is why floral patterns remain a staple in the repertoire of every creative person working with textiles today.
Before you begin working on your Crochet Flower – Pattern, you must gather the right tools to ensure a smooth and enjoyable experience. The hook is your most important ally; for most floral patterns, an ergonomic hook in the 3.5mm to 5.0mm range is standard. Choosing a hook that feels comfortable in your hand will prevent fatigue, especially if you plan on making a large bouquet of crochet blossoms.
The yarn selection for your Crochet Flower – Pattern significantly impacts the final “vibe” and durability of the piece. Mercerized cotton is a top choice for flowers because it has a slight sheen and excellent stitch definition, which makes the petals pop. If you prefer a softer, fuzzier look, a wool blend or high-quality acrylic can provide a cozy feel that works beautifully for clothing embellishments or winter accessories.
Don’t forget the “notions” or small accessories that make the Crochet Flower – Pattern easier to execute. You will need a pair of sharp embroidery scissors for clean cuts and a darning needle (also called a tapestry needle) to weave in your ends. Weaving in the yarn tails is a crucial step to ensure your flower doesn’t unravel over time, especially if it will be handled or washed frequently.
A stitch marker can also be incredibly helpful when working on a Crochet Flower – Pattern, particularly during the first few rounds. Since flowers are worked in circles, it is easy to lose track of where a round begins or ends. Placing a marker in the first stitch of the round allows you to focus on your tension and technique rather than constantly counting your stitches in your head.
Lighting and ergonomics play a subtle but vital role in how your Crochet Flower – Pattern turns out. Working in a well-lit area ensures you can see the individual loops clearly, which prevents mistakes and uneven stitches. Sitting in a comfortable chair with good back support will allow you to get into a “flow state,” making the repetitive motions of the hook feel like a form of meditation.
Lastly, it is always a good idea to have a notebook nearby when starting a new Crochet Flower – Pattern. You might want to jot down which yarn brand and colorway you used, or perhaps note a specific modification you made to the petals. Building a library of your own notes will help you replicate your favorite designs in the future and allow you to track your progress as a growing artist.
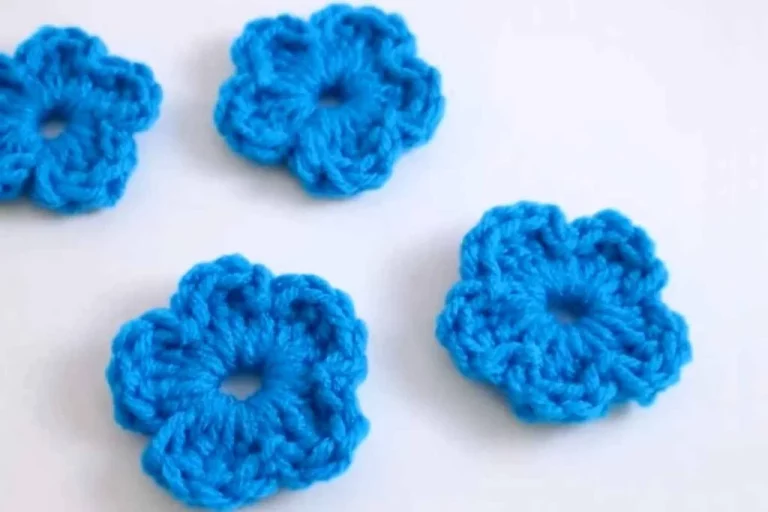
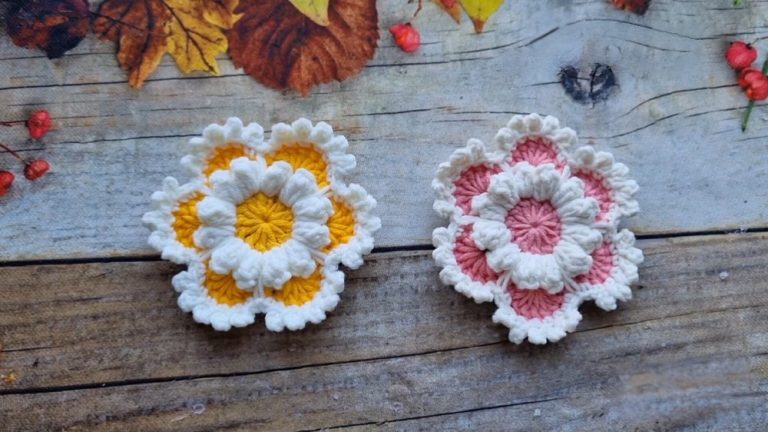
To start your Crochet Flower – Pattern, you will typically begin with a “Magic Ring” or a small chain loop of four stitches joined with a slip stitch. This creates the foundation for the center of the flower. In the first round, you will usually work several single crochet stitches into this center ring. This creates a sturdy “eye” for the flower, which can be done in a contrasting color to mimic the pollen-heavy center of a real daisy or sunflower.
The second round of your Crochet Flower – Pattern is where the magic happens, as you begin to set the stage for the petals. Usually, this involves a series of “increases,” where you put two stitches into every single stitch from the previous round. This expands the diameter of the circle and provides enough “real estate” for the petals to grow without the work curling or puckering.
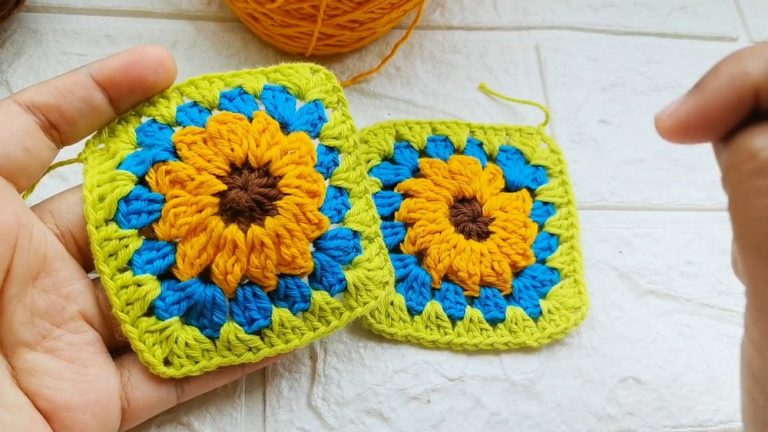
Now, we move into the petal construction phase of the Crochet Flower – Pattern. Most patterns follow a sequence such as: (Slip stitch, half-double crochet, double crochet, double crochet, half-double crochet, slip stitch) all within the same space or across two spaces. This sequence creates the rise and fall of a petal’s edge. Repeating this sequence around the entire circumference will yield a beautiful, symmetrical flower that looks professionally made.
Tension is the most important factor during this stage of the Crochet Flower – Pattern. If you pull the yarn too tight, the petals will look cramped and small; if you hold it too loosely, the flower might look floppy and lose its shape. Aim for a consistent, moderate tension that allows the hook to pass through the loops easily but keeps the fabric firm enough to stand on its own.
Changing colors is a fantastic way to make your Crochet Flower – Pattern stand out. By switching to a new color at the start of the petal round, you create a vibrant contrast that draws the eye. To do this seamlessly, finish the last pull-through of the previous round with the new color. This technique ensures a clean transition that keeps the geometry of the flower looking sharp and intentional.
Once the final petal is complete, you finish the Crochet Flower – Pattern by “fastening off” the yarn. Leave a tail of about six inches, which gives you plenty of length to weave back into the back of the flower. This hidden tail keeps the work secure. If you plan to sew the flower onto a garment, you can leave a longer tail (about 12 inches) to use as your sewing thread, ensuring a perfect color match.
Once you have mastered the Crochet Flower – Pattern, you will likely find yourself with a surplus of yarn blossoms. One of the most popular uses is creating “3D Wall Art.” By mounting various sizes and colors of flowers onto a canvas or inside a shadow box, you can create a stunning piece of home decor that adds texture and warmth to any room. It’s a great way to showcase your skills to guests.
Another excellent application for your Crochet Flower – Pattern creations is fashion customization. A simple denim jacket or a plain tote bag can be completely transformed with a few strategically placed floral appliqués. You can sew them onto the lapels, around the pockets, or even create a cluster of flowers on the shoulder. It’s an easy way to breathe new life into old clothes while expressing your unique style.
For those who love organizing, use your Crochet Flower – Pattern to make decorative “cord ties” or “curtain tie-backs.” By attaching the flower to a simple braided chain of yarn, you create a functional and beautiful accessory. These small touches make a house feel like a home and serve as a constant reminder of your creative capabilities. They also make wonderful, thoughtful gifts for friends and family.
Holiday decorating is another area where the Crochet Flower – Pattern shines. You can make white and silver flowers for a winter theme, or bright oranges and yellows for a fall garland. Because they are lightweight and unbreakable, they are perfect for households with pets or small children. You can even add a small loop of thread to the back to turn them into unique Christmas tree ornaments.
If you are interested in jewelry making, try using a very thin thread and a tiny hook with your Crochet Flower – Pattern. This allows you to create miniature flowers that can be stiffened with a bit of fabric glue and attached to earring hooks or necklace bails. Handcrafted lace-style jewelry is incredibly trendy and allows you to wear your art wherever you go, sparking conversations and compliments.
Finally, consider using your Crochet Flower – Pattern skills for charity. Many hospitals and shelters accept handmade donations. A “pocket hug” (a small flower with a nice note) or a floral-embellished baby blanket can bring immense comfort to someone going through a difficult time. The act of creating something beautiful for others is perhaps the most fulfilling way to use your talent, turning your hobby into a force for good.
1. Is it hard to learn a Crochet Flower – Pattern if I am a total beginner?
Not at all! Many floral patterns are designed specifically for beginners because they are small and use basic stitches. If you can make a chain and a single crochet, you can likely complete a simple flower in less than twenty minutes.
2. What type of yarn is best for a Crochet Flower – Pattern?
Cotton yarn is generally considered the gold standard for flowers because it holds its shape well and has great stitch definition. However, you can use any yarn you have on hand, provided you use the corresponding hook size.
3. How do I make my flowers look more realistic?
To achieve a more natural look, try using variegated yarn (yarn with multiple colors) or “blocking” your finished flowers. Blocking involves pinning the flower to a foam board and lightly steaming it to set the petals in a specific position.
4. Can I wash items that have a Crochet Flower – Pattern attached to them?
Yes, but you should check the care label on your yarn. Most cotton and acrylic flowers can be machine-washed on a gentle cycle, but it is often better to air dry them to ensure the petals maintain their shape over time.
5. Why are my flower petals curling inward?
This is usually caused by tension that is too tight. Try relaxing your grip on the hook or moving up to a slightly larger hook size. It can also happen if you miss an increase stitch in the foundation rounds.
6. How many flowers can I make from one skein of yarn?
Depending on the size of the Crochet Flower – Pattern and the yardage of the skein, you can often make dozens of flowers from a single ball of yarn. This makes it a very cost-effective hobby!
In this guide, we have explored the wonderful world of the Crochet Flower – Pattern, from understanding the basic terminology to executing the stitches and finding creative ways to use your finished pieces.
We learned that crochet is an accessible and versatile art form, that the flower is a perfect project for any skill level, and that a well-written pattern is the key to achieving professional results. Whether you are making these for yourself, for gifts, or for charity, the joy of creating something by hand is unmatched.