
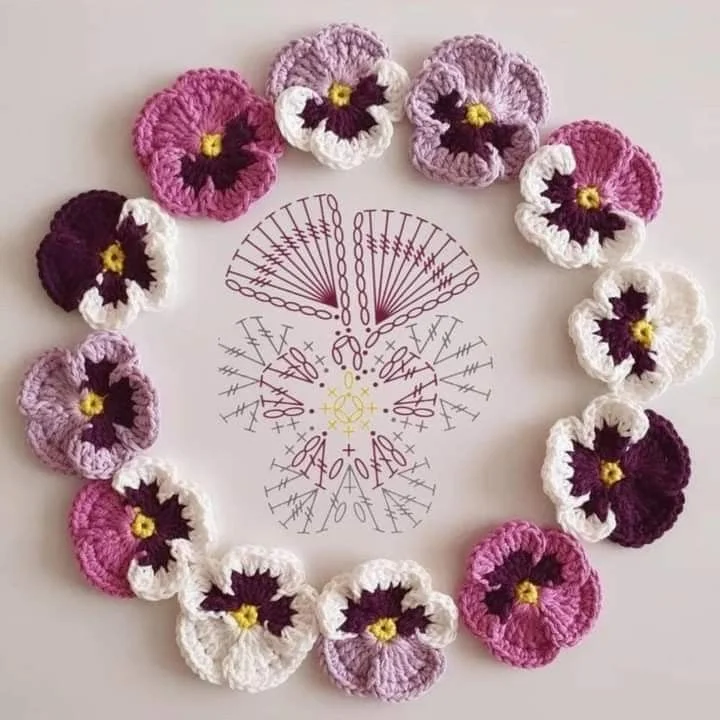
Lily in Crochet - Pattern

The Crochet flowers – Pattern is one of the most versatile and joyful projects a fiber artist can undertake, offering an endless array of possibilities for customization and creative expression. There is something deeply satisfying about taking a simple strand of yarn and transforming it into a delicate, blooming petal that will never wither or fade. These handmade floral motifs serve as the perfect introduction to the craft for beginners, while providing experienced crocheters with a quick, “instant-gratification” project that can be used to embellish everything from sun hats and sweaters to home decor items like pillows and blankets.
Finding the right Crochet flowers – Pattern can feel like stepping into a vast botanical garden of possibilities, ranging from simple five-petal daisies to complex, multi-layered roses and realistic lilies. The beauty of these yarn blossoms lies in their adaptability; by simply changing your yarn weight or hook size, you can create a tiny micro-flower for a pair of earrings or a giant sunflower to serve as a centerpiece for a table. This creative crochet project allows you to experiment with colors that may not exist in nature, giving you the freedom to “grow” a garden of neon pink tulips or shimmering metallic violets.
When you decide to work on a Crochet flowers – Pattern, you are also embracing a fantastic way to use up those small “scraps” of yarn that are too precious to throw away but too short for a full scarf or sweater. Because most flowers require only a few yards of thread, they are the ultimate “stash-buster” project. In this guide, we will explore the best fibers for floral work, the essential stitches needed to create realistic crochet petals, and the various ways to assemble your blooms into stunning arrangements. Let’s dive into the colorful world of everlasting crochet blossoms and discover how to make your projects truly flourish.
The first step in successfully following a Crochet flowers – Pattern is selecting a yarn that offers the right amount of “stitch definition.” For beginners, a 100% mercerized cotton yarn is highly recommended because it has a smooth, slightly shiny finish that makes the individual petals look crisp and well-defined. Cotton also holds its shape much better than acrylic or wool, which is essential if you want your handmade flowers to stand upright rather than drooping. A “DK” (double knitting) or “Sport” weight yarn is usually the sweet spot for creating medium-sized blooms that are neither too bulky nor too fiddly.
If you are aiming for a more delicate or vintage look with your Crochet flowers – Pattern, you might want to try “crochet thread” (size 10 or 20). Working with thread and a very small steel hook allows you to create intricate lace flowers that look like fine jewelry. These are perfect for wedding accessories, delicate hair pins, or even as appliqués on formal wear. While thread crochet requires a bit more patience and better lighting, the results are incredibly refined and demonstrate a high level of artisan craftsmanship that is hard to replicate with thicker yarns.
Texture also plays a vital role in the realism of your Crochet flowers – Pattern. For example, using a slightly “fuzzy” mohair yarn can mimic the soft, velvety texture of a pansy or a dusty miller leaf. Alternatively, a yarn with a slight metallic thread can add a “morning dew” effect to your crochet roses. Mixing different fibers within a single bouquet is a great way to add visual depth and interest, making your yarn garden feel more organic and diverse. Always consider how the fiber will interact with the light in the room where the decoration will be placed.
The choice of hook is just as critical as the yarn when working on a Crochet flowers – Pattern. Generally, it is best to use a hook size that is slightly smaller than what is recommended on the yarn label. This creates tight, firm stitches that prevent the stuffing (if you are making 3D flowers) from showing through and helps the petals maintain their structural integrity. An ergonomic crochet hook is a great investment if you plan on making a whole bouquet, as the repetitive motions of floral work can sometimes lead to hand fatigue over long periods of time.
Color selection is where the Crochet flowers – Pattern truly becomes personal. You can choose to follow “nature’s rules” by using realistic greens, yellows, and reds, or you can go “avant-garde” with variegated yarns that change colors mid-petal. Variegated yarn is particularly effective for flowers like carnations or hydrangeas, where natural color shifts are common. If you are making a set of flowers to match a specific outfit, bringing a swatch of the clothing to the yarn store can help you find the perfect tonal match for your floral accessory.
Finally, don’t forget the importance of “notions” when preparing for your Crochet flowers – Pattern. You will need a sharp pair of embroidery scissors, a large-eyed tapestry needle for weaving in ends, and perhaps some floral wire if you intend to give your flowers stems. Some makers also use “fabric stiffener” or a simple sugar-water solution to give their petals extra rigidity. Having these essential crochet tools ready before you start will make the process much smoother and allow you to focus entirely on the beauty of your growing fiber art.
The foundation of almost every Crochet flowers – Pattern is the “Magic Ring” (also known as the Magic Circle). This technique allows you to start your flower with a perfectly closed center, eliminating the unsightly hole that often occurs when starting with a chain-loop. Learning the Magic Ring technique is a game-changer for any floral project, as it ensures the “stamen” of your flower looks professional and tight. It provides a sturdy base from which your petals can radiate outward in a symmetrical and balanced fashion.
To create the “curved” edges found in a Crochet flowers – Pattern, you will often use a combination of stitches with varying heights in a single petal. For instance, starting a petal with a “Single Crochet,” moving up to a “Half-Double Crochet,” peaking with a “Double Crochet,” and then working back down creates a perfect teardrop petal shape. Mastering this “gradient of stitch heights” is the secret to creating realistic crochet flora that mimics the organic shapes found in the natural world. It adds a level of dimensionality that flat stitches simply cannot achieve.
The “Picot Stitch” is another vital tool for your Crochet flowers – Pattern toolkit. A picot is a tiny loop made of three chains that creates a pointed tip at the end of a petal. This is especially useful when making crochet lilies or sunflowers, where the petals have a distinct point. These small details may seem insignificant, but they are what provide the “character” to your crochet motifs, transforming a simple circle of yarn into a recognizable botanical specimen that displays your attention to detail.
Many complex Crochet flowers – Pattern designs utilize “Front Post” or “Back Post” stitches to create layers. By working into the “posts” of a previous row, you can create a second or third layer of petals that sits behind or in front of the first. This layered crochet technique is how you achieve the lush, full look of a marigold or a many-petaled rose. It adds “heft” and a 3D quality to your work, making the crochet blossom look much more substantial and high-end than a flat appliqué.
“Increasing and Decreasing” are the mechanics that allow you to fold and ruffle your Crochet flowers – Pattern. For example, putting multiple double crochets into a single stitch will cause the fabric to “wave” or ruffle, which is perfect for a crochet carnation or poppy. On the other hand, decreasing stitches allows you to “cup” the flower, creating a bell-like shape suitable for lily of the valley or bluebells. Understanding how stitch count affects the “flow” of the fabric is key to customizing any floral crochet design.
Finally, the “Slip Stitch” is the unsung hero of the Crochet flowers – Pattern. It is used to join rounds, move yarn across a petal without adding height, and create “veining” on the surface of leaves. Adding a round of surface slip stitches in a contrasting color can simulate the delicate veins of a leaf or the edges of a variegated petal. These finishing stitches are the “ink lines” of your yarn drawing, providing the final definition that makes your crochet artwork truly pop against any background.
Once you have finished your Crochet flowers – Pattern pieces, the fun of assembly begins. If you want to create a long-lasting bouquet, you can “mount” your flowers onto green floral wire. By wrapping the wire in green yarn or floral tape and securing it to the base of the flower, you create a poseable stem. These everlasting crochet bouquets are popular gifts for hospital patients (where real flowers are often restricted) or as a “sustainable” alternative to fresh flowers for home decor that never wilts.
A popular use for the Crochet flowers – Pattern is as a “fashion appliqué.” You can sew a single large flower onto a denim jacket, a plain headband, or even a pair of flip-flops. Because they are made of yarn, these floral embellishments are soft, washable, and durable. For a coordinated look, try making a “set” of flowers in different sizes using the same yarn to decorate a matching hat and scarf. It adds a bespoke, artisanal touch to your wardrobe that you simply cannot find in mass-produced fashion.
In home decor, the Crochet flowers – Pattern can be used to create stunning “floral garlands.” By stringing your blooms along a length of twine or a crocheted chain, you create a whimsical decoration for a nursery, a mantelpiece, or a wedding arch. You can alternate between crochet flowers and leaves to create a lush, leafy vine. These garlands are a fantastic way to celebrate the seasons, using bright yellows for spring and deep burgundies for autumn, keeping your home atmosphere fresh and vibrant.
“Shadow Box Art” is another sophisticated way to display the results of your Crochet flowers – Pattern. By mounting various 3D flowers onto a fabric backing inside a deep frame, you create a piece of textile wall art. This protects the delicate stitches from dust and creates a beautiful “specimen” display. You can even include crochet butterflies or bees to add a touch of whimsy to the scene. It turns your “craft” into a formal piece of art that can be proudly displayed in any room of the house.
For those who love “pincushions,” the Crochet flowers – Pattern offers a functional and beautiful solution. A large, multi-layered rose or cactus flower can be stuffed firmly with polyester fiberfill to serve as a decorative pincushion. Not only does it keep your sewing pins organized, but it also brightens up your craft space. This is a perfect example of “utility meeting beauty,” where a handmade crochet item serves a practical purpose while remaining a joy to look at every day.
Finally, consider using your Crochet flowers – Pattern for “gift wrapping.” Instead of a plastic bow, tie a small crochet daisy onto the ribbon of a birthday or holiday gift. It adds a “personal signature” to your presents and gives the recipient a bonus gift that they can keep and reuse as a brooch or an ornament. This thoughtful gifting strategy shows the recipient that you took the extra time to create something unique just for them, embodying the spirit of the “slow-made” movement.
To ensure your Crochet flowers – Pattern projects stay beautiful for years, proper care is essential. Since most are made of cotton or acrylic, they can be “spot cleaned” with a damp cloth if they accumulate dust. If your crochet blooms are not mounted on wire, they can often be placed in a mesh laundry bag and washed on a gentle cycle. However, hand-washing in cool water is always the safest method to prevent the petals from losing their shape or the yarn from “pilling” over time.
Dust is the primary enemy of “display” Crochet flowers – Pattern items. A quick blast from a hair dryer on the “cool” setting is an effective way to remove dust without damaging the fibers. For more stubborn dust, a soft-bristled makeup brush can be used to “paint” the dust off the petals and leaves. Keeping your crochet arrangements out of direct sunlight will also prevent the colors from fading, ensuring that your “red” roses stay vibrant and don’t turn into a dull pink after a few months.
If your Crochet flowers – Pattern pieces start to look a bit “limp,” they may need to be “re-blocked.” This involves dampening the flower and pinning the petals into the desired shape until they dry. For extra-crisp flowers, a light spray of fabric starch can work wonders. This is especially helpful for flowers used as jewelry or hair accessories, where you want the petal edges to remain sharp and distinct despite frequent handling and wear.
Storage of your Crochet flowers – Pattern items should be handled with care. Never squish them into a tight box, as this can permanently crease the yarn and ruin the 3D effect. Instead, store them in a large, sturdy container where they have “room to breathe.” If you have a collection of seasonal crochet flowers, wrapping them individually in acid-free tissue paper will keep them pristine until the next year. This mindful storage protects your hard work and preserves the “magic” of the blossoms.
If you made your Crochet flowers – Pattern with natural fibers like wool, you must be wary of moths. Storing them with cedar blocks or lavender sachets is a natural way to deter pests. Checking your fiber art periodically for any signs of wear or “stray threads” allows you to make quick repairs before a small problem becomes a large one. A well-maintained crochet garden can last a lifetime, becoming a cherished family heirloom passed down through generations.
Lastly, remember that the “imperfections” in your Crochet flowers – Pattern are what make them unique. Unlike plastic flowers, no two hand-stitched blooms are exactly alike, much like in nature itself. Embrace the slight variations in your tension or the way a petal curls—it adds “soul” to your work. The process of nurturing a crochet project from a single loop to a full blossom is a rewarding journey that celebrates the beauty of growth, patience, and the human touch in an increasingly digital world.
Is a Crochet flowers – Pattern suitable for total beginners?
Absolutely! Many Crochet flowers – Patterns consist of only one or two rounds, making them the perfect “practice” project for learning new stitches. Small flowers allow you to see your progress quickly, which is incredibly encouraging for someone just starting their crochet journey.
How do I choose the best hook size for flowers?
For floral work, you generally want a “tighter” fabric. If the yarn label suggests a 4.0mm hook, try using a 3.5mm or even a 3.0mm hook. This ensures your crochet petals are sturdy and don’t have large gaps, resulting in a more professional-looking and durable finished product.
Can I use any type of yarn for these flowers?
While you can use almost any yarn, cotton is the most popular because of its stability and definition. However, don’t be afraid to experiment with silk for a luxurious shine or wool for a cozy, rustic feel. The “best” yarn depends entirely on the aesthetic look you want for your specific project.
How do I make the stems for my crochet flowers?
The most common way is using 18-gauge floral wire. You can either crochet around the wire or wrap the wire in yarn, using a bit of fabric glue at the ends to secure it. This gives your Crochet flowers – Pattern a realistic height and allows you to “arrange” them in a vase just like real flowers.
What is the “Magic Ring” and why is it used?
The Magic Ring is a way to start crocheting in the round that allows you to pull the center hole completely shut. In a Crochet flowers – Pattern, this is vital for the center of the bloom to look neat and realistic. It is much more effective than the “chain-4 and join” method used in older patterns.
How many flowers can I make from one skein of yarn?
Because flowers are small, a single 50g skein of yarn can often produce 20 to 50 medium-sized flowers. This makes the Crochet flowers – Pattern one of the most cost-effective projects in the fiber arts, providing hours of entertainment and a “prosperous” amount of decor for a very small investment.
In conclusion, the Crochet flowers – Pattern is a delightful gateway into a world of endless creativity and color. We have explored the importance of choosing high-definition cotton yarns, the technical mastery of stitches like the Magic Ring and Picot, and the countless ways to use your finished blooms—from boutique fashion appliqués to stunning “shadow box” wall art.
By learning to “sculpt” with your hook through varying stitch heights and layering techniques, you can create a diverse yarn garden that reflects the beauty of the natural world without the worry of maintenance or wilting. Whether you are a beginner looking for a quick win or an expert seeking to add delicate details to a larger project, handmade crochet flowers are a rewarding and “everlasting” way to practice your craft.


