
Crochet Hat With Cat - Pattern

Creating a Crochet Hat With Cat – Pattern is one of the most rewarding projects for crafters of all skill levels, combining the cozy utility of headwear with the irresistible charm of feline aesthetics. Whether you are looking to make a whimsical gift for a friend or a stylish accessory for yourself, this specific design has taken the crafting world by storm due to its versatility and “cuteness factor.” In this comprehensive guide, we will explore everything you need to know about mastering this project, ensuring your finished piece looks professional, feels comfortable, and captures that perfect kitty silhouette.
The beauty of a Crochet Hat With Cat – Pattern lies in its simplicity; you don’t need to be a master artist to achieve a look that is both modern and playful. By using basic stitches and clever shaping, you can transform a simple beanie or rectangular “sack” hat into a piece of wearable art that features those iconic pointed ears. As we dive into the details, you will see how choosing the right yarn and hook size can drastically change the drape and texture of your Crochet Hat With Cat – Pattern, making it suitable for chilly winter mornings or breezy autumn walks.
In the world of DIY fashion, the Crochet Hat With Cat – Pattern stands out because it bridges the gap between costume wear and everyday streetwear. High-end boutiques and indie designers alike have embraced the “cat ear” trend, but nothing beats the satisfaction of hand-stitching your own version. Throughout this article, we will break down the essential terminology, the best materials to use, and the step-by-step logic required to complete your project. Let’s get started on your journey to creating the ultimate Crochet Hat With Cat – Pattern that will have everyone asking, “Where did you get that?”
When we talk about a Crochet Hat With Cat – Pattern, we are referring to a specific set of instructions that guides you through creating a head-covering featuring feline-inspired elements. This pattern is essentially your roadmap, detailing how many stitches to cast on, which rows to repeat, and where to place your increases or decreases. Most modern versions of this design utilize the “square top” method, where the ears naturally form when the hat is worn, or the “attached ear” method, where triangular pieces are sewn onto a finished beanie.
The Crochet Hat With Cat – Pattern is highly sought after because it is accessible to beginners. If you know how to do a foundation chain and a double crochet, you can likely finish this project in a single weekend. The pattern acts as a technical document that ensures your sizing is consistent, whether you are making a tiny version for a newborn or a slouchy version for an adult. Following a well-written pattern is crucial for maintaining the symmetry of the cat ears, which are the most defining feature of the garment.
In the context of this craft, the term Crochet Hat With Cat refers to the finished physical product. It is a category of “animal hats” that prioritizes the silhouette of a cat. To achieve the best results, your Crochet Hat With Cat should have a sturdy base so the ears don’t flop over. Many enthusiasts prefer using a medium-weight (worsted) yarn because it provides the structural integrity needed to keep the feline shape sharp and recognizable from a distance.
Precision is key when executing a Crochet Hat With Cat – Pattern. You must pay close attention to your “gauge,” which is the number of stitches per inch. If your gauge is too loose, the cat ears might look saggy; if it’s too tight, the hat won’t stretch comfortably over the head. A good pattern will always provide a gauge swatch instruction to help you calibrate your tension before you start the main body of the work.
Another important aspect of the Crochet Hat With Cat – Pattern is the assembly phase. Some designs are “seamless,” meaning they are worked in a continuous round, while others are worked flat and then seamed together. Choosing a pattern that matches your comfort level with a darning needle is important. If you dislike sewing, look for a “top-down” circular pattern that incorporates the ears into the final few rounds of the hat’s construction.
Finally, the Crochet Hat With Cat – Pattern allows for immense personalization. While the basic shape remains the same, you can experiment with “variegated yarns” to create a calico cat effect or use “fuzzy mohair” to mimic real fur. The pattern serves as the foundation, but your choice of color and texture is what truly brings the feline character to life. Always read through the entire pattern once before starting to ensure you have all the necessary supplies on hand.
The success of your Crochet Hat With Cat – Pattern depends heavily on the yarn you choose. For a classic look, a 100% acrylic yarn is often recommended because it is durable, machine washable, and holds its shape well—perfect for the upright ears of a Crochet Hat With Cat. However, if you want something softer and more luxurious, a wool-blend yarn offers excellent warmth and a more “organic” feel that mimics the softness of a real kitten.
When looking at your Crochet Hat With Cat – Pattern, check the recommended hook size. Usually, a 5.0mm (H) or 5.5mm (I) hook is the standard for this type of project. Using the correct hook ensures that the stitches are dense enough to prevent cold air from passing through, while still allowing the Crochet Hat With Cat to be flexible. If you tend to crochet tightly, you might want to go up half a size in your hook to ensure the hat has enough stretch.
Color choice is where the Crochet Hat With Cat – Pattern becomes truly fun. Traditional black or gray creates a sleek, “witchy” or minimalist vibe that pairs well with any outfit. Alternatively, bright neon colors or pastel pinks can turn your Crochet Hat With Cat into a bold statement piece. Some crafters even use a contrasting color for the “inner ear” portion to add depth and a realistic touch to the feline design.
Don’t forget the essential “notions” required by your Crochet Hat With Cat – Pattern. You will need a pair of sharp yarn scissors, a measuring tape, and a tapestry needle. Stitch markers are also incredibly helpful, especially if your pattern involves working in a spiral. Marking the first stitch of every round prevents you from losing your place and ensures that the cat ears are perfectly centered on the top of the head.
Texture also plays a role in the final aesthetic of the Crochet Hat With Cat. Using a “ribbed stitch” for the brim of the hat provides a snug fit around the forehead, preventing the hat from sliding down. Many patterns suggest a “Front Post Double Crochet” to create this ribbing. This technical detail not only improves functionality but also gives the Crochet Hat With Cat a professional, store-bought appearance.
Lastly, consider the weight of the yarn in relation to the season. A “chunky” or “bulky” yarn version of the Crochet Hat With Cat – Pattern will result in a very thick, warm hat that works great for sub-zero temperatures. For a spring-appropriate version, a lightweight “DK” (Double Knit) yarn can be used. Just remember that changing the yarn weight requires adjusting the pattern stitch count to ensure the hat still fits the intended wearer.
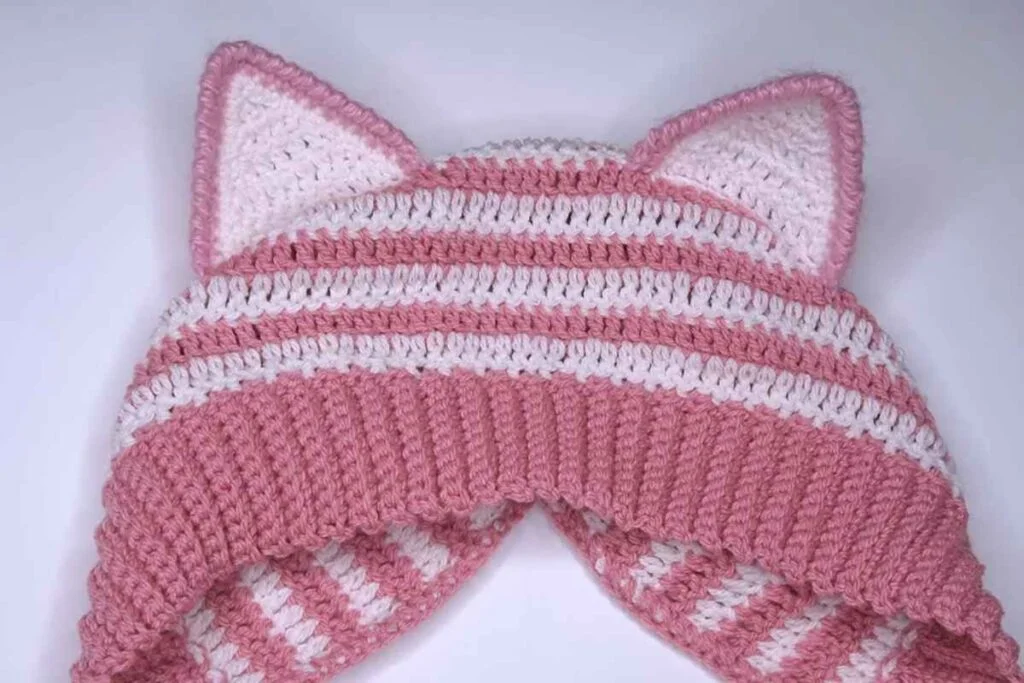
The most critical part of the Crochet Hat With Cat – Pattern is, unsurprisingly, the ears. There are two primary ways to create them. The first is the “Rectangle Method,” where you crochet a simple wide rectangle, fold it, and sew the sides. When you seam the top shut, the corners naturally poke up like cat ears when the hat is placed on a round head. This is the easiest version of a Crochet Hat With Cat for absolute beginners.
The second method involves the “Appliqué Technique.” In this version of the Crochet Hat With Cat – Pattern, you crochet the beanie first and then create two separate triangles. These triangles are then stuffed slightly or reinforced with a stiffer stitch and sewn onto the top. This allows for more precise ear placement and a more anatomical “kitty” look. It requires a bit more skill in terms of placement and “invisible seaming.”
To ensure your Crochet Hat With Cat looks balanced, use a ruler to measure the distance from the center of the hat to each ear. Symmetry is what makes the feline design recognizable. A common mistake in the Crochet Hat With Cat – Pattern is placing the ears too far down the sides, which can make them look more like bear ears or dog ears. They should sit high on the crown to give that alert, feline expression.
If your Crochet Hat With Cat – Pattern calls for pointed ears, you will likely use a series of “decreases.” By working two stitches together at the edges of your triangles, you taper the shape into a sharp point. Using a “slip stitch” around the edge of the finished ear can give it a clean, finished border. This small detail elevates the quality of your Crochet Hat With Cat and makes the edges look crisp.
For those who want to get creative, you can add “ear tufts” to your Crochet Hat With Cat – Pattern. By looping small strands of yarn through the very tip of the ears and brushing them out with a fine-tooth comb, you can create a Maine Coon or Lynx effect. This adds a touch of whimsical realism to the Crochet Hat With Cat that is sure to garner compliments and make your work stand out from basic designs.
Regardless of the method, always leave a long “tail” of yarn when you finish crocheting your ears. This tail is used to sew the ears onto the Crochet Hat With Cat. Using the same yarn for sewing as you did for the hat ensures the seam is invisible. Thread your tapestry needle and use a “whip stitch” or “mattress stitch” to securely fasten the ears so they can withstand daily wear and washing without tilting.
Once the main structure of your Crochet Hat With Cat – Pattern is complete, it’s time for the finishing touches. “Weaving in your ends” is a vital step that many beginners overlook. Use your tapestry needle to hide all loose yarn tails inside the stitches on the interior of the hat. This prevents the Crochet Hat With Cat from unraveling and ensures a smooth, comfortable fit against the skin without any itchy knots.
Blocking your finished Crochet Hat With Cat can also make a huge difference in the final look. Blocking involves wetting the hat slightly and pinning it into the correct shape until it dries. This process evens out the tension of your stitches and makes the Crochet Hat With Cat – Pattern look much more polished. It is especially helpful if your yarn is a natural fiber like wool or cotton, which responds well to moisture shaping.
If you want your Crochet Hat With Cat to have more personality, consider adding a face. You can use embroidery thread to stitch a simple nose and whiskers onto the front of the hat. Some people even use safety eyes or buttons, though if you are making the hat for a small child, embroidery is much safer to avoid choking hazards. This turns your Crochet Hat With Cat – Pattern into a full character piece.
Another popular modification for the Crochet Hat With Cat – Pattern is adding a lining. If you live in an extremely cold climate, sewing a fleece lining inside the crochet shell makes the hat incredibly warm and windproof. While this isn’t usually included in a standard crochet pattern, it is a simple upgrade that adds a lot of value to the Crochet Hat With Cat, making it a premium winter accessory.
Don’t be afraid to experiment with “stitch definition.” A Crochet Hat With Cat – Pattern worked in “half-double crochet” will be softer and more pliable, while one worked in “single crochet” will be denser and warmer. You can also try “waffle stitches” or “basketweave stitches” for the body of the hat to give it a unique texture that contrasts with the smooth surface of the cat ears.
Finally, remember that the Crochet Hat With Cat – Pattern is a starting point for your creativity. You can add bows, bells, or even a small “fish” charm to the brim to enhance the feline theme. The goal is to create a Crochet Hat With Cat that reflects your style. Once you have mastered the basic pattern, you can produce these hats in various colors and sizes, making them a staple in your handmade wardrobe or a top-seller in your craft shop.
What is the best yarn for a Crochet Hat With Cat – Pattern?
The best yarn is usually a medium-weight (Level 4) acrylic or wool blend. Acrylic is preferred for its ability to hold the shape of the ears, while wool provides extra warmth. Avoid very “drapey” yarns like silk or bamboo for the ears, as they may not stand up properly.
How long does it take to finish a Crochet Hat With Cat?
For an intermediate crocheter, a standard Crochet Hat With Cat takes about 3 to 5 hours. Beginners might take a bit longer, perhaps 6 to 8 hours, as they get used to the pattern instructions and ear placement.
Can I make this hat for a child?
Yes! The Crochet Hat With Cat – Pattern is easily scalable. You simply need to reduce the number of starting chain stitches and the total number of rows. Many patterns provide a size chart for newborns, toddlers, and adults.
How do I make the ears stand up on my Crochet Hat With Cat?
To keep the ears upright, use a smaller hook for the ear portion to create a tighter, stiffer fabric. Alternatively, you can sew a small piece of felt inside the ears or use a bit of polyester stuffing to give them volume and structure.
Is this pattern suitable for beginners?
Absolutely. If you choose the “rectangle method” (also known as the Sakura Hat style), it is one of the easiest projects a beginner can undertake. It only requires basic rectangular construction and minimal sewing.
How should I wash my finished Crochet Hat With Cat?
It is best to hand wash your handmade items in cool water with a mild detergent. Lay the Crochet Hat With Cat flat on a towel to dry. Avoid the dryer, as the heat can frizz the yarn and ruin the shape of the feline ears.
In this guide, we have explored the delightful world of the Crochet Hat With Cat – Pattern, covering everything from the initial material selection to the intricate details of ear construction and finishing. We learned that the Crochet Hat With Cat is more than just a winter accessory; it is a creative expression that combines technical skill with playful design.
By following a structured pattern, selecting the right yarn, and paying attention to symmetry, anyone can create a professional-looking piece that is both functional and fashionable.