
Lily in Crochet - Pattern

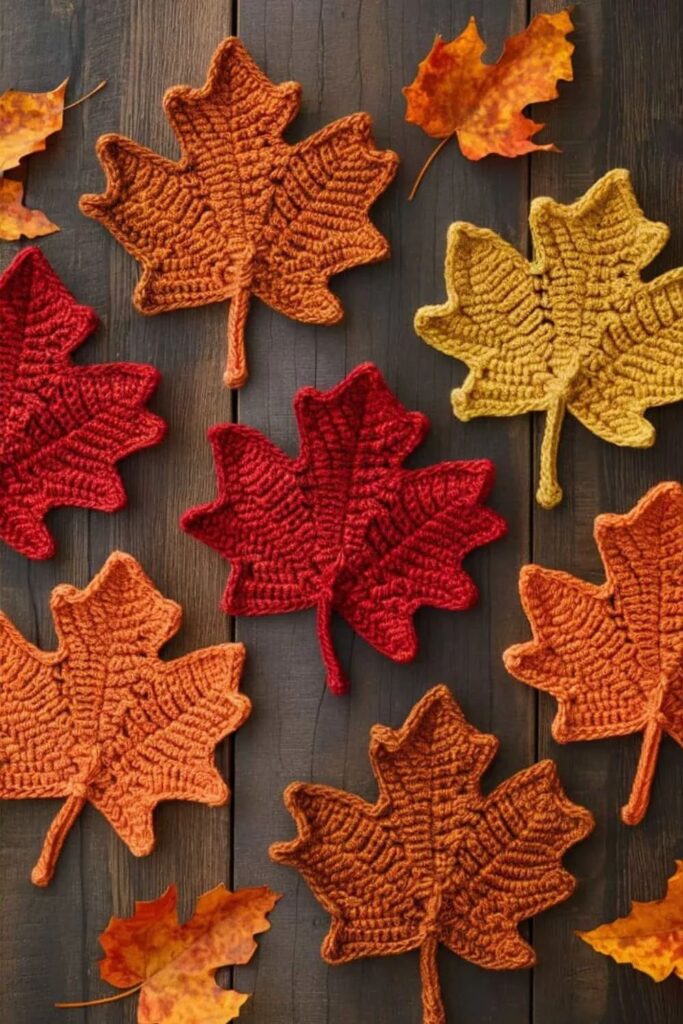
Creating a Crochet Maple Leaf – Pattern is one of the most rewarding projects for any fiber artist who wants to bring the beauty of nature into their home. The Crochet Maple Leaf – Pattern is versatile, allowing you to create stunning autumn decor, embellishments for blankets, or even unique coasters. In this guide, we will explore everything you need to know about mastering this free crochet pattern and choosing the right yarn for crochet to ensure your leaves look as realistic as possible.
Whether you are a beginner or an advanced crafter, following a structured Crochet Maple Leaf – Pattern helps you understand the intricate geometry of nature. These leaves are characterized by their iconic five-pointed shape, which requires specific crochet stitches like the treble crochet and picot stitch to define the sharp edges. By practicing this autumn crochet project, you will improve your ability to read complex diagrams and work in rounds or rows to create organic shapes.
As we dive into this Crochet Maple Leaf – Pattern, remember that the beauty of handmade crochet lies in the details. From selecting a vibrant fall color palette to choosing the correct crochet hook size, every decision impacts the final look of your maple leaf applique. This article serves as a comprehensive resource to help you navigate the steps of the Crochet Maple Leaf – Pattern, ensuring your finished pieces are durable, beautiful, and perfectly shaped for any seasonal display.
The Crochet Maple Leaf – Pattern typically starts with a magic ring or a small foundation chain joined into a circle. This center serves as the base from which all the “lobes” or points of the leaf will grow, mimicking the central vein structure of a real leaf.
To achieve the pointed look required in a Crochet Maple Leaf – Pattern, you will use a combination of different stitch heights. By transitioning from a single crochet to a half double crochet, then to a double crochet, and finally a treble crochet, you create the natural rise and fall of the leaf’s edge.
One of the most important aspects of the Crochet Maple Leaf – Pattern is the use of the picot stitch. This small loop creates the tiny, sharp tips at the end of each lobe, giving the crochet leaf its unmistakable maple silhouette that distinguishes it from other foliage patterns.
When working on a Crochet Maple Leaf – Pattern, it is essential to maintain consistent stitch tension. If your stitches are too loose, the leaf may become floppy and lose its structural integrity; if they are too tight, the leaf might curl inward rather than laying flat on a surface.
Choosing the right yarn weight is also a key factor in the Crochet Maple Leaf – Pattern. Using a medium weight yarn (worsted) is ideal for home decor like garlands, while a fingering weight yarn or crochet thread is better suited for delicate jewelry or greeting card embellishments.
Finally, the Crochet Maple Leaf – Pattern often involves working in the back loops only (BLO) for certain rows. This technique creates a ribbed texture that looks like the veins of a real leaf, adding a layer of three-dimensional realism to your finished crochet project.
To begin your Crochet Maple Leaf – Pattern, you must select a high-quality crochet hook that matches your yarn. For most standard patterns, a 4.0mm (G) or 5.0mm (H) hook works perfectly, providing enough flexibility to work the stitches comfortably while keeping the shape firm.
The choice of yarn fibers significantly affects the outcome of your Crochet Maple Leaf – Pattern. Cotton yarn is highly recommended because it offers excellent stitch definition and holds its shape well, making it the top choice for crochet coasters or autumn table runners.
If you prefer a softer feel for your Crochet Maple Leaf – Pattern, an acrylic blend yarn can provide a wide range of autumnal colors like burnt orange, deep red, and golden yellow. These synthetic fibers are also very durable and easy to wash, which is great for frequently used items.
Don’t forget the small but vital tools for finishing your Crochet Maple Leaf – Pattern. A sharp pair of embroidery scissors and a yarn needle (tapestry needle) are necessary for weaving in ends securely so your leaf doesn’t unravel over time during use or washing.
Stitch markers are incredibly helpful when following a complex Crochet Maple Leaf – Pattern, especially if the pattern is worked in continuous rounds. Placing a marker at the start of each lobe ensures you don’t lose track of your progress and helps keep the leaf symmetrical.
Lastly, you might want to consider fabric stiffener or a “blocking” setup for your Crochet Maple Leaf – Pattern. Blocking involves wetting the finished leaf and pinning it into the desired shape until dry, ensuring the points of the maple leaf stay sharp and professional-looking.
The first stage of the Crochet Maple Leaf – Pattern usually involves creating a round “heart” or base. This is where you establish the number of points the leaf will have, typically five or seven, by placing increase stitches in specific locations around the initial circle.
As you progress through the Crochet Maple Leaf – Pattern, you will work on each lobe individually or in a continuous flow. The “stair-stepping” technique—using taller stitches in the center of the lobe and shorter ones on the sides—is what creates the tapered leaf look that is so iconic.
To ensure the Crochet Maple Leaf – Pattern looks symmetrical, pay close attention to the stitch count. Even a single missing slip stitch can cause one side of the leaf to look larger than the other, which is why checking your work after every row is a best practice for crocheters.
Advanced versions of the Crochet Maple Leaf – Pattern might incorporate front post double crochet (FPDC). This technique creates a raised line on the surface of the work, effectively “drawing” the veins onto the leaf without needing to embroider them later with a needle.
If you want to add a stem to your Crochet Maple Leaf – Pattern, this is usually done at the very end. By chaining a few stitches and then slip stitching back down the chain toward the base of the leaf, you create a sturdy, integrated stem that completes the botanical look.
For those who want a variegated look, try using self-striping yarn with your Crochet Maple Leaf – Pattern. This creates a beautiful transition of colors that mimics the natural changing of leaves in the fall, making every single crochet leaf you make completely unique.
Once you have mastered the Crochet Maple Leaf – Pattern, you can use these pieces to create a stunning Autumn Leaf Garland. Simply string the leaves together using a long chain of yarn or twine to decorate your fireplace mantle, windows, or doorway for the season.
Another popular use for the Crochet Maple Leaf – Pattern is as a functional coaster. Because the maple leaf has a broad center, it provides a stable base for mugs and glasses. Using absorbent cotton yarn ensures that moisture from cold drinks is trapped, protecting your furniture.
You can also use the Crochet Maple Leaf – Pattern as an applique to revitalize old clothing. Sewing a few colorful leaves onto a plain denim jacket, a hat, or a tote bag is a fantastic way to personalize your wardrobe with handmade fiber art.
In the world of home staging and interior design, scattered leaves from a Crochet Maple Leaf – Pattern can be used as table confetti for Thanksgiving dinners. They add a warm, “hygge” feel to the environment that store-bought plastic decorations simply cannot replicate.
If you enjoy making gifts, a set of leaves created from the Crochet Maple Leaf – Pattern makes a thoughtful present. Tie a bundle of four or six leaves together with a ribbon and a handmade tag to give to friends, teachers, or family members who appreciate artisan crafts.
Finally, consider scaling the Crochet Maple Leaf – Pattern. By using a much larger hook and chunky T-shirt yarn, you can turn a simple leaf pattern into a decorative floor rug or a large cushion cover, proving just how versatile this classic crochet design truly is.
What is the best yarn for a Crochet Maple Leaf – Pattern?
For the best results, use 100% cotton yarn. It provides the stiffness and stitch definition needed to keep the leaf points sharp. However, acrylic yarn is a budget-friendly alternative that offers a wider variety of autumn colors.
Is the Crochet Maple Leaf – Pattern suitable for beginners?
Yes, but it is considered an intermediate beginner project. You should be comfortable with basic stitches like the chain, single crochet, and double crochet before attempting the more complex shaping and picot stitches found in this pattern.
How do I prevent my crochet leaves from curling?
Curling often happens due to tight tension or a hook that is too small. Try using a larger hook or “blocking” your finished leaf. Blocking involves pinning the leaf to a flat surface and lightly steaming it or wetting it to set the fibers in place.
Can I make the leaf bigger or smaller?
Absolutely! To change the size of your Crochet Maple Leaf – Pattern, simply change your yarn weight and hook size. Using a thinner thread and a small hook will result in a tiny charm, while using bulky yarn and a large hook will create a much larger leaf.
How long does it take to finish one maple leaf?
An experienced crocheter can typically complete a standard Crochet Maple Leaf – Pattern in about 20 to 30 minutes. It is a perfect “one-sitting” project for those who want quick satisfaction and a fast way to use up yarn scraps.
What can I do with the finished leaves?
The possibilities are endless! You can make garlands, coasters, appliques for clothing, bookmarks, or ornaments. They are also great for scrapbooking or as unique embellishments for gift wrapping.
In this article, we have explored the wonderful world of the Crochet Maple Leaf – Pattern, covering everything from the essential crochet tools to advanced shaping techniques. We learned that the secret to a perfect leaf lies in the combination of stitch heights and the use of the picot stitch to create those iconic points. We also discussed how selecting the right natural yarn colors and fibers like cotton can elevate your project from a simple craft to a piece of professional home decor. By following these steps and practicing your tension control, you can create a forest of beautiful, everlasting autumn foliage.
I hope this guide inspires you to pick up your hook and start your own Crochet Maple Leaf – Pattern today! Please leave your sincere opinion in the comments below and share your suggestions for other nature-inspired patterns you would like to see. Your feedback helps us create better content for the global crochet community!


