Crochet Rose - Pattern

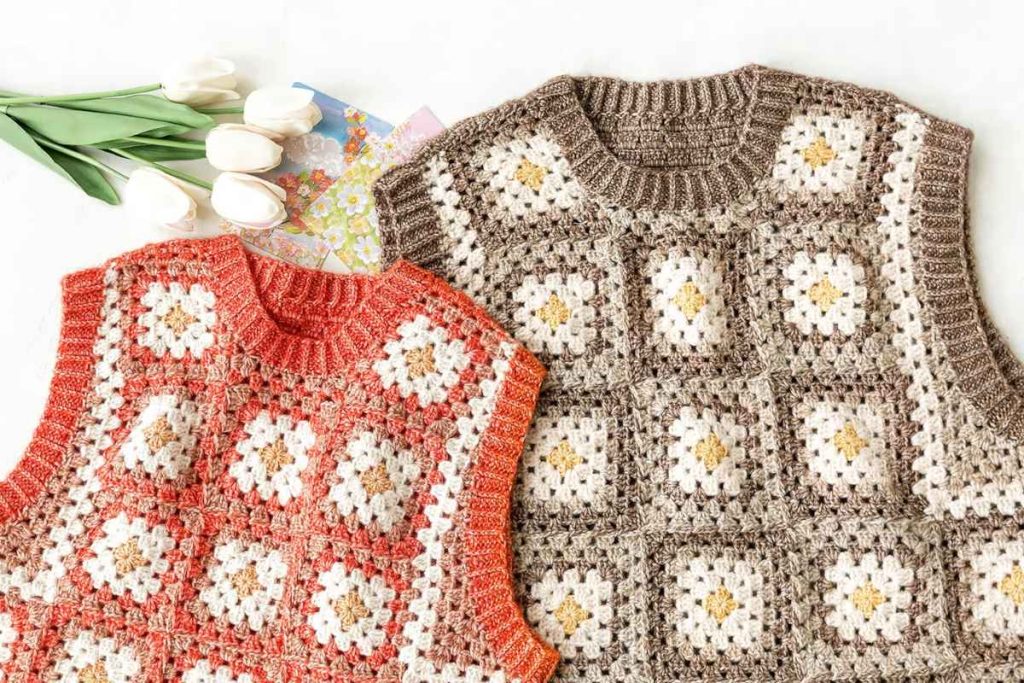
The Crochet Nesting Squares Vest – Pattern is more than just a simple garment design; it is a gateway into the world of geometric wearable art that combines traditional techniques with modern aesthetics. If you are looking for a project that blends the rhythmic comfort of classic granny squares with a sophisticated silhouette, this crochet vest is the perfect choice for your next creative endeavor. Whether you are a seasoned crafter or a dedicated beginner, understanding the nuances of this handmade pattern will allow you to create a piece that is both functional and stylish.
Working on a Crochet Nesting Squares Vest – Pattern allows you to experiment with color theory and texture in a way that few other projects permit. The “nesting” aspect refers to the clever way squares of different sizes or colors are layered and joined, creating a visual depth that mimics architectural structures. By following a well-structured crochet tutorial, you can transform simple skeins of premium yarn into a versatile wardrobe staple that works beautifully over dresses, turtlenecks, or casual shirts throughout the seasons.
As we dive into the specifics of the Crochet Nesting Squares Vest – Pattern, it is important to focus on the technical details that make this design stand out, such as gauge consistency, stitch definition, and seamless joining methods. This article will guide you through every essential step, from selecting the right crochet hook size to mastering the finishing techniques that give your vest a professional, boutique-quality look. Get ready to pick up your tools and embark on a journey of stitches and creativity that results in a truly unique piece of DIY fashion.
The core of the Crochet Nesting Squares Vest – Pattern lies in its geometric foundation, where multiple crochet squares are calculated to fit perfectly together. Unlike standard garments that follow traditional shaping, this vest pattern utilizes the symmetry of squares to create armholes and necklines naturally. Understanding how these squares “nest” or sit within one another is the first step toward mastering the overall construction of the piece.
Selecting the right materials is crucial for the success of your Crochet Nesting Squares Vest – Pattern. Most designers recommend a medium weight yarn (worsted) or a soft cotton blend to ensure the vest has enough structure to hold the square shapes without being too stiff. If the yarn is too heavy, the nesting effect might get lost in the bulk; if it is too thin, the vest may lack the necessary drape for a comfortable fit.
The hook size you choose will directly impact the drape and tension of your finished garment. For a Crochet Nesting Squares Vest – Pattern, a 5mm (H-8) hook is often the standard, but you must always check your swatch against the pattern requirements. A looser tension creates a boho, airy feel, while a tighter tension results in a more modern, structured look that highlights the geometric precision of the nesting squares.
One of the most appealing features of the Crochet Nesting Squares Vest – Pattern is its inherent customizability. Because the design is modular, you can easily adjust the size by adding more rounds to each square or by increasing the number of squares used in the assembly. This makes it a size-inclusive crochet pattern that can be adapted for children, adults, or even as an oversized layering piece for a cozy winter outfit.
Colorwork is where the Crochet Nesting Squares Vest – Pattern truly shines and allows your personality to come through. You can opt for a monochromatic palette to emphasize the texture of the stitches, or use complementary colors to make each nesting square pop against the others. Many enthusiasts prefer using self-striping yarn to achieve a complex look with minimal effort, allowing the yarn to handle the transitions between the nested elements.
Before starting the full project, always create a test square to ensure your measurements align with the Crochet Nesting Squares Vest – Pattern specifications. This step prevents the common frustration of finishing a garment only to find it is too small or too large. Measuring the diagonal and the sides of your first nesting square will give you a clear indication of the final dimensions and help you maintain consistent tension throughout the process.
To successfully execute the Crochet Nesting Squares Vest – Pattern, you must be comfortable with the double crochet (dc) and chain stitch (ch) combinations. These are the building blocks of the classic granny square style that forms the base of the nesting units. Mastery of these basic stitches ensures that your squares remain flat and do not curl at the edges, which is vital for a clean vest assembly.
The slip stitch (sl st) is another vital component of the Crochet Nesting Squares Vest – Pattern, specifically for joining rounds and moving the yarn to the corners. When you are “nesting” colors or shapes, a clean transition is necessary to maintain the illusion of interlocking squares. Learning to do a standing double crochet can also help eliminate the visible “ch-3” start, giving your squares a much more professional and seamless appearance.
Advanced versions of the Crochet Nesting Squares Vest – Pattern might incorporate front post double crochet (fpdc) or back post double crochet (bpdc) to add texture. These stitches create ridges that can outline the “nesting” sections, making the geometric transitions even more pronounced. Using these relief stitches adds a tactile dimension to the vest, elevating it from a simple craft project to a piece of high-quality knitwear.
The magic ring (or magic circle) technique is highly recommended when starting each component of your Crochet Nesting Squares Vest – Pattern. Unlike the traditional “chain and join” method, the magic ring allows you to pull the center tight, leaving no hole in the middle of your squares. This creates a solid foundation for the nesting effect and ensures that the center of your vest looks tidy and well-constructed.
Increasing at the corners is the secret to keeping your Crochet Nesting Squares Vest – Pattern perfectly square. Most patterns use a sequence of (2 dc, ch 2, 2 dc) in each corner space to expand the square evenly. Precision in these corners is what allows the “nesting” squares to fit together like a puzzle during the final assembly stage, preventing any unwanted puckering or warping of the fabric.
Finally, blocking your finished squares is a step you cannot skip when following a Crochet Nesting Squares Vest – Pattern. Wet blocking or steam blocking your individual pieces before joining them ensures they are all exactly the same size. This process relaxes the fibers and sets the stitches, making the assembly of the crochet vest much smoother and ensuring the final garment hangs beautifully on the body.
Once you have completed all the individual elements of your Crochet Nesting Squares Vest – Pattern, the assembly phase begins. There are several ways to join your squares, but the invisible join or the mattress stitch are often preferred for a flat, clean look. These methods ensure that the “nesting” appearance remains the focal point without bulky seams distracting the eye from the intricate stitch patterns.
For those who prefer a more decorative finish, the join-as-you-go (JAYG) method is a popular choice for the Crochet Nesting Squares Vest – Pattern. This technique involves connecting the squares during the final round of crochet, which eliminates the need for sewing later. It creates a flexible, lacy seam that complements the open structure of many crochet vest designs, though it requires careful planning to ensure correct placement.
The layout of your Crochet Nesting Squares Vest – Pattern is what determines the final silhouette, including the depth of the V-neck or the width of the armholes. Laying your squares out on a flat surface before joining allows you to visualize the color gradient and the nesting flow. This is the moment to make any final adjustments to the arrangement, ensuring that the visual balance of the vest is perfect before the pieces are permanently attached.
Don’t forget the importance of the shoulder seams in your Crochet Nesting Squares Vest – Pattern. Because the weight of the vest hangs from the shoulders, these seams need to be reinforced. Using a slip stitch join on the inside of the garment provides a sturdy structure that prevents the vest from stretching out of shape over time, maintaining the integrity of the nesting square design.
Adding a border or edging is the final touch that ties the entire Crochet Nesting Squares Vest – Pattern together. A simple single crochet (sc) or crab stitch (reverse single crochet) border around the armholes and bottom hem provides a clean finish. This border also helps to stabilize the edges, preventing the squares from curling and giving the handmade vest a polished, retail-ready look.
Weaving in your ends is the final, albeit tedious, step in completing your Crochet Nesting Squares Vest – Pattern. Since this design often involves multiple color changes to achieve the nesting effect, you will likely have many yarn tails to manage. Using a tapestry needle to weave them securely back into the stitches—following the direction of the work—will ensure your vest remains durable and beautiful even after multiple washes.
The beauty of the Crochet Nesting Squares Vest – Pattern is its incredible versatility in modern fashion. For a casual daytime look, pair your crochet vest with high-waisted jeans and a simple white tee, letting the geometric patterns take center stage. The nesting squares provide a pop of texture that can turn a basic outfit into something thoughtful and artisan-inspired.
If you want to dress up your Crochet Nesting Squares Vest – Pattern, consider layering it over a midi-dress or a crisp collared shirt. The structured nature of the squares adds a formal touch, while the crochet texture keeps the outfit feeling approachable and soft. Choosing a neutral color palette for your yarn—such as creams, tans, or soft greys—makes the vest a timeless accessory for office wear or evening events.
Proper care is essential to maintain the shape of a garment made from a Crochet Nesting Squares Vest – Pattern. It is always best to hand wash your crochet items in cool water using a gentle detergent specifically designed for delicate fibers. Avoid wringing the vest, as this can distort the nesting squares; instead, roll it in a towel to remove excess moisture and lay it flat to dry in its original shape.
Storage also plays a role in the longevity of your Crochet Nesting Squares Vest – Pattern project. Instead of hanging the vest, which can cause the weight of the yarn to stretch the shoulder seams, fold it neatly and store it in a drawer or on a shelf. This preserves the “nesting” geometry and ensures that the stitches remain crisp and the fit remains true to the original pattern dimensions.
As trends shift towards sustainable fashion, owning a piece made from a Crochet Nesting Squares Vest – Pattern puts you at the forefront of the “slow fashion” movement. Each stitch represents an investment of time and skill, resulting in a garment that is far more durable and meaningful than mass-produced alternatives. Sharing your process on social media using crochet community hashtags can also inspire others to take up the craft.
Ultimately, the Crochet Nesting Squares Vest – Pattern is a project that rewards patience and attention to detail. Once you have mastered the technique, you can create multiple versions in different yarn weights and colors, gifting them to friends or even selling them as custom crochet pieces. The satisfaction of wearing something you built square by square is a feeling every crafter deserves to experience.
1. Is the Crochet Nesting Squares Vest – Pattern suitable for beginners?
Yes, it is very beginner-friendly! If you know how to make a basic granny square, you can follow this pattern. The nesting effect is achieved through simple color changes and strategic assembly rather than complex stitches.
2. How much yarn do I need for this vest?
For a standard medium-sized vest, you will typically need between 800 to 1,200 yards of worsted weight yarn. This varies depending on the length you choose and whether you add decorative borders.
3. Can I use different types of yarn for the nesting squares?
While you can mix colors, it is highly recommended to stay with the same yarn brand and weight throughout the project. Using different weights can cause the squares to be uneven, making the assembly difficult and the final fit awkward.
4. How do I make the vest larger or smaller?
To adjust the size, you can either use a larger hook to increase the size of each square or add more rounds of double crochet to each nesting unit before joining them together.
5. What is the best way to join the squares so they don’t look bulky?
The mattress stitch is the best method for an invisible, flat seam. If you want a faster method, the slip stitch join on the wrong side of the fabric is also very effective and provides good structure.
6. Can I make this vest into a full sweater?
Absolutely! You can adapt the Crochet Nesting Squares Vest – Pattern by crocheting two long rectangles of nesting squares to serve as sleeves and attaching them to the armholes.
In conclusion, the Crochet Nesting Squares Vest – Pattern is a delightful project that combines the comfort of classic crochet with a bold, modern geometric design. Throughout this article, we have explored the importance of gauge, the variety of essential stitches like the double crochet, and the various joining techniques that ensure a professional finish.
By focusing on the “nesting” aspect of the squares, you can create a visually stunning garment that is both a joy to make and a pleasure to wear. Whether you are creating this for yourself or as a gift, the skills learned here—from blocking to color selection—will enhance your overall crochet expertise.


