
Lily in Crochet - Pattern

Creating a CROCHET RABBIT – Pattern is one of the most rewarding projects for both beginners and experienced crafters alike, offering a perfect blend of creativity and relaxation. This comprehensive guide is designed to help you navigate the wonderful world of amigurumi, ensuring that your finished handcrafted bunny is as professional as it is adorable. Whether you are looking to create a thoughtful gift for a newborn or a charming piece of home decor, following a structured crochet rabbit tutorial is the essential first step toward success.
When you start working on a CROCHET RABBIT – Pattern, you are engaging in a timeless craft that transforms simple yarn into a soulful companion. The beauty of a crochet rabbit lies in its versatility, as you can easily customize the size, color, and texture by simply swapping your yarn weight or hook size. In this article, we will dive deep into the techniques, materials, and step-by-step instructions needed to master this specific bunny crochet project, making sure you feel confident from the very first slip knot to the final stitch.
Understanding the foundation of a CROCHET RABBIT – Pattern involves more than just moving a hook; it’s about mastering the tension and the specific crochet stitches that give the plushie its shape. Amigurumi requires a tight weave to ensure that the polyester fiberfill stuffing doesn’t peek through the gaps, creating a clean and durable finish. As we move forward, keep in mind that patience is your best tool, and with the right amigurumi techniques, you will soon have a long-eared friend that looks like it came straight from a high-end boutique.
Before you pick up your hook, it is vital to understand that a CROCHET RABBIT – Pattern typically follows the amigurumi style, which means working in continuous rounds. This technique eliminates the visible seam often found in traditional crochet, giving your crochet bunny a smooth and professional appearance. Most patterns will start with a magic ring, a fundamental skill that allows you to pull the center tight, leaving no hole at the top of the head or the bottom of the body.
The primary stitch used in any CROCHET RABBIT – Pattern is the single crochet (sc). This stitch is preferred because it creates a dense, sturdy fabric that holds its shape well even after significant handling. For those new to the craft, practicing your single crochet increases and invisible decreases is crucial. These maneuvers are what allow you to sculpt the curves of the rabbit’s cheeks, the roundness of its belly, and the delicate point of its paws.
Choosing the right materials for your CROCHET RABBIT – Pattern can make a significant difference in the final result. Most designers recommend mercerized cotton yarn or a high-quality acrylic blend because they offer great stitch definition and are less likely to pill over time. Additionally, using a crochet hook that is slightly smaller than what the yarn label suggests is a pro tip for achieving that tight, gap-free look essential for stuffing amigurumi.
Safety is a top priority when executing a CROCHET RABBIT – Pattern, especially if the toy is intended for a small child. While plastic safety eyes provide a realistic look, they can be a choking hazard for infants. In such cases, it is highly recommended to use embroidery techniques to stitch the eyes and nose directly onto the face. This not only makes the crochet rabbit safer but also adds a unique, artisanal charm to your creation.
To keep track of your progress within a CROCHET RABBIT – Pattern, you should always use a stitch marker. Since amigurumi is worked in a spiral, it is incredibly easy to lose count of your rounds, which can lead to a lopsided bunny. Marking the first stitch of every round ensures that your increases and decreases are perfectly aligned. This simple habit saves hours of “frogging” (pulling out stitches) and ensures your crochet project stays on track.
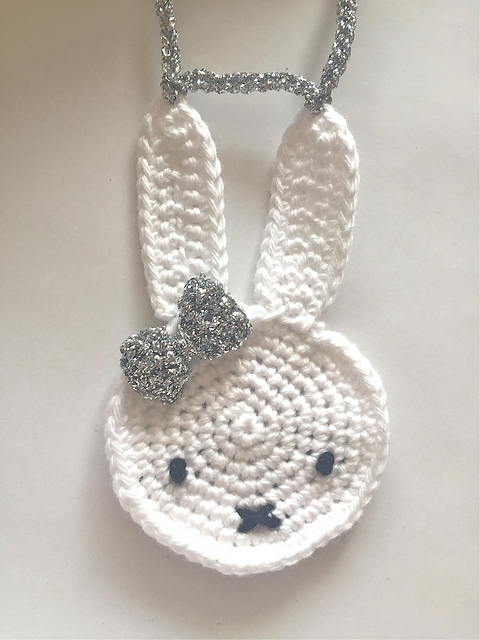
Finally, remember that the CROCHET RABBIT – Pattern is just a blueprint. While the instructions provide the structure, your personal touch—like the choice of a pastel color palette or the addition of a small crochet bowtie—is what brings the character to life. Don’t be afraid to experiment with different yarn textures, such as chenille or velvet yarn, to create a “velveteen rabbit” effect that is incredibly soft to the touch and popular in modern crochet trends.
Selecting the correct yarn is the most impactful decision you will make for your CROCHET RABBIT – Pattern. For a classic look, worsted weight cotton yarn is the gold standard because it is easy to handle and provides a clear view of your stitches. If you want a larger, cuddlier rabbit, you might opt for bulky weight yarn. Regardless of your choice, ensure you have enough yardage of your primary color to complete the head, body, and those iconic long rabbit ears.
Your tool kit for a CROCHET RABBIT – Pattern should include an ergonomic crochet hook. Since amigurumi requires a tight tension, your hands can tire quickly; an ergonomic handle reduces strain during long crafting sessions. Common sizes for this type of project range from 2.5mm to 3.5mm, depending on your yarn choice. Having a sharp pair of craft scissors and a set of blunt-ended yarn needles is also necessary for weaving in ends and assembling the parts.
Stuffing is what gives your CROCHET RABBIT – Pattern its soul. Use high-quality premium polyester fiberfill that is washable and non-allergenic. The trick to a great crochet rabbit is to stuff firmly but not so much that the stitches stretch and show the filling. Pay special attention to the neck area; adding a bit more stuffing there will prevent the “floppy head” syndrome, ensuring your handmade toy stands or sits upright properly.
The assembly phase of a CROCHET RABBIT – Pattern is where the magic happens. You will need sewing pins to temporarily attach the ears, arms, and legs to the body before sewing them permanently. This allows you to check for symmetry. There is nothing more frustrating than finishing a crochet bunny only to realize one ear is significantly higher than the other. Taking five minutes to pin and adjust will elevate the quality of your crochet amigurumi.
Don’t forget the small details that make a CROCHET RABBIT – Pattern stand out. A small amount of pink embroidery floss is perfect for creating a delicate nose and mouth. Some crafters also like to use a bit of fabric blush or a pink colored pencil to give the rabbit’s cheeks a rosy glow. These tiny finishing touches are what transform a simple yarn project into a professional-grade gift that people will cherish for years.
Lastly, keep a digital row counter or a simple notebook by your side. Even the most detailed CROCHET RABBIT – Pattern can become confusing if you are interrupted mid-round. Documenting which round you are on and any modifications you made to the pattern instructions is a great way to ensure consistency, especially if you plan on making a second bunny to create a matching set or a “mommy and me” pair.
The head of a CROCHET RABBIT – Pattern usually begins with a magic circle of six single crochet stitches. From there, you will perform round-by-round increases until you reach the desired diameter. To achieve a perfectly round head, many experienced crafters suggest using “shifted increases,” which prevents the head from looking like a hexagon. This technical nuance is a hallmark of a high-quality amigurumi pattern and results in a much smoother surface.
When working on the body of the CROCHET RABBIT – Pattern, you will often transition from the head directly or create a separate piece that is sewn on later. The body typically features a “pear shape,” achieved by working several rounds without increases after the initial widening. This provides a stable base. If your bunny pattern includes a seated position, you will focus the increases toward the bottom to create a wider “bum” for the crochet rabbit.
The ears are perhaps the most defining feature of any CROCHET RABBIT – Pattern. Depending on the style, you might be making long, floppy ears or short, pointy ones. For floppy ears, you will work long chains and then crochet around them, or create long tubes that are left unstuffed. This allows the weight of the yarn to let the ears hang naturally, giving your crochet bunny a sweet, docile expression that is characteristic of the species.
Creating the limbs for your CROCHET RABBIT – Pattern requires precision. The arms are usually thinner and require less stuffing to allow them to rest against the body. The legs, however, may need to be stuffed more firmly at the bottom to represent paws. If you are following a seamless crochet pattern, you might join the legs together and continue upward to form the body, a popular technique in modern amigurumi design that reduces the amount of sewing required at the end.
The tail of a crochet rabbit is the literal “cherry on top.” Most CROCHET RABBIT – Pattern guides suggest a simple small ball made with the same yarn, but you can also use a pompom maker to create a fluffy, white tail. If you choose a pompom, ensure it is attached very securely. A fluffy tail adds a tactile element to the handcrafted toy that children especially love, making the crochet rabbit feel more interactive and lifelike.
Finally, the face is where you define the “personality” of your CROCHET RABBIT – Pattern. The placement of the eyes is critical; placing them lower on the head and wider apart usually creates a “kawaii” or cute appearance. When you follow the pattern’s eye placement instructions, use your pins first to test different spots. This stage of the crochet process is your chance to be an artist, sculpting an expression that is unique to your specific handmade creation.
One of the best things about a CROCHET RABBIT – Pattern is how easily it can be adapted for different holidays. For an Easter crochet bunny, you can add a small crochet egg or a carrot accessory. For a winter-themed rabbit, you might stitch a tiny scarf using a contrasting yarn color. These modifications don’t require changing the base rabbit pattern; they simply build upon the foundation you’ve already created, adding layers of storytelling to your work.
If you want to scale your CROCHET RABBIT – Pattern up or down, you don’t necessarily need a new pattern. To make a giant bunny, simply use blanket yarn and a much larger hook (like 8mm or 10mm). To make a tiny keychain version, use embroidery thread and a 1.0mm hook. The proportions of the original crochet pattern will remain the same, but the physical size of the finished amigurumi rabbit will change dramatically, allowing for endless variety.
Advanced crafters might want to experiment with colorwork within their CROCHET RABBIT – Pattern. You can create a “spotted” rabbit by changing yarn colors mid-round. To do this cleanly, finish the last pull-through of the previous stitch with the new color. This tapestry crochet technique prevents jagged lines and keeps the spots looking natural on your crochet animal, adding a layer of realism and complexity to the finished product.
Texture plays a huge role in the success of a CROCHET RABBIT – Pattern. You can use a “loop stitch” to create a furry effect or use a wire brush on acrylic yarn to “fuzz” the surface after finishing. This creates a soft, halo-like effect that mimics real rabbit fur. While this requires a bit more effort, the result is a luxury crochet toy that looks like it belongs in a high-end gift shop, significantly increasing the value of your work.
Blocking isn’t usually required for amigurumi, but for a CROCHET RABBIT – Pattern with long, flat ears, it can be helpful. Lightly steaming the ears can help them lay flat or curve in a specific direction. Always check the yarn fiber content before applying heat; synthetic fibers can melt if the iron is too hot. A gentle steam is usually enough to set the shape of your crochet bunny’s ears without damaging the delicate stitches.
Sharing your completed CROCHET RABBIT – Pattern project online is the final step for many crafters. When photographing your work, use natural light and a simple background to let the crochet details shine. Using hashtags like #CrochetRabbit, #AmigurumiPattern, and #HandmadeBunny will help you connect with the global crafting community. Your journey with this bunny pattern not only results in a beautiful toy but also builds your skills as a versatile and talented fiber artist.
1. What is the best yarn for a CROCHET RABBIT – Pattern?
The best yarn is generally a cotton or cotton-blend for beginners because it doesn’t split easily and shows stitch definition. For a softer feel, chenille or velvet yarns are popular, though they can be harder to see the stitches in.
2. How long does it take to finish a CROCHET RABBIT – Pattern?
For an intermediate crocheter, a standard 8-10 inch rabbit usually takes between 4 to 8 hours of active work, depending on the complexity of the ears and accessories.
3. Is this CROCHET RABBIT – Pattern suitable for beginners?
Yes! As long as you know the basic stitches (single crochet, increase, and decrease), you can complete a rabbit. It is a great project to practice working in the round.
4. How do I make the rabbit’s head stay upright?
The key is firm stuffing in the neck area. You can also use a “neck support” made of a rolled-up piece of felt or a thick strand of yarn to provide extra stability inside the toy.
5. Can I sell the bunnies I make from this CROCHET RABBIT – Pattern?
Generally, yes. Most designers allow you to sell finished items, but it is standard etiquette to credit the pattern designer in your product listing.
6. How do I clean my crochet rabbit?
If you used cotton or acrylic yarn and safety eyes, you can hand wash the rabbit in cool water with mild soap. Air dry it thoroughly to ensure the stuffing inside doesn’t stay damp.
In this article, we have explored the comprehensive journey of creating a CROCHET RABBIT – Pattern, from selecting the right ergonomic hooks and premium yarns to mastering the fine art of amigurumi assembly. We discussed the importance of tension, the utility of the magic ring, and the creative ways you can customize your handcrafted bunny for different seasons or sizes. By following these structured steps and SEO-optimized tips, you are now equipped to create a high-quality, professional crochet toy that is both safe and beautiful.
The world of crochet is one of constant learning and community. We hope this guide has inspired you to pick up your hook and start your next CROCHET RABBIT – Pattern project today. Whether you are making it for yourself or as a gift, the effort you put into every stitch is what makes the final piece truly special.


