
Lily in Crochet - Pattern

Crochet Scrunchies – Pattern is the ultimate gateway project for craft enthusiasts looking to combine 90s nostalgia with modern handmade flair. Whether you are a beginner picking up a hook for the first time or a seasoned artisan looking for a quick, satisfying win, mastering a Crochet Scrunchies – Pattern allows you to create functional fashion accessories that are far gentler on your hair than traditional elastic bands. The beauty of these items lies in their simplicity; with just a few yards of yarn and a basic hair tie, you can produce a high-quality accessory that adds a pop of color and texture to any hairstyle.
When you dive into a Crochet Scrunchies – Pattern, you are not just making a hair accessory; you are engaging in a sustainable fashion practice that helps reduce waste while allowing for total creative control. Unlike mass-produced store versions, a handmade scrunchie can be customized to match specific outfits, seasons, or even your favorite yarn textures, from velvet to mercerized cotton. Because a Crochet Scrunchies – Pattern requires very little material, it is often considered the perfect “scrap-buster” project, turning those leftover bits of expensive yarn from larger projects into beautiful, wearable art.
In this comprehensive guide, we will break down the entire process of following a Crochet Scrunchies – Pattern, covering everything from the essential tools to the most popular stitch variations. We will focus on how to maintain the right tension to ensure the elastic remains stretchy while the yarn provides full, ruffled coverage. By the end of this article, you will feel confident in your ability to execute a professional-grade Crochet Scrunchies – Pattern, making you ready to fill your own accessory drawer or start a small business selling these popular items at local craft fairs.
At its most basic level, a Crochet Scrunchies – Pattern is a method of crocheting directly around an existing elastic hair tie to cover it with fabric ruffles. The “pattern” serves as your guide for how many stitches are needed to achieve the desired fullness; too few stitches will leave the elastic showing, while too many can make the scrunchie overly heavy and prone to sliding out of the hair. Understanding the ratio of yarn to elastic is the first step in mastering the technical side of any Crochet Scrunchies – Pattern.
The foundation of most Crochet Scrunchies – Pattern designs involves a “slip knot” and a series of “single crochet” stitches worked over the elastic band. Instead of working into a chain, you are essentially treating the hair tie as your foundation row, which allows the yarn to move freely along the elastic as it stretches. This mobility is crucial because it ensures the crocheted fabric doesn’t snap or distort when you wrap the scrunchie twice or thrice around a ponytail.
One of the most important technical terms in a Crochet Scrunchies – Pattern is “ruffle density,” which is achieved through a process of significant stitch increases. For example, after completing a base layer of stitches around the elastic, the pattern will typically instruct you to put three or four double crochets into every single stitch from the previous round. This exponential growth is what creates the iconic wavy, voluminous look that defines a classic scrunchie style.
The choice of yarn weight is a vital component of the Crochet Scrunchies – Pattern success, as it dictates the final “weight” and “vibe” of the accessory. Using a lightweight “Sport” or “DK” weight yarn will result in a delicate, floral-like scrunchie, whereas using a “Bulky” velvet yarn will create a bold, plush statement piece. Most Crochet Scrunchies – Pattern instructions will recommend a specific hook size to match the yarn, ensuring the stitches are tight enough to be durable but loose enough to remain soft.
Tension management is another skill that is honed through the repetition of a Crochet Scrunchies – Pattern. Because you are working around a flexible object, you must learn to hold the elastic slightly stretched while you work the first few stitches to prevent the yarn from bunching up in one spot. As you progress through the pattern, you will find a rhythm that allows the stitches to distribute themselves evenly, resulting in a symmetrical and professional-looking handmade accessory.
Finally, the Crochet Scrunchies – Pattern usually concludes with a “slip stitch” join and a “weaving in” of the yarn tails. Securing the ends is perhaps the most critical step for a functional item like a hair tie, as it will be subjected to constant pulling and stretching. A well-constructed Crochet Scrunchies – Pattern will provide tips on how to hide these ends deep within the ruffles so they never poke out or unravel during daily wear.
To begin your Crochet Scrunchies – Pattern, you must first select a high-quality elastic hair tie that has no metal parts, as metal can snag the yarn and eventually break the fibers. Look for seamless “ouchless” elastics that have a good amount of “snap-back” strength. Since the elastic is the core of your Crochet Scrunchies – Pattern, starting with a cheap or worn-out band will result in a finished product that doesn’t hold hair properly, regardless of how beautiful the crochet work is.
Next, you must choose the right hook for your Crochet Scrunchies – Pattern based on the yarn you’ve selected. An ergonomic hook is often recommended because the repetitive nature of the ruffle stitches can be tiring for the hand. If your pattern calls for a “velvet” or “chenille” yarn, using a hook with a slightly deeper throat will help catch the fuzzy fibers without splitting them, making the execution of the Crochet Scrunchies – Pattern much smoother and faster.
Yarn fiber content is the next consideration for your Crochet Scrunchies – Pattern project; cotton is excellent for summer because it is breathable and washable, while polyester velvet is popular for its luxury feel. If you are making a scrunchie for someone with very fine or delicate hair, a silk or bamboo blend yarn can provide a smooth surface that prevents breakage. A versatile Crochet Scrunchies – Pattern can be adapted to almost any fiber, but always remember that the more “slippery” the yarn, the more careful you must be with your finishing knots.
You will also need a sharp pair of embroidery scissors and a tapestry needle with a large eye to finish your Crochet Scrunchies – Pattern. Because scrunchies are small, you don’t need many specialized notions, but having a stitch marker can be helpful if you are working a multi-round pattern with complex color changes. These simple tools ensure that the final stages of your crochet project are precise and that your finished work looks like it belongs in a high-end boutique.
Optional embellishments can also be gathered before starting the Crochet Scrunchies – Pattern, such as tiny pearls or beads that can be strung onto the yarn before you begin. Adding these “extras” can elevate a basic pattern into something special for weddings or formal events. However, for a standard daily-wear scrunchie, sticking to the high-quality yarn and a solid Crochet Scrunchies – Pattern is usually enough to produce a stunning result that people will constantly ask you about.
Lastly, consider the “stretch test” as part of your material preparation; stretch your chosen elastic to its limit and see if it returns to its original shape. If it stays stretched out, it isn’t a good candidate for the Crochet Scrunchies – Pattern. By taking the time to vet your materials before you pick up the hook, you ensure that every minute you spend following the Crochet Scrunchies – Pattern is an investment in a durable, long-lasting hair accessory.
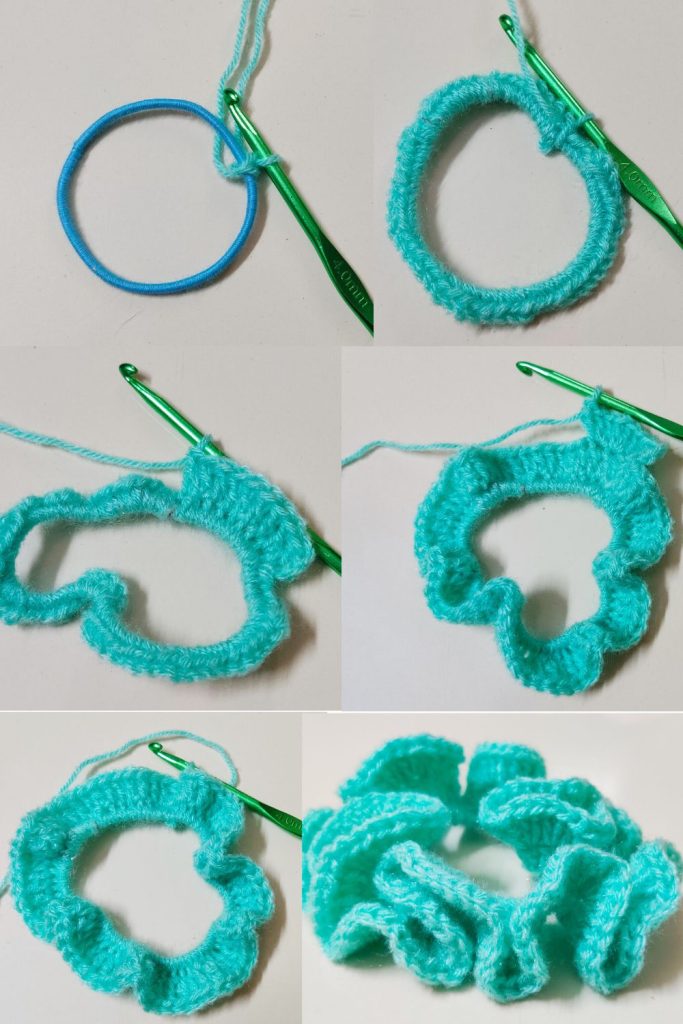
The first step in executing the Crochet Scrunchies – Pattern is the attachment phase, where you join your yarn to the elastic with a slip stitch. Once joined, you will work single crochet stitches all the way around the band, “crowding” them slightly so that the elastic is completely covered even when stretched. This “base round” is the most important part of the Crochet Scrunchies – Pattern, as it provides the foundation for the voluminous ruffles that will follow in the subsequent rounds.
Once the base is complete, the Crochet Scrunchies – Pattern typically moves into the “expansion” phase, where the magic happens. In this round, you will perform “increases” in every single stitch around the circle. For a moderately ruffled look, the pattern might suggest two double crochets in each stitch; for a “mega-ruffle” look, you might do three or four. This rapid increase in the number of stitches is what causes the fabric to fold over itself, creating that iconic scrunchie texture.
As you work through the expansion rounds of the Crochet Scrunchies – Pattern, you will notice the project starts to look like a “scrunchie” very quickly. It is important to keep your stitches consistent in height; if some double crochets are taller than others, the ruffles will look uneven. Many crochet tutorials suggest using a “relaxed” grip during this stage to allow the ruffles to have a soft, bouncy drape rather than a stiff, rigid appearance.
If your Crochet Scrunchies – Pattern includes a third round, this is usually the “edging” round where you can add a decorative touch. You might use a “crab stitch” (reverse single crochet) or a “picot stitch” to give the edges of the ruffles a pointed or textured finish. This final layer of detail is what makes a handmade scrunchie look sophisticated and high-quality, setting it apart from simpler patterns you might find elsewhere.
During the final inches of the Crochet Scrunchies – Pattern, you will join the round with a slip stitch to the first stitch of the row. It is essential to pull this slip stitch tight to close the gap. After cutting the yarn, leave a “tail” of at least 6 inches; this allows you enough length to weave the yarn back through the stitches securely. A professional Crochet Scrunchies – Pattern will always emphasize that the “finish” is just as important as the “start.”
The final step in the technique is the “scrunch and pull” adjustment. Once the Crochet Scrunchies – Pattern is off the hook, take a moment to slide the stitches around the elastic band to ensure they are evenly distributed. This ensures that when the scrunchie is in the hair, the ruffles are balanced and the elastic is hidden from all angles. With this final tweak, your Crochet Scrunchies – Pattern project is officially complete and ready for its first wear!
One of the greatest joys of mastering the Crochet Scrunchies – Pattern is the ability to customize the design to suit your personal brand or the latest fashion trends. You can experiment with “two-tone” ruffles by using a different color of yarn for the final round, creating a beautiful “dipped” effect. This variation of the Crochet Scrunchies – Pattern is particularly popular for sports teams or school colors, making them excellent personalized gifts for students and athletes.
Another way to adapt the Crochet Scrunchies – Pattern is by varying the stitch height throughout the ruffle round. For a “star-shaped” or “uneven” look, you could alternate between half-double crochets and triple crochets. This modification to the pattern creates a more organic, flower-like appearance that looks stunning in “boho-chic” hairstyles or at music festivals where unique, textured accessories are a staple.
You can also create “mini” and “jumbo” versions of the Crochet Scrunchies – Pattern simply by changing your starting elastic size and yarn weight. A “mini” scrunchie made with lace-weight thread is perfect for the ends of braids, while a “jumbo” scrunchie made with chunky chenille yarn is the ultimate comfort accessory for a “messy bun” look. The pattern remains fundamentally the same, proving how versatile a single set of instructions can be.
For a vintage-inspired look, consider using the Crochet Scrunchies – Pattern with a “mohair” or “brushed alpaca” yarn. This creates a halo of soft fuzz around the ruffles that mimics the high-end designer accessories of the early 90s. When using these specialty yarns, the pattern may require a slightly larger hook to keep the “halo” from getting trapped in tight stitches, but the result is a cloud-like scrunchie that is incredibly soft to the touch.
Seasonal variations are another way to utilize the Crochet Scrunchies – Pattern year-round. Use sparkly “tinsel” yarn for holiday party scrunchies, or bright neon acrylics for summer pool days. Because the Crochet Scrunchies – Pattern is so fast to complete, you can have a rotating collection of accessories that match the “vibe” of every month, ensuring your hair game is always on point and perfectly coordinated.
Finally, you can add “tails” or “bows” to your Crochet Scrunchies – Pattern to create a “scrunchie-scarf” hybrid. By attaching long chains of crochet to the base of the scrunchie after the ruffles are finished, you create a flowing accessory that looks like a ribbon tied into the hair. This “level-up” to the basic pattern is currently a huge trend in the world of handmade fashion, proving that the humble scrunchie is a canvas for endless creative evolution.
1. Is the Crochet Scrunchies – Pattern good for beginners?
Yes, it is one of the best projects for new crocheters! It teaches you how to work around a foundation (the elastic), how to do basic stitches, and how to increase. Most people can finish their first Crochet Scrunchies – Pattern in under 30 minutes.
2. Can I wash my crocheted scrunchies?
Absolutely. If you use cotton or acrylic yarn, you can hand-wash them in warm soapy water and lay them flat to dry. This is actually a major benefit of the Crochet Scrunchies – Pattern, as it allows you to keep your hair accessories clean and hygienic.
3. What is the best yarn for a Crochet Scrunchies – Pattern?
For a classic look, use a velvet or chenille yarn. For durability and stitch definition, mercerized cotton is excellent. Avoid very “slippery” yarns like 100% silk until you are more experienced with securing your knots.
4. How many scrunchies can I make from one ball of yarn?
Depending on the size of the ball and the fullness of the ruffles, you can usually make between 5 to 10 scrunchies from a standard 100g skein. This makes the Crochet Scrunchies – Pattern a very cost-effective way to create gifts or products for sale.
5. Why is my scrunchie not “scrunching” enough?
This usually happens if you didn’t put enough stitches in the ruffle round. To fix this, increase the number of stitches you put into each base stitch. A good Crochet Scrunchies – Pattern will emphasize that “more is more” when it comes to ruffles!
6. Will the yarn pull my hair?
Actually, it’s the opposite! The yarn creates a soft barrier between the elastic and your hair. Following a Crochet Scrunchies – Pattern results in an accessory that is much gentler than a plain elastic, reducing tangles and “ponytail headaches.”
In conclusion, mastering the Crochet Scrunchies – Pattern is a delightful journey that combines the ease of a quick craft with the satisfaction of creating a practical, stylish accessory. Throughout this guide, we have explored the foundational steps of working around an elastic, the importance of choosing high-quality materials like ouchless hair ties and mercerized cotton, and the technical “increase” methods used to create voluminous ruffles.
We also discussed how the Crochet Scrunchies – Pattern can be adapted for different textures, sizes, and seasonal styles, making it one of the most versatile designs in your crochet repertoire. Whether you are crafting for yourself, for gifts, or for a small business, the humble crocheted scrunchie is a testament to the beauty of handmade fashion.


