
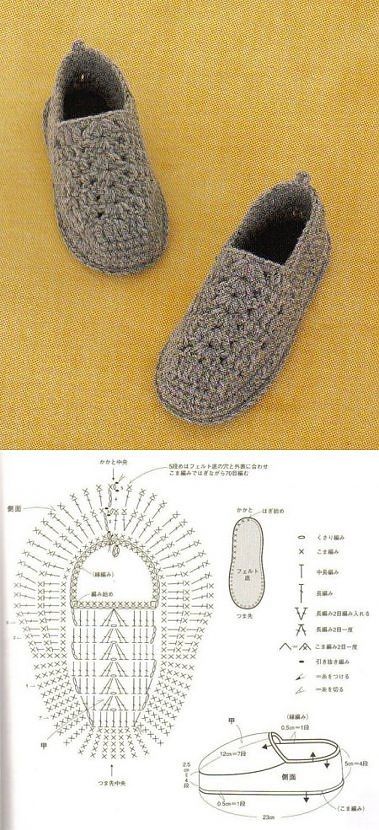
Lily in Crochet - Pattern

The CROCHET SLIPPER – Pattern is one of the most comforting and practical projects a crafter can take on, especially when the weather begins to turn chilly. Creating a high-quality CROCHET SLIPPER – Pattern allows you to tailor your footwear to the exact shape of your foot, ensuring a level of comfort that mass-produced store items simply cannot match. Whether you are looking for a thick, chunky bootie or a light, airy ballet-style slipper, finding the right CROCHET SLIPPER – Pattern is the first step toward cozy feet and a very satisfying crafting experience.
In the world of DIY fashion, the CROCHET SLIPPER – Pattern stands out as a top-tier choice for handmade gifts because it combines utility with a personal touch. Many people find that working through a CROCHET SLIPPER – Pattern helps them master essential techniques like increasing and decreasing in the round, which are vital skills for any crocheter. Furthermore, a well-executed CROCHET SLIPPER – Pattern can be a great way to use up premium wool or soft acrylic blends that feel luxurious against the skin while providing much-needed insulation for cold floors.
As we dive deeper into this guide, we will explore the nuances of the CROCHET SLIPPER – Pattern, covering everything from yarn selection to finishing techniques that make your slippers durable. A professional-grade CROCHET SLIPPER – Pattern will provide instructions for various sizes, from toddlers to adults, making it a versatile tool in your crochet library. By understanding the structural logic behind a CROCHET SLIPPER – Pattern, you can eventually learn to customize your designs with unique textures, colors, and embellishments that reflect your personal style or that of the recipient.
The foundation of any successful CROCHET SLIPPER – Pattern lies in the yarn you choose, as this determines both the warmth and the longevity of your footwear. For a sturdy CROCHET SLIPPER – Pattern, many experts recommend using a wool-nylon blend because the wool provides natural warmth and breathability, while the nylon adds the necessary strength to withstand constant friction against the floor. If you prefer a vegan option for your CROCHET SLIPPER – Pattern, high-quality acrylics can work well, though they may not be as moisture-wicking as natural fibers.
Cotton is another interesting choice for a CROCHET SLIPPER – Pattern, particularly for summer slippers or spa-style footwear. While cotton doesn’t have much “give,” it creates a very stable structure in a CROCHET SLIPPER – Pattern that holds its shape wash after wash. However, if you choose cotton for your CROCHET SLIPPER – Pattern, ensure the tension is tight enough so the slippers don’t stretch out and become loose after only a few wears around the house.
Thickness is also a major factor when following a CROCHET SLIPPER – Pattern; bulky or super-bulky yarns are popular because they make the project fly by quickly. A bulky CROCHET SLIPPER – Pattern results in a thick, cushioned sole that feels like walking on a cloud. On the other hand, a medium-weight (worsted) CROCHET SLIPPER – Pattern offers more flexibility and can easily fit inside larger boots or be worn comfortably while lounging on the sofa.
Color choice for your CROCHET SLIPPER – Pattern can be purely aesthetic or highly practical, depending on your lifestyle. Darker shades like navy, charcoal, or forest green are excellent for a CROCHET SLIPPER – Pattern because they hide dirt and wear better than lighter pastels. If you are making a CROCHET SLIPPER – Pattern for a child, using bright, variegated yarns can make the slippers look playful and harder for the little ones to lose.
Don’t forget to check the care instructions for your yarn before starting the CROCHET SLIPPER – Pattern, as footwear needs frequent cleaning. A “superwash” wool is often the best compromise for a CROCHET SLIPPER – Pattern because it can be tossed in the washing machine without fear of shrinking them down to doll size. Always keep a small portion of the yarn used in your CROCHET SLIPPER – Pattern for future repairs, as soles tend to wear out first.
Finally, consider the “grip” of the yarn you select for your CROCHET SLIPPER – Pattern to ensure safety on hardwood or tile floors. While yarn itself is often slippery, some textures created by a specific CROCHET SLIPPER – Pattern can offer a bit more traction. Preparing your materials thoughtfully before beginning your CROCHET SLIPPER – Pattern ensures that the final product is not only beautiful but also safe and functional for everyday use.
Most CROCHET SLIPPER – Pattern designs begin with the toe or the sole, requiring you to work in continuous rounds. Mastery of the “Magic Ring” is often essential for a CROCHET SLIPPER – Pattern that starts at the toe, as it ensures there is no hole at the front of your foot. As you follow the CROCHET SLIPPER – Pattern, you will learn how to increase stitches evenly to create a comfortable pocket for your toes without making the fabric too bulky.
The mid-section of a CROCHET SLIPPER – Pattern is typically worked in simple stitches like the single crochet (sc) or half-double crochet (hdc) to maintain a dense, wind-resistant fabric. A high-quality CROCHET SLIPPER – Pattern will often use these shorter stitches to ensure that the slipper doesn’t have large gaps where cold air can enter. Consistency in your tension while working the body of the CROCHET SLIPPER – Pattern is key to making sure both slippers in the pair end up the same size.
Heel construction is arguably the most technical part of any CROCHET SLIPPER – Pattern, as it requires shaping to fit the curve of the human foot. Some CROCHET SLIPPER – Pattern versions use “short rows” to create this cup shape, while others may have you sew a flat seam at the back. Understanding the specific heel method in your CROCHET SLIPPER – Pattern will help you avoid the common mistake of making the slipper too shallow, which causes it to slip off while walking.
For those who enjoy texture, many a CROCHET SLIPPER – Pattern incorporates post stitches or “waffle” stitches to add extra thickness to the top of the foot. These decorative elements within the CROCHET SLIPPER – Pattern serve a functional purpose by adding a layer of insulation. If your CROCHET SLIPPER – Pattern is a bit more advanced, you might even see “crocodile stitches” used to create a scale-like effect that looks incredibly modern and stylish.
The sole of the CROCHET SLIPPER – Pattern can be reinforced by working with two strands of yarn held together or by using a smaller hook to create a tighter gauge. Some specialized CROCHET SLIPPER – Pattern guides even suggest crocheting directly onto a leather or felt sole for maximum durability. Regardless of the method, the sole is the heart of the CROCHET SLIPPER – Pattern, and it needs to be the most robust part of your construction.
Finally, finishing the “cuff” of the CROCHET SLIPPER – Pattern allows you to customize the height of the footwear. You can follow the CROCHET SLIPPER – Pattern to create a low-cut loafer style or extend the stitches upward to create a cozy mid-calf bootie. Adding a ribbed stitch (alternating front and back post double crochets) at the end of your CROCHET SLIPPER – Pattern provides a nice stretch that helps the slipper stay securely around your ankle.
Achieving a perfect fit with your CROCHET SLIPPER – Pattern is one of the most rewarding aspects of handmade footwear. Because feet come in all shapes and widths, a good CROCHET SLIPPER – Pattern will offer a guide on how to measure your foot and adjust the stitch count accordingly. If you find that the CROCHET SLIPPER – Pattern is too tight across the instep, you can easily add an extra increase round to provide more volume.
Customization within a CROCHET SLIPPER – Pattern can also include adding “arch support” by strategically placing thicker stitches in the middle of the sole. Many people who suffer from foot pain appreciate a CROCHET SLIPPER – Pattern that allows for such personalized modifications. By making these small tweaks to the standard CROCHET SLIPPER – Pattern, you transform a generic piece of clothing into an orthopedic-friendly accessory tailored specifically to your needs.
Embellishments are where you can truly let your personality shine through your CROCHET SLIPPER – Pattern. You can add buttons, faux-fur trim, or even embroidered flowers to the top of the CROCHET SLIPPER – Pattern once the main structure is complete. For a holiday-themed CROCHET SLIPPER – Pattern, consider using red and green yarns or adding small bells to the toes for a festive “elf” look that children will absolutely love.
If you are making the CROCHET SLIPPER – Pattern for someone else, it is helpful to know their shoe size, but measuring their foot in centimeters is even better. Most CROCHET SLIPPER – Pattern documents include a conversion chart to help you translate these measurements into the correct number of rounds. Remember that crochet fabric tends to stretch over time, so a CROCHET SLIPPER – Pattern that feels slightly snug at first will likely become a perfect fit after a few days of wear.
Another popular customization for the CROCHET SLIPPER – Pattern is the addition of a “double sole” for extra padding. This involves making two identical soles from the CROCHET SLIPPER – Pattern and stitching them together before building the sides of the slipper. This not only makes the CROCHET SLIPPER – Pattern more comfortable but also doubles the time it takes for the bottoms to wear through, extending the life of your work.
Lastly, consider the breathability of your CROCHET SLIPPER – Pattern by choosing open-work stitches for the upper portion if you live in a warmer climate. A “mesh” style CROCHET SLIPPER – Pattern can be very chic and keep your feet cool while still providing a protective layer against the floor. The beauty of the CROCHET SLIPPER – Pattern is that it is a flexible blueprint that you can mold to suit any environment or personal preference.
Safety is a critical consideration when completing a CROCHET SLIPPER – Pattern, especially if the wearer will be walking on smooth surfaces. To prevent slips, many crafters finish their CROCHET SLIPPER – Pattern by applying “puff paint” or clear silicone dots to the bottom of the soles. These additions to your CROCHET SLIPPER – Pattern provide the necessary friction to prevent accidents without compromising the comfort or flexibility of the yarn.
Proper care will ensure that your CROCHET SLIPPER – Pattern creations remain a staple in your wardrobe for many seasons. When washing your slippers, it is often best to place them in a mesh laundry bag to prevent the stitches of the CROCHET SLIPPER – Pattern from snagging on other items in the machine. Use a mild detergent and avoid fabric softeners, as these can sometimes break down the fibers of a CROCHET SLIPPER – Pattern over time and cause them to lose their shape.
Air drying is universally recommended for any CROCHET SLIPPER – Pattern project to prevent shrinkage and maintain the integrity of the stitches. If you have used wool for your CROCHET SLIPPER – Pattern, laying them flat on a towel will help them dry without stretching out of proportion. Once dry, you can gently “fluff” the fibers of your CROCHET SLIPPER – Pattern to restore that soft, cozy feel they had when they were brand new.
If you find that your CROCHET SLIPPER – Pattern begins to develop “pills” (small balls of fuzz), you can use a fabric shaver or a simple razor to carefully remove them. This simple maintenance task keeps your CROCHET SLIPPER – Pattern looking fresh and professional. Over years of use, the sole of your CROCHET SLIPPER – Pattern may thin out, but because you made them yourself, you can easily “darn” the holes using matching yarn.
Sharing your experience with a specific CROCHET SLIPPER – Pattern is a wonderful way to contribute to the crafting community. Many online platforms allow you to post photos of your finished CROCHET SLIPPER – Pattern and offer tips on any modifications you made. This feedback loop helps other makers choose the right CROCHET SLIPPER – Pattern for their skill level and can even lead to collaborations or new design ideas.
In conclusion, the journey of making a CROCHET SLIPPER – Pattern is just as enjoyable as the final result of having warm feet. From the initial excitement of choosing the perfect yarn to the technical satisfaction of shaping the heel, every step of the CROCHET SLIPPER – Pattern offers a chance to learn and grow as an artist. By following these guidelines and putting your own unique spin on the CROCHET SLIPPER – Pattern, you will create functional art that brings comfort and joy to your daily life.
What is the best stitch for a durable CROCHET SLIPPER – Pattern?
The single crochet (sc) is widely considered the best stitch for a CROCHET SLIPPER – Pattern because it creates a dense, tight fabric. This density is important for keeping feet warm and ensuring the slipper holds its shape over time.
How do I prevent my slippers from being too slippery?
You can add non-slip soles by sewing on leather patches or using liquid non-slip products (like “Sock Stop” or even hot glue dots) on the bottom of the finished CROCHET SLIPPER – Pattern. This is an essential safety step for walking on wood or tile.
Can I use a CROCHET SLIPPER – Pattern to make slippers for men?
Absolutely! Most CROCHET SLIPPER – Pattern designs are unisex. To adapt them for men, you simply use larger measurements and perhaps choose more neutral colors or thicker yarns to suit a larger foot structure.
How long does it typically take to finish a pair using a CROCHET SLIPPER – Pattern?
For an intermediate crocheter using bulky yarn, a single slipper can often be completed in 1 to 2 hours. A full pair from a standard CROCHET SLIPPER – Pattern is a perfect weekend project.
What should I do if my slippers stretch out too much?
If your CROCHET SLIPPER – Pattern becomes loose, you can weave a piece of elastic thread through the top round (the cuff). This will help the slipper “grip” the foot better and maintain a snug fit.
To summarize, this article has explored the wonderful world of the CROCHET SLIPPER – Pattern, highlighting its importance as a versatile and practical project for any crafter. We discussed the critical role of yarn selection—emphasizing the need for a balance between comfort and durability—and delved into the structural techniques like heel shaping and sole reinforcement that make a CROCHET SLIPPER – Pattern successful.
We also touched upon the importance of sizing accuracy and the creative freedom you have to customize your slippers with textures and embellishments. Finally, we covered essential safety tips and maintenance routines to ensure your handmade footwear lasts for years. By following a well-designed CROCHET SLIPPER – Pattern, you are essentially building a custom piece of luxury for your feet.


