
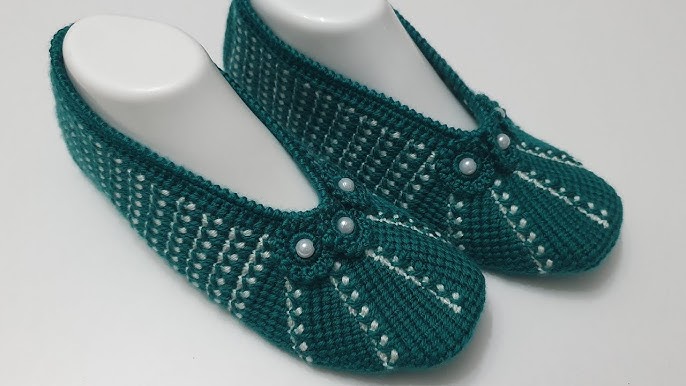
Lily in Crochet - Pattern

Finding the perfect CROCHET SLIPPER – Pattern is like discovering a secret recipe for ultimate home comfort, blending the timeless art of yarn craft with the practical need for warmth. There is something profoundly satisfying about transforming a simple skein of yarn into a pair of soft, custom-fitted footwear that hugs your feet after a long day of work. Whether you are an experienced crafter or a novice picking up a hook for the first time, mastering a CROCHET SLIPPER – Pattern allows you to create personalized gifts and cozy essentials that are far superior to mass-produced alternatives found in stores.
The versatility of a modern CROCHET SLIPPER – Pattern is truly impressive, offering designs that range from sleek, minimalist ballet-style flats to thick, chunky boots that can withstand the coldest winter mornings. By understanding the core mechanics of how a slipper is constructed—focusing on the sole, the toe box, and the heel—you can adapt any CROCHET SLIPPER – Pattern to fit any foot size perfectly, from tiny toddlers to adults. This adaptability is one of the primary reasons why the search for the ideal CROCHET SLIPPER – Pattern remains one of the most popular activities in the global fiber arts community today.
In this comprehensive guide, we will dive deep into the essential elements that make a CROCHET SLIPPER – Pattern successful, ensuring your finished project is not only beautiful but also durable and safe for indoor wear. We will explore the best yarn choices, the necessary tools for the job, and the specific stitches that provide the best structural integrity for footwear. By the end of this article, you will feel confident in your ability to read, execute, and even customize a CROCHET SLIPPER – Pattern to suit your unique style and comfort preferences.
When you begin your journey with a CROCHET SLIPPER – Pattern, the yarn you choose will dictate the longevity and feel of your footwear. Most experts recommend using a wool blend or high-quality acrylic because these fibers offer a good balance of warmth, stretch, and durability. Since slippers are subject to constant friction against the floor, choosing a sturdy yarn for your CROCHET SLIPPER – Pattern ensures that your hard work doesn’t wear through at the heels or toes within just a few weeks of use.
The weight of the yarn is another critical factor to consider when following a CROCHET SLIPPER – Pattern. Generally, a worsted weight (Level 4) or bulky weight (Level 5) yarn is preferred because it creates a thicker fabric that provides better cushioning for the soles of your feet. If your chosen CROCHET SLIPPER – Pattern calls for a lighter yarn, you might consider “doubling up” the strands to create a more robust texture that feels substantial and cozy.
Your crochet hook must be sized appropriately for the yarn to ensure the tension of your CROCHET SLIPPER – Pattern remains consistent. For footwear, many designers suggest using a hook that is slightly smaller than what the yarn label recommends; this creates a tighter, denser fabric. A dense stitch in your CROCHET SLIPPER – Pattern prevents your toes from poking through the gaps and helps the slipper maintain its shape over time, even after multiple washes.
Beyond the hook and yarn, a successful CROCHET SLIPPER – Pattern project requires a few specialized notions, such as stitch markers and a sharp tapestry needle. Stitch markers are indispensable for keeping track of the beginning of rounds or identifying where to start the heel turn. Because slippers are worked in three dimensions, losing your place in a CROCHET SLIPPER – Pattern can lead to lopsided shoes, so marking your progress is a vital habit to develop.
Safety is a common concern with handmade footwear, so your CROCHET SLIPPER – Pattern should ideally include a plan for non-slip soles. You can achieve this by applying puffy fabric paint, liquid silicone, or sewing on suede leather patches to the bottom of the finished slipper. These additions provide the necessary grip on hardwood or tile floors, making your CROCHET SLIPPER – Pattern creation both comfortable and functional for everyone in the family.
Finally, don’t forget to check the laundry requirements of your materials before finalizing your CROCHET SLIPPER – Pattern. Since slippers live on the floor, they will inevitably get dirty and need frequent cleaning. Using a “superwash” wool or a high-end synthetic in your CROCHET SLIPPER – Pattern ensures that your slippers can survive a trip through the washing machine without shrinking into a size meant for a doll.
Most versions of a CROCHET SLIPPER – Pattern follow a logical progression that begins at the toe and works back toward the heel, or starts with a flat sole and builds upward. The “Toe-Up” method is particularly popular because it allows you to try on the slipper as you go, making it easy to adjust the width and length. This real-time adjustment is a major benefit of working with a flexible CROCHET SLIPPER – Pattern, as it guarantees a snug fit that won’t slip off while walking.
The “Toe Box” section of a CROCHET SLIPPER – Pattern typically involves working in a circle or spiral with frequent increases. This part of the project requires careful counting to ensure that both the left and right slippers are identical. A well-written CROCHET SLIPPER – Pattern will provide specific stitch counts for each round, helping you create a smooth, rounded shape that comfortably accommodates your toes without being too restrictive.
Once the toe box is complete, the CROCHET SLIPPER – Pattern transitions into the “Foot” or “Body” section. This is usually the easiest part of the project, consisting of simple rounds of stitches until you reach the bridge of the foot. During this phase of the CROCHET SLIPPER – Pattern, you can experiment with different textures, such as waffle stitches or cable designs, to add visual interest and extra thickness to the top of the slipper.
The “Heel Turn” is often considered the most challenging part of any CROCHET SLIPPER – Pattern, but it is also the most rewarding. This section uses short rows or specific decreases to create a pocket for the heel of your foot. If you are following a CROCHET SLIPPER – Pattern for the first time, take your time with the heel instructions, as this is the structural anchor that keeps the slipper firmly in place.
After the heel is shaped, many a CROCHET SLIPPER – Pattern will offer options for the “Cuff” or “Ankle” section. You can leave the slipper as a low-profile loafer or continue crocheting upward to create a warm bootie. A ribbed stitch, such as front post and back post double crochet, is often used in this part of the CROCHET SLIPPER – Pattern to provide a stretchy, snug fit around the ankle that seals in the heat.
The final phase of the CROCHET SLIPPER – Pattern involves the finishing touches, such as seaming the back of the heel if the slipper was worked flat. Using a mattress stitch for seaming ensures that there isn’t a bulky ridge on the inside of the shoe that might irritate your skin. A meticulous finish is the hallmark of a high-quality CROCHET SLIPPER – Pattern project, turning a simple craft into a professional-grade garment.
To ensure your CROCHET SLIPPER – Pattern results in a pair of shoes that actually lasts, you need to use stitches that offer both density and flexibility. The Single Crochet (SC) is the workhorse of the quilting and slipper world because it creates a very tight fabric with minimal holes. Many patterns use the SC for the sole of the CROCHET SLIPPER – Pattern to provide maximum protection between the foot and the floor.
The Half Double Crochet (HDC) is another fantastic option for a CROCHET SLIPPER – Pattern, especially for the body of the slipper. It is slightly taller than a single crochet, which means the project grows faster, but it still maintains a solid structure. The HDC also has a unique “third loop” that can be used in your CROCHET SLIPPER – Pattern to create beautiful knit-like ribs and braids without complex techniques.
For those who want a bit more “squish” in their CROCHET SLIPPER – Pattern, the Waistcoat Stitch (or Center Single Crochet) is an excellent choice. This stitch mimics the look of knitting and creates an exceptionally thick, sturdy fabric that is perfect for winter footwear. While it can be a bit harder on the hands, the results in a CROCHET SLIPPER – Pattern are incredibly durable and professional-looking.
If your CROCHET SLIPPER – Pattern is designed for the summer or for use as “spa slippers,” you might see the Double Crochet (DC) used more frequently. While less dense than other stitches, the DC allows for more breathability. However, when using the DC in a CROCHET SLIPPER – Pattern, it is often paired with a second strand of yarn or a smaller hook to ensure the fabric doesn’t become too “holy” or flimsy.
Texture-focused stitches like the Puff Stitch or the Bobble Stitch are often incorporated into the top of a CROCHET SLIPPER – Pattern for aesthetic flair. These stitches create small “bumps” that trap air and provide extra insulation. When you see these used in a CROCHET SLIPPER – Pattern, they are usually decorative accents rather than the primary structural stitch, adding a touch of luxury to your handmade footwear.
Finally, the Slip Stitch (SL ST) is vital for the edging and joining of your CROCHET SLIPPER – Pattern. Using a slip stitch around the opening of the slipper can prevent the edge from stretching out over time. It acts as a “reinforcement” round in the CROCHET SLIPPER – Pattern, ensuring that even after months of being pulled on and off, the slippers maintain their original, snug dimensions.
One of the greatest joys of working with a CROCHET SLIPPER – Pattern is the ability to customize the fit for “hard-to-size” feet. If you have a wide foot or a high arch, you can simply add a few extra increase stitches in the toe box or work extra rows in the body of the CROCHET SLIPPER – Pattern. This bespoke approach ensures that your slippers feel like they were made specifically for you—because they were!
Styling your CROCHET SLIPPER – Pattern is where your personality can truly shine. You can add buttons, pom-poms, or even faux-fur trim to the cuffs to create a variety of different looks from the same basic blueprint. A single CROCHET SLIPPER – Pattern can yield a dozen different pairs of slippers just by swapping the yarn color and the decorative embellishments.
For children, you can easily adapt a CROCHET SLIPPER – Pattern into animal shapes. By adding small crocheted ears, eyes, and noses, a basic grey CROCHET SLIPPER – Pattern becomes a mouse, while a yellow one becomes a duckling. These creative modifications make the CROCHET SLIPPER – Pattern a favorite among parents and grandparents looking to make something special for the little ones in their lives.
Colorwork is another way to enhance a CROCHET SLIPPER – Pattern. You can use stripes, ombre yarns, or even fair-isle techniques to create intricate designs on the surface of your slippers. Since slippers are small projects, they are the perfect canvas to practice new color-changing skills without the commitment of a full-sized blanket, all within the framework of your CROCHET SLIPPER – Pattern.
Don’t forget the importance of the “Insole” when customizing your CROCHET SLIPPER – Pattern. If you need extra support, you can crochet a separate flat sole and insert a layer of memory foam or felt between the two layers. This “sandwich” technique in your CROCHET SLIPPER – Pattern provides an incredible level of comfort that rivals expensive orthotic house shoes.
Lastly, consider making a “travel version” of your CROCHET SLIPPER – Pattern. By using a lightweight cotton yarn, you can create a pair of foldable, breathable slippers that fit easily into a suitcase. This makes the CROCHET SLIPPER – Pattern a versatile tool for any lifestyle, ensuring you always have a clean, cozy way to protect your feet no matter where your travels take you.
1. How long does it take to finish a typical CROCHET SLIPPER – Pattern?
For most intermediate crocheters, a pair of slippers can be completed in 3 to 6 hours. Because they are small, they make excellent “weekend projects.” If you are using a chunky yarn with your CROCHET SLIPPER – Pattern, you might even finish a pair in a single evening!
2. Can I use cotton yarn for a CROCHET SLIPPER – Pattern?
Yes, cotton is great for summer slippers or “spa” style footwear because it is breathable and absorbent. However, keep in mind that cotton has very little “spring” or elasticity compared to wool, so your CROCHET SLIPPER – Pattern might need to be sized more precisely to avoid the slippers becoming loose.
3. What is the most common mistake when following a CROCHET SLIPPER – Pattern?
The most frequent error is making one slipper tighter than the other. This usually happens if you work on them over several days and your tension changes. A good tip for any CROCHET SLIPPER – Pattern is to work both slippers simultaneously—row by row—to ensure they are identical.
4. How do I make my slippers from a CROCHET SLIPPER – Pattern non-slip?
As mentioned, you can use silicone sealant, puffy paint, or sew on leather soles. Another quick fix is to apply small dots of hot glue to the bottom of the finished project, though this may need to be reapplied after washing your CROCHET SLIPPER – Pattern creation.
5. How do I know what size to make in a CROCHET SLIPPER – Pattern?
Most patterns provide a size chart based on foot length in inches or centimeters. The best way to ensure a perfect fit with a CROCHET SLIPPER – Pattern is to measure your foot from the back of the heel to the tip of the longest toe and compare it to the pattern’s gauge and dimensions.
6. Can a CROCHET SLIPPER – Pattern be adjusted for men?
Absolutely. To adapt a feminine CROCHET SLIPPER – Pattern for men, simply use a larger hook and neutral colors. Men’s feet are typically wider, so you may need to add a few extra rounds of increases at the toe box to ensure the CROCHET SLIPPER – Pattern fits comfortably.
In this article, we have thoroughly explored the world of the CROCHET SLIPPER – Pattern, covering everything from the importance of yarn selection and tool kits to the specific stitches that ensure a long-lasting, comfortable product.
We learned how a CROCHET SLIPPER – Pattern is constructed in stages—toes, body, and heel—and how to overcome common hurdles like the heel turn and ensuring a non-slip finish. Most importantly, we’ve seen how a single CROCHET SLIPPER – Pattern can be a foundation for endless creativity, allowing you to customize size, style, and texture to fit your personal needs or those of your loved ones.


