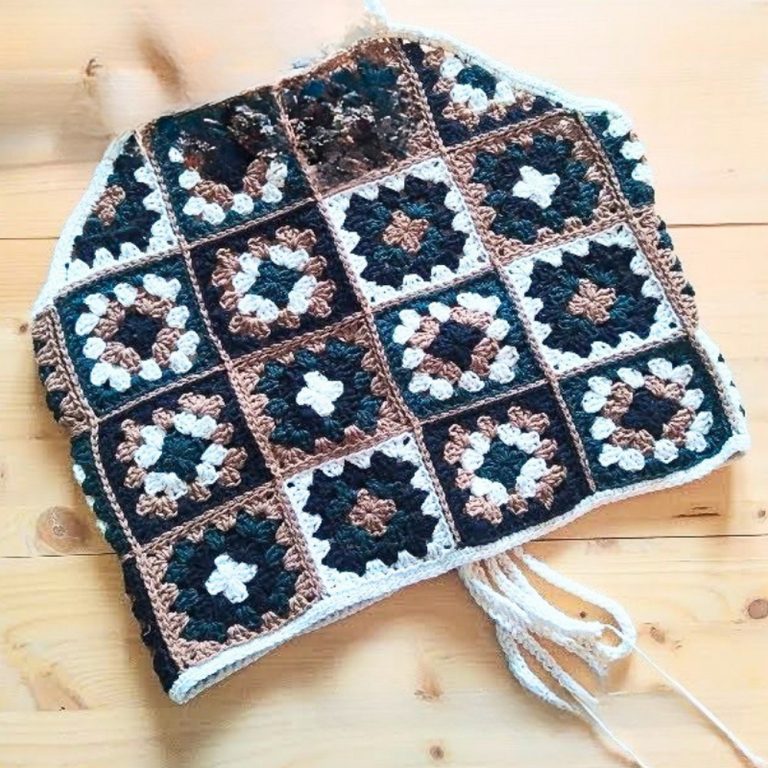
Crochet Granny Square Top - Tutorial

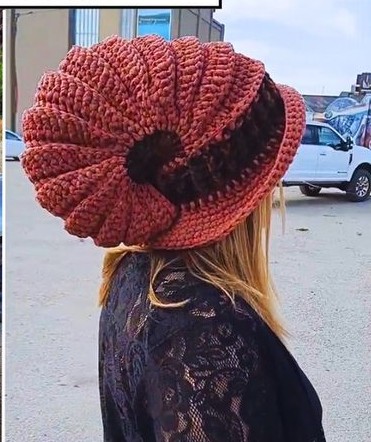
The Crochet Snail Shell Hat – Pattern is one of the most imaginative and visually striking projects any fiber artist can take on to showcase their technical skills while creating a truly whimsical accessory. Unlike standard beanies that follow a simple vertical or horizontal ribbing, a snail-inspired design utilizes a spiraling construction that mimics the natural Fibonacci sequence found in the shells of garden gastropods. This project is perfect for those who want to move beyond the basics of crochet and experiment with architectural shapes that maintain their structure while being worn.
When you embark on a Crochet Snail Shell Hat – Pattern, you are not just making a piece of clothing; you are engineering a wearable sculpture. The beauty of the snail shell design lies in its versatility, as it looks just as charming on a newborn for a themed photoshoot as it does on an adult looking for a quirky, avant-garde winter accessory. Because the spiral creates built-in air pockets and thick ridges, this hat is exceptionally warm, making it a functional choice for colder climates where style and insulation must go hand-in-hand.
In the following sections, we will delve deep into the mechanics of the Crochet Snail Shell Hat – Pattern, exploring everything from the specific yarn weights that hold a “swirl” best to the advanced stitching techniques required to achieve that iconic gastropod silhouette. Whether you are looking to master the magic of Tunisian crochet spirals or prefer a more traditional modular approach, this guide will provide the foundation you need. Let’s explore how to transform a simple skein of yarn into a stunning, spiraled masterpiece that will turn heads wherever you go.
Choosing the right yarn is the most critical decision when starting your Crochet Snail Shell Hat – Pattern. To ensure the spiral ridges of the shell stand out prominently, you should opt for a yarn with excellent stitch definition, such as a mercerized cotton or a high-twist wool blend. Avoid excessively “fuzzy” yarns like mohair, as the halo of the fibers can blur the architectural lines of the shell, making the unique spiral crochet look messy rather than intentional.
The hook size you select will directly impact the “rigidity” of your Crochet Snail Shell Hat – Pattern. While most yarn labels suggest a specific size, many crafters find that dropping down half a size (for example, using a 4.5mm hook for a 5.0mm yarn) helps create a denser fabric. This density is vital because it prevents the “shell” from collapsing under its own weight, ensuring the hat structure remains upright and retains its three-dimensional spiral even after multiple wears.
For a truly realistic look, color selection in your Crochet Snail Shell Hat – Pattern can make a huge difference. Using a long-gradient “cake” yarn is a popular choice because the colors shift gradually as you work through the spiral, highlighting the depth of the ridges without requiring you to weave in dozens of ends. Earthy tones like beige, tan, and moss green can give the hat a naturalistic forest vibe, while vibrant neons turn it into a fun cosplay accessory.
Since the Crochet Snail Shell Hat – Pattern involves complex counting to keep the spiral symmetrical, you will absolutely need high-quality stitch markers. Placing a marker at the start of each increase or at the transition point of the swirl prevents you from losing your place in the pattern. This is especially important if you are working in continuous rounds, where the lack of a visible seam can make it easy to accidentally add or subtract stitches.
Tension management is a subtle but essential tool in your arsenal for this project. If you are a naturally loose crocheter, your snail shell might end up looking a bit floppy. Practicing a consistent, firm tension ensures that the 3D crochet effect is uniform from the base of the hat to the very tip of the shell. Many advanced patterns for this style suggest using a “standing” stitch to start new segments, which helps maintain a seamless look throughout the construction.
Finally, don’t forget the finishing tools like a large-eye blunt yarn needle and sharp embroidery scissors. Because a Crochet Snail Shell Hat – Pattern often features a tapered end or a “pointy” shell tip, you will need to weave your ends in deeply to prevent them from popping out when the hat is stretched. A good steam iron can also be helpful for “blocking” the final product, which sets the stitches and helps the shell ridges “pop” for that professional finish.
The core of most Crochet Snail Shell Hat – Pattern designs is the use of the “Post Stitch,” specifically the Front Post Double Crochet (fpdc). By working around the post of the stitch from the row below rather than into the top loops, you create a raised ridge that sits on the surface of the fabric. These ridges are what form the “spiral arms” of the snail shell, providing the texture that defines this unique textured hat pattern.
Increasing in a spiral requires a specific mathematical approach to ensure the hat grows outward before it curves downward to fit the head. In a typical Crochet Snail Shell Hat – Pattern, the increases are often hidden within the valleys between the ridges. This technique allows the “spiral” to expand in diameter while keeping the visible ridges straight and clean. Mastering the “invisible increase” will help you maintain the illusion of a solid, spiraling shell without unsightly gaps.
Short-row shaping is another advanced technique often utilized in a high-end Crochet Snail Shell Hat – Pattern. By only working across a portion of the round and then turning back, you can add “height” to one side of the shell, creating the characteristic asymmetrical look of a real snail. This method allows the shell to “lean” slightly, giving the hat a more organic and dynamic appearance than a standard symmetrical beanie would offer.
Working in the “Third Loop” of a half-double crochet is a fantastic alternative for achieving the Crochet Snail Shell Hat – Pattern look. When you work into the third loop (located at the back of the stitch), the top two loops are pushed forward, creating a flat, braided-looking ridge. This is an excellent technique for beginners who find post stitches a bit too fiddly but still want to achieve a high-level spiral texture in their work.
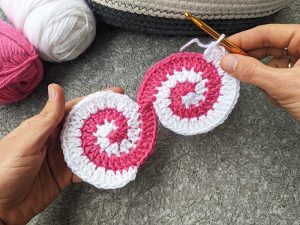
The “Magic Ring” or “Magic Circle” is the only way to start the very top of your Crochet Snail Shell Hat – Pattern. Since snail shells start at a tiny point and spiral outward, you need a starting method that can be pulled completely tight to leave no hole at the peak. This ensures the “apex” of your shell looks solid and professional, providing a sturdy foundation for the rest of the geometric crochet work that follows.
Understanding stitch heights is vital for a smooth transition in your Crochet Snail Shell Hat – Pattern. To make the spiral look like it is growing, you will often move from a single crochet to a half-double, then to a double, and finally to a treble crochet within a single round. This creates a “ramped” effect that naturally flows into the next layer of the shell, giving the finished hat a sophisticated, sculptural silhouette.
When adapting a Crochet Snail Shell Hat – Pattern for infants or children, comfort is your top priority. While the ridges should be prominent, ensure the interior of the hat remains smooth against the skin. You might consider using a softer “baby” acrylic or a bamboo blend that offers the same stitch definition but with a much gentler feel. Adding a pair of crochet “tentacles” or “eyes” to the front can also turn the hat into a full-blown snail character.
For adult fashion, the Crochet Snail Shell Hat – Pattern can be leaned into as a piece of “wearable art.” Choosing sophisticated, monochromatic palettes like charcoal, slate, or oatmeal can make the complex texture look like something out of a high-end boutique. In this context, the snail shell becomes a subtle, chic statement piece rather than just a costume item, proving that crochet can be truly high-fashion when executed with the right color and yarn.
Adjusting the “height” of the shell is a great way to customize the Crochet Snail Shell Hat – Pattern. Some people prefer a “flat” snail shell that sits close to the head like a beret, while others want a dramatic, towering shell that stands several inches tall. By increasing the number of rounds before you stop the “expansion” phase, you can control exactly how much of a “spiral peak” your hat will have, allowing for a personalized custom crochet fit.
Incorporating “bead crochet” into your Crochet Snail Shell Hat – Pattern can add a touch of sparkle that mimics the glistening trail of a snail. By stringing small glass beads onto your yarn before you begin and sliding them into place as you work the ridges, you create a hat that catches the light beautifully. This is a popular variation for those making hats for festivals or as part of a creative handmade gift set.
The brim of your Crochet Snail Shell Hat – Pattern offers another opportunity for customization. You can finish the hat with a simple ribbed brim for a snug fit, or you can continue the spiral pattern right down to the edge for a seamless look. Some crafters even add a “wavy” brim to simulate the “foot” of the snail, adding another layer of thematic consistency to the whimsical headwear project.
Using “Scrap Yarn” can result in a beautiful, eclectic version of the Crochet Snail Shell Hat – Pattern. Snail shells in nature are often multi-toned and weathered, so using leftover bits of yarn in various shades of the same color family can create a “stash-buster” project that looks intentional. This approach is not only eco-friendly but also ensures that no two hats you make from the same pattern will ever look exactly the same.
Because the Crochet Snail Shell Hat – Pattern creates a lot of surface texture, it can be prone to catching on jewelry or zippers. To maintain the integrity of the ridges, always store the hat flat or on a mannequin head rather than hanging it on a sharp hook. Hanging can stretch the crochet stitches unevenly, causing the spiral to lose its crispness over time and potentially ruining the “swirl” effect you worked so hard to create.
When it comes to cleaning your Crochet Snail Shell Hat – Pattern, hand-washing is the gold standard. Submerge the hat in lukewarm water with a bit of wool wash, gently squeezing the suds through the fibers without rubbing or wringing. Rubbing the ridges can cause “pilling,” which will make the hat’s texture look fuzzy and worn. Rinse thoroughly and roll the hat in a clean towel to remove excess moisture before laying it flat to dry.
Reshaping during the drying process is a secret tip for keeping your Crochet Snail Shell Hat – Pattern looking brand new. While the hat is damp, use your fingers to “pinch” the ridges and accentuate the spiral. If the shell has a tall peak, you can lightly stuff the inside with clean tissue paper while it dries to help it hold its 3D form. This “wet blocking” technique ensures the yarn’s memory sets in the correct position.
Pilling is an inevitable part of wearing any wool or acrylic item, but it can be managed. If your Crochet Snail Shell Hat – Pattern starts to develop small balls of fuzz on the ridges, use a specialized fabric shaver or a small pair of grooming scissors to carefully remove them. Keeping the surface “clean” ensures that the geometric lines of the snail shell remain the focus of the design, keeping the accessory looking high-quality.
If you used a “Magic Ring” to start your Crochet Snail Shell Hat – Pattern, it is a good idea to check that center point occasionally. Over time, the tension of wearing the hat can cause the center hole to loosen slightly. Simply turn the hat inside out and give the starting tail a gentle tug, then secure it with an extra knot using your yarn needle to ensure your snail shell apex remains tightly closed and secure.
Finally, consider the seasonal transition of your Crochet Snail Shell Hat – Pattern. If you are storing it away for the summer, place it in a breathable cotton bag with a cedar block or a lavender sachet to protect it from moths and dust. This ensures that when autumn rolls around again, your handmade crochet hat is fresh, clean, and ready to make another stylish appearance in your winter wardrobe.
While a very determined beginner could tackle it, this pattern is generally considered “Intermediate.” It requires knowledge of post stitches, working in the round, and maintaining consistent tension. If you have already made a few basic beanies, you are likely ready to try this spiral hat design.
For an average adult-sized hat, you will typically need between 200 to 300 yards of worsted-weight yarn. If you decide to make a very tall, dramatic shell with many extra spiral rounds, you may need closer to 400 yards. Always buy an extra skein just in case!
Most authentic Crochet Snail Shell Hat – Pattern designs require working in the round to achieve the continuous spiral. While there are “flat” versions that are seamed together later, they often lack the seamless, 3D flow that makes the snail design so iconic and visually appealing.
Yes, if your tension is firm and you use a supportive yarn like cotton or a structured wool. If you find your shell is drooping, you can move to a smaller hook size to create a stiffer fabric. Some people also use a small amount of lightweight stuffing in the very tip of the shell for extra support.
Yes, the Crochet Snail Shell Hat – Pattern is highly scalable. To make it smaller or larger, you simply adjust the number of increase rounds at the beginning. Most patterns provide a “crown diameter” guide to help you know when to stop increasing and start working the sides of the hat.
The Front Post Double Crochet (fpdc) is the most common stitch for creating those deep, beautiful snail ridges. Some patterns also use the “Front Post Treble” for even more drama, or the “Third Loop HDC” for a more subtle, ribbed texture that is easier on the hands.
The Crochet Snail Shell Hat – Pattern is a fantastic journey into the world of sculptural fiber arts, offering a perfect blend of logic, geometry, and whimsical creativity. We’ve covered everything from the technical importance of yarn selection and hook sizes to the advanced post-stitch techniques that bring the snail’s spiral to life.
By understanding how to manipulate stitch heights and use short-row shaping, you can create a piece of headwear that is both a functional winter staple and a stunning conversation piece. Remember that the key to a professional-looking shell lies in your tension and the “hidden” increases that allow the design to flow naturally without interruption.


