Crochet Rose - Pattern

If you’re looking for a project that’s both charming and versatile, the CROCHET STAR – PATTERN is a perfect place to start. Stars have universal appeal—they symbolize hope, dreams, and celebration. When translated into yarn through crochet, they become delightful decorative elements that can brighten up any room, season, or event. From Christmas ornaments to baby mobiles, wall hangings to festive garlands, a crocheted star adds a touch of handmade magic.
The beauty of the CROCHET STAR – PATTERN lies in its simplicity and adaptability. You can create flat stars for appliqués, three-dimensional stars for ornaments, or even large, lacy versions to use as doilies or centerpieces. Whether you’re a beginner picking up your hook for the first time or an advanced crocheter looking for a quick and satisfying project, star patterns are the ideal choice.
In this guide, you’ll learn everything you need to know to get started with your own CROCHET STAR – PATTERN. From the essential tools and materials to different design variations and creative uses, this article provides both inspiration and instruction. Plus, we’ll answer the most frequently asked questions to help you avoid common mistakes and get the best results with your project.
There’s a reason why so many crocheters love working with a CROCHET STAR – PATTERN—it’s fast, fun, and flexible. Whether you’re crocheting for the holidays, a baby gift, or just to relax and unwind, a star is always a good idea.
The most obvious appeal is versatility. You can use stars in nearly every type of project. Add them to hats, blankets, clothing, or bags. Make a whole garland for a party, or a mobile to hang over a crib. The options are endless.
Another reason to love the CROCHET STAR – PATTERN is that it’s usually quick to complete. Even beginners can create a simple five-pointed star in under an hour. This makes it an ideal project when you want something satisfying but don’t have time for a full blanket or garment.
Crocheting stars is also a great way to use up scrap yarn. Those small leftover balls you’ve been saving from other projects can finally shine. Since stars are usually small, they’re perfect for colorful combinations or multi-pattern collections.
From a design standpoint, stars are also highly customizable. Want a lacy star? Use a thin thread and an openwork pattern. Prefer something chunky and rustic? Grab bulky yarn and a large hook. Add glitter yarn or beads for something festive. Each star can have its own personality.
Working with the CROCHET STAR – PATTERN also helps improve your skills. You’ll get better at reading patterns, working in the round, increasing, decreasing, and shaping. These are essential techniques that will carry over into more complex projects.
Finally, stars are just joyful to make. There’s something satisfying about seeing the points form and come together into a perfect shape. And once you start making them, it’s hard to stop—they’re practically addictive.
Before you begin your CROCHET STAR – PATTERN, it’s important to gather the right materials. The good news is that these patterns don’t require a lot of supplies. In fact, you probably already have most of what you need in your yarn stash.
First, choose your yarn. For classic stars, many crocheters prefer cotton yarn because of its structure and stitch definition. Acrylic is also a popular choice, especially for colorful, soft, and durable stars that will be handled often.
The yarn weight will affect the size of your finished star. Worsted weight yarn creates a nice, medium-sized star, while bulky yarn makes a larger, squishier version. Use thread or lace-weight yarn for delicate, mini stars suitable for jewelry or small décor.
Your crochet hook should match your yarn, though using a smaller hook than recommended can give your star a tighter shape. For worsted weight yarn, a 4.0 mm to 5.0 mm hook typically works well. For thread, use a fine steel hook.
You’ll also need a yarn needle for weaving in the ends, and sharp scissors to cut your yarn cleanly. If your pattern includes embellishments like beads, you’ll need a beading needle or crochet hook small enough to slide through the bead holes.
Optional items include blocking tools, such as a blocking mat and pins. Blocking helps your star lie flat and keeps the points sharp, especially if you’re making a lacy or openwork design.
Some crafters also use starch spray or fabric stiffener to help the stars keep their shape when used as ornaments or wall hangings. A light mist and proper drying can add structure without making the yarn feel too stiff.
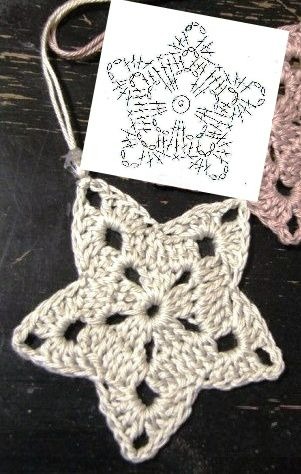
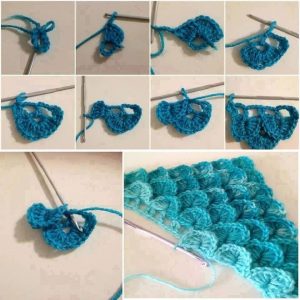
A basic CROCHET STAR – PATTERN typically starts in the round, working from the center outward. While patterns may vary, most include five points and use basic stitches like chains, single crochet, and double crochet.
Start with a magic ring or chain 4 and join with a slip stitch to form a circle. This will be the center of your star. Work a round of stitches—usually double crochets—to form the base.
Next, you’ll create the points of the star. This usually involves chaining a certain number of stitches, then working back down the chain with a combination of slip stitches, single crochet, and double crochet to form the triangular point.
Repeat the process around the circle to create the other points. Each point is usually separated by a slip stitch to maintain shape and even spacing.
Once your star is finished, fasten off and weave in your ends. If desired, block your star flat using pins and a mist of water or starch spray. This step is especially helpful if your yarn curls or the points aren’t even.
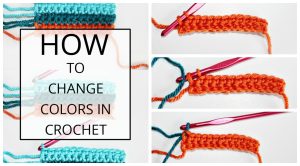
To add more interest to your CROCHET STAR – PATTERN, consider adding color changes, beads, or even embroidery. For example, using a different color for the points can make your star pop with contrast.
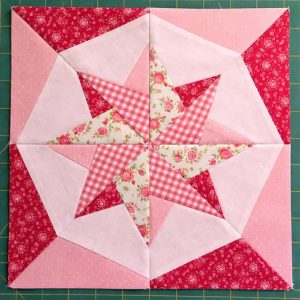
There are also many pattern variations to explore—six-pointed stars, puff stitch stars, granny-style stars, or even stuffed 3D stars. You can combine them into quilts, mobiles, or festive décor for every season.
Once you’ve made your first few stars, you’ll start to see just how many creative possibilities they offer. The CROCHET STAR – PATTERN is incredibly flexible, and the projects you can make with it are only limited by your imagination.
One popular use is as Christmas ornaments. Thread a ribbon through one point and hang it on your tree for a rustic, handmade touch. You can even add glitter or beads for extra sparkle.
Stars also make great garlands. String several together and hang them on a wall, fireplace, or over a window. Mix and match colors for seasonal themes—red, white, and blue for Independence Day, or pastels for springtime celebrations.
If you’re crocheting for a baby or child, consider making a crib mobile with colorful stars hanging from a wooden hoop. Add soft music or a rotating mechanism for a soothing, handmade nursery piece.
For home décor, you can use larger stars as table centerpieces, coasters, or appliqués on cushions and blankets. Their geometric beauty brings symmetry and charm to any room.
You can also incorporate the CROCHET STAR – PATTERN into wearable accessories. Add a small star to a hat, scarf, or bag for a fun embellishment. You can even make earrings or pins using thread and miniature patterns.
Finally, these stars are wonderful gifts. They’re small enough to make quickly but personal enough to feel meaningful. Add a handmade star to a card, package, or bouquet to give your present an extra layer of care and creativity.
Q1: Is the CROCHET STAR – PATTERN beginner-friendly?
Yes! Many patterns are perfect for beginners and use only basic stitches. As you improve, you can explore more complex versions.
Q2: How long does it take to make a crochet star?
A simple star can take as little as 30 minutes, while more complex or layered stars may take 1–2 hours depending on your skill level.
Q3: What size should my crochet star be?
That depends on the yarn and hook you use. Most stars range from 2 to 6 inches across, but you can scale up or down easily.
Q4: Can I use the CROCHET STAR – PATTERN in larger projects?
Absolutely. Stars can be joined to create blankets, shawls, or wall hangings. You can also use them as appliqués on larger pieces.
Q5: How do I make my stars stiff enough to hang?
Use spray starch or fabric stiffener after blocking. Allow the star to dry flat with pins to maintain shape.
**Q6: Can I sell items made
from these patterns?**
In most cases, yes—but always check the pattern’s terms of use or licensing if it’s from a specific designer.
The CROCHET STAR – PATTERN is more than just a fun craft—it’s a creative outlet with endless possibilities. Whether you’re making ornaments, gifts, or personal decorations, crocheted stars are a joy to create and share.
Throughout this article, we’ve covered materials, techniques, design ideas, and creative uses for your stars. We hope this guide helps you feel inspired and ready to make something special with your hook and yarn.
Have you made your own crochet stars? We’d love to hear from you. Leave a sincere comment with your experience and suggestions to help others who are just beginning their crochet star journey. Happy stitching!


