
Lily in Crochet - Pattern

Finding the perfect Crochet Stitch – Pattern can be a transformative journey for both beginners and seasoned crafters looking to elevate their handmade projects. When you dive into the world of fiber arts, understanding how a specific Crochet Stitch – Pattern is constructed allows you to create everything from cozy blankets to intricate garments with professional-grade finishes. This guide is designed to help you master the nuances of various techniques while ensuring your tension and flow remain consistent throughout your creative process.
The beauty of a high-quality Crochet Stitch – Pattern lies in its versatility and the mathematical harmony of its loops. Whether you are working on a simple single crochet foundation or a complex shell stitch, the repetitive nature of the craft provides a meditative experience that results in a tangible piece of art. By focusing on the foundational Crochet Stitch – Pattern steps, you can build a library of textures that will make your work stand out in any craft community or online marketplace.
As we explore the specifics of this Crochet Stitch – Pattern, it is essential to remember that the choice of yarn and hook size can drastically change the final look of your design. Using a merino wool yarn might give your Crochet Stitch – Pattern a soft, luxurious drape, while a mercenized cotton will highlight the stitch definition and crispness of the geometry. In the following sections, we will break down the essential components of popular stitches and how to read a pattern effectively to achieve the best results for your upcoming projects.
Mastering a Crochet Stitch – Pattern begins with understanding the anatomy of the stitch itself. Every loop you pull through is a building block that contributes to the overall structural integrity of the fabric. By focusing on where the hook enters the previous row, you can create different effects like ribbing or texture.
The most common Crochet Stitch – Pattern often starts with a foundation chain, which sets the width of your project. It is crucial to keep your tension even during this stage, as a chain that is too tight will cause your work to curl. Practice makes perfect when it comes to finding that “sweet spot” of tension that allows for smooth transitions.
When reading a Crochet Stitch – Pattern, you will encounter various abbreviations like sc (single crochet), dc (double crochet), and tr (treble crochet). These are the standard “vocabulary” of the craft. Learning these terms is like learning a new language that unlocks thousands of potential designs.
Visualizing the Crochet Stitch – Pattern before you start can help you identify potential mistakes early on. Many crafters find that using stitch markers is a life-saver, especially when working in rounds or complex repeats. These small tools ensure you don’t lose your place in the rhythm of the work.
Another vital aspect of the Crochet Stitch – Pattern is the “turning chain.” This small addition at the end of a row provides the necessary height to begin the next level without pulling the edges inward. Skipping this step is a common mistake that leads to uneven or triangular-shaped projects.
Finally, remember that every Crochet Stitch – Pattern is customizable. Once you understand the basic logic of how the loops interact, you can start experimenting with color changes or combining different stitches to create a unique custom design. This creative freedom is what makes crocheting so rewarding.
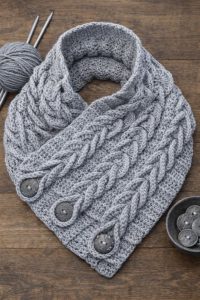
To take your Crochet Stitch – Pattern to the next level, you might want to explore post stitches. By working around the “post” of the stitch from the previous row rather than the top loops, you create a 3D effect known as crochet cables or waffle textures. This adds significant weight and warmth to blankets.
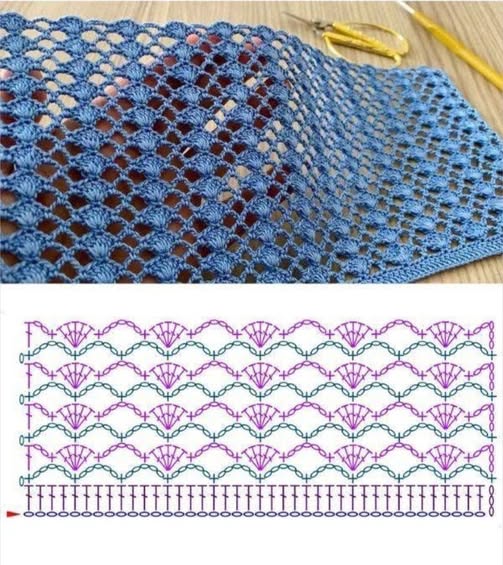
Another popular variation in a Crochet Stitch – Pattern is the lace technique. This involves using chain spaces and skipped stitches to create airy, breathable fabrics. These are perfect for summer shawls or decorative table runners where a delicate appearance is desired over pure insulation.
When working on a complex Crochet Stitch – Pattern, the concept of gauge becomes incredibly important. Gauge refers to the number of stitches and rows per inch. If your gauge doesn’t match the pattern instructions, your finished garment might end up being much larger or smaller than intended.
Colorwork is another way to enhance a Crochet Stitch – Pattern. Techniques like Tapestry Crochet or Intarsia allow you to “paint” pictures with your yarn. This requires carrying multiple strands of yarn and switching them out at specific intervals to create intricate motifs and logos.
The Crochet Stitch – Pattern can also be modified using the Back Loop Only (BLO) technique. By inserting your hook only into the back loop of the stitch, you create a stretchy, ribbed texture that is perfect for the cuffs of sweaters or the brims of winter hats. It is a simple change with a huge visual impact.
Don’t forget the importance of blocking your finished Crochet Stitch – Pattern. Blocking involves wetting your finished piece and pinning it to specific dimensions to set the stitches. This process evens out any minor tension issues and gives the final product a professional, “store-bought” look.
Choosing the right hook is fundamental to any Crochet Stitch – Pattern. Hooks come in various materials, including aluminum, bamboo, and ergonomic plastic. Many crafters prefer ergonomic hooks because they reduce hand fatigue during long sessions of working on a demanding pattern.
The yarn weight is the next critical factor in your Crochet Stitch – Pattern success. Yarn is categorized from 0 (Lace) to 7 (Jumbo). A delicate doily pattern will require a size 0 or 1, while a chunky, modern throw blanket might call for a size 6 or 7 to achieve that oversized look.
In addition to hooks and yarn, a pair of sharp yarn snips and a tapestry needle are essential for any Crochet Stitch – Pattern. The needle is used to “weave in ends,” which is the process of hiding the yarn tails inside the stitches so they don’t unravel over time.
For those who enjoy digital organization, many apps now help you track your Crochet Stitch – Pattern progress. You can upload PDFs, highlight rows you’ve completed, and even use digital row counters. This modern approach keeps your workspace clean and your mind focused on the craft.
Yarn bowls are another fantastic tool for maintaining the flow of your Crochet Stitch – Pattern. By placing your yarn ball inside the bowl, it prevents the yarn from rolling across the floor and collecting dust. It also provides a consistent tension as the yarn feeds through the carved slot.
Lastly, never underestimate the power of a good lighting setup. Crocheting, especially with dark-colored yarns or intricate Crochet Stitch – Pattern details, can strain the eyes. A bright, adjustable lamp ensures you can see every loop clearly, preventing mistakes and reducing headaches.
One of the most frequent problems in a Crochet Stitch – Pattern is the accidental addition or subtraction of stitches. This usually happens at the ends of the rows. Counting your stitches at the end of every row is the best way to ensure your project stays perfectly rectangular and aligned.
If your Crochet Stitch – Pattern looks “holy” or too loose, you may be using a hook that is too large for your yarn weight. Conversely, if the fabric is stiff and difficult to work with, your hook might be too small. Always check the yarn label for the manufacturer’s recommended hook size.
Yarn splitting is another nuisance that can ruin the look of a Crochet Stitch – Pattern. This happens when the hook pierces through the plies of the yarn instead of going under the whole strand. To fix this, try slowing down your movements or switching to a hook with a smoother “throat.”
If you find that the edges of your Crochet Stitch – Pattern are curving inward, your tension is likely getting tighter as you progress. This often happens when a crafter gets stressed or tired. Taking regular breaks and stretching your hands can help maintain a relaxed and consistent crochet tension.
Sometimes, a Crochet Stitch – Pattern might call for a “magic ring” to start a circular project. If your ring is coming loose, ensure you are leaving a long enough tail to weave in securely. Pulling the tail tight and “knotting” it into the first few stitches provides extra security for hats and amigurumi.
If you run out of yarn in the middle of a Crochet Stitch – Pattern row, try to join the new ball at the end of the row instead. This makes the join less visible. If you must join in the middle, use a Russian Join or a Magic Knot to ensure the connection is strong and seamless.
What is the easiest Crochet Stitch – Pattern for a beginner?
The easiest starting point is usually the Single Crochet (sc). It is a compact stitch that helps you learn how to control your hook and yarn. Once you master the single crochet, you can move on to the Double Crochet, which is the basis for many popular patterns like the Granny Square.
How do I read a Crochet Stitch – Pattern correctly?
Reading a pattern requires understanding standard abbreviations. Always check the “Notes” section of a pattern first, as designers often include specific instructions for that project. Start by making a small swatch to practice the stitches before committing to the full piece.
Why does my crochet project look slanted?
A slanted edge usually occurs because you are either skipping the first stitch of a row or accidentally crocheting into the turning chain. Using stitch markers in the first and last stitch of every row is the most effective way to keep your edges perfectly straight.
Can I use any yarn for any Crochet Stitch – Pattern?
While you can experiment, it is best to follow the weight recommendations in the pattern. Using a different yarn weight will change the size and the “drape” of the item. If you change the yarn, you must also change the hook size to match the new thickness.
How do I prevent my yarn from tangling?
To prevent tangles, pull the yarn from the center of the ball (center-pull) rather than the outside. You can also use a yarn winder to create “cakes” that sit flat and feed smoothly, making your Crochet Stitch – Pattern much easier to manage.
What is the difference between US and UK crochet terms?
This is a very important distinction! For example, a “Double Crochet” in US terms is a “Treble Crochet” in UK terms. Always check which terminology your Crochet Stitch – Pattern uses before you begin to avoid scaling issues.
In this guide, we have explored the essential elements of creating a beautiful Crochet Stitch – Pattern, from the basic foundation to advanced textures and troubleshooting. We covered the importance of tension, the role of ergonomic tools, and how to properly read a pattern to ensure your projects turn out exactly as envisioned. Crocheting is a skill that rewards patience and practice, allowing you to create heirloom-quality items that last a lifetime.
We hope this article has provided you with the clarity and inspiration needed to start your next Crochet Stitch – Pattern journey. Whether you are making a gift for a loved one or building a business around your crafts, the techniques discussed here are the pillars of success.


