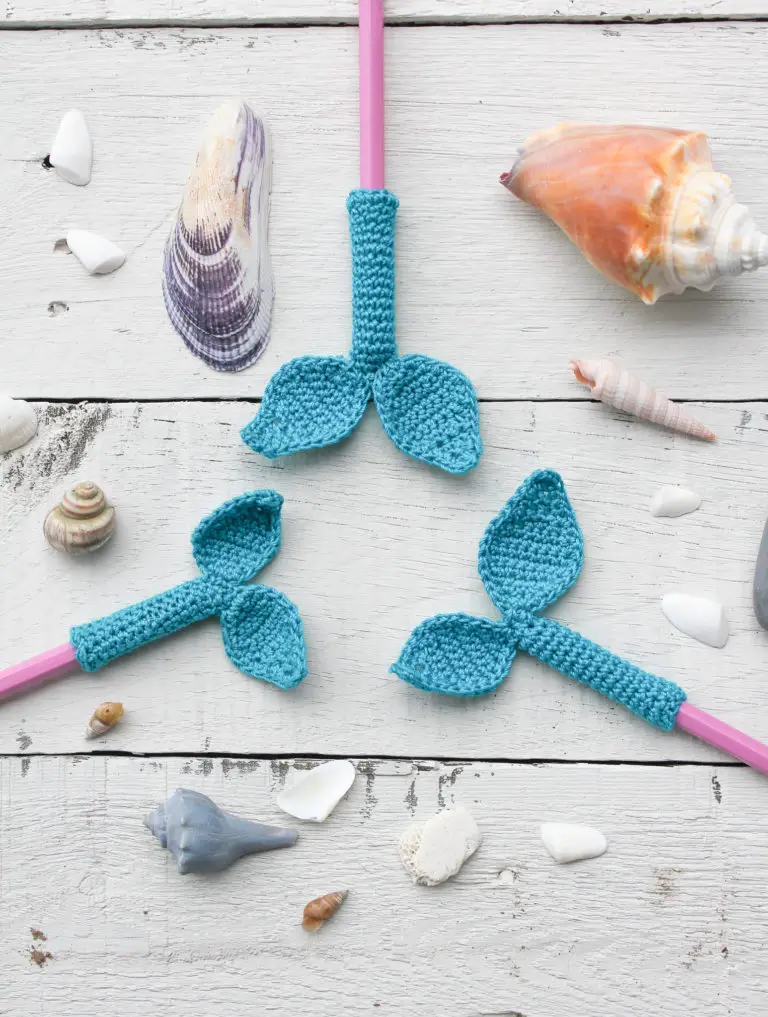
Mermaid Tail Pencil Topper Crochet - Pattern

Finding the perfect Crochet Stitch- Pattern is often the spark that ignites a brand-new creative journey, turning a simple skein of yarn into a functional work of art. Whether you are a seasoned artisan or a curious beginner, understanding the nuances of stitch construction is the fundamental building block of the entire craft. A well-chosen Crochet Stitch- Pattern not only dictates the visual texture of your project but also influences its weight, drape, and overall durability, making it one of the most important decisions you will make before picking up your hook.
The versatility of a Crochet Stitch- Pattern allows makers to transition seamlessly between delicate, lacy designs for summer shawls and thick, insulating textures for winter blankets. By mastering different sequences of loops and pull-throughs, you can simulate the look of knitted fabric, create 3D geometric shapes, or even produce intricate floral motifs. The beauty of this hobby is that every Crochet Stitch- Pattern is essentially a variation of a few basic movements, meaning that once you understand the core logic, the possibilities for customization are virtually endless.
In this comprehensive guide, we will delve deep into the mechanics of the Crochet Stitch- Pattern, exploring how various combinations of stitches can transform the look and feel of your handmade items. We will discuss the essential tools required to execute these patterns flawlessly, provide troubleshooting tips for common mistakes, and offer professional advice on how to read complex charts. By the end of this article, you will have a much clearer perspective on how to choose and execute the ideal Crochet Stitch- Pattern for any project you have in mind.

To truly master any Crochet Stitch- Pattern, one must first understand the fundamental anatomy of the stitch itself. Every loop created by the hook serves as a foundation for the next, forming a chain reaction that builds the fabric. Whether you are working on a simple single crochet or a complex cable, the way you insert the hook—into the front loop, back loop, or both—drastically alters the final appearance of the crochet design.
The “height” of a stitch is a defining characteristic of a Crochet Stitch- Pattern. Short stitches like the slip stitch or single crochet create a dense, sturdy fabric that is perfect for amigurumi or heavy-duty bags. In contrast, taller stitches like the double or triple crochet create more space between the fibers, resulting in a lighter, more flexible drape. Mastering this balance is key to following any crochet template successfully.
Another vital element in a Crochet Stitch- Pattern is the concept of “turning chains.” These are the small chains made at the beginning of a row to bring the hook up to the correct height for the next set of stitches. If these chains are too tight, your project will bow inward; if they are too loose, the edges will look messy. Precision in these small details is what elevates a standard Crochet Stitch- Pattern into a professional-looking garment.
Many modern patterns now utilize the “V-stitch” or “Shell stitch” variations to add visual interest without increasing the difficulty level. These involve working multiple stitches into a single base stitch, creating a fan-like or V-shaped effect. This is a classic example of how a basic Crochet Stitch- Pattern can be manipulated to create complex, rhythmic textures that catch the eye and feel wonderful to the touch.
Gauge is perhaps the most overlooked aspect of executing a Crochet Stitch- Pattern correctly. Gauge refers to the number of stitches and rows per inch, and it ensures that your finished item will be the correct size. Even if you follow a Crochet Stitch- Pattern perfectly, using a different yarn weight or hook size than recommended can result in a sweater that is three sizes too big or a hat that won’t fit a doll.
Finally, understanding the “repeat” of a Crochet Stitch- Pattern is essential for larger projects like blankets or scarves. Most patterns consist of a specific number of stitches that repeat across the row. Once you memorize this rhythm, the process becomes meditative and relaxing. This rhythmic nature is one of the reasons why working on a Crochet Stitch- Pattern is often cited as a powerful tool for stress relief and mindfulness.
The quality of your Crochet Stitch- Pattern is heavily dependent on the synergy between your yarn and your crochet hook. For patterns that feature intricate detail, a smooth, mercerized cotton yarn is often preferred because it doesn’t “pill” or fuzz, allowing every loop of the Crochet Stitch- Pattern to stand out clearly. For beginners, a light-colored yarn is highly recommended so that the “eyes” of the stitches are easy to see.
Hook material also plays a significant role in how you handle a Crochet Stitch- Pattern. Aluminum hooks are popular for their glide, making them perfect for “sticky” wool yarns. Bamboo or wooden hooks, on the other hand, provide a bit more grip, which is helpful when working with slippery fibers like silk or bamboo. The right tool ensures that your Crochet Stitch- Pattern remains consistent in tension from the first row to the last.
Stitch markers are the unsung heroes of any complex Crochet Stitch- Pattern. When working in rounds or keeping track of a long repeat, a simple plastic clip can prevent hours of frustration. Markers help you identify the beginning of a sequence or the exact spot for an increase, ensuring that the mathematical symmetry of your Crochet Stitch- Pattern remains intact throughout the construction process.
Tension is the “invisible tool” that every crafter must develop. It is the amount of pressure you apply to the yarn as it flows through your fingers toward the hook. If your tension varies, the Crochet Stitch- Pattern will look uneven. Many experts suggest practicing a new Crochet Stitch- Pattern by making a small “swatch” first to stabilize your tension before starting the actual project.
For those who enjoy a more technical approach, using a row counter can be a lifesaver. When a Crochet Stitch- Pattern requires different actions on even and odd rows, it is very easy to lose your place. A digital or manual counter keeps you on track, allowing you to pick up and put down your work without having to recount dozens of rows of your crochet project.
Blocking tools, such as foam mats and T-pins, are the final step in perfecting a Crochet Stitch- Pattern. Blocking involves wetting the finished piece and pinning it to specific dimensions to “set” the stitches. This process opens up lacy patterns and evens out any minor tension issues, transforming a slightly crumpled piece of crochet into a crisp, professional-looking Crochet Stitch- Pattern masterpiece.
Learning to read a Crochet Stitch- Pattern is like learning a new language. Written patterns often use abbreviations like “dc” for double crochet or “ch” for chain. While this can be confusing at first, these shorthand codes allow designers to fit complex instructions into a readable format. Familiarizing yourself with standard crochet terminology is the first step toward independence in the craft.
In addition to written text, many people find that visual crochet charts are easier to follow. These charts use symbols to represent each stitch, providing a bird’s-eye view of the Crochet Stitch- Pattern. This is particularly helpful for international patterns, as symbols are universal, allowing a crafter in Japan to follow a Crochet Stitch- Pattern designed in Brazil without needing a translator.
One common hurdle when reading a Crochet Stitch- Pattern is the difference between US and UK terminology. For example, a “double crochet” in the US is the same as a “treble crochet” in the UK. Always check the pattern’s introduction to see which system the designer is using. Misinterpreting these terms can completely change the scale and look of your Crochet Stitch- Pattern.
Parentheses and brackets in a Crochet Stitch- Pattern indicate repetitions or groups of stitches to be worked into the same space. Paying close attention to these punctuation marks is vital. A single missed bracket can throw off the entire alignment of a Crochet Stitch- Pattern, leading to a “domino effect” of errors that might not be noticed until several rows later.
Technological advancements have introduced interactive digital patterns that allow you to highlight the current row or click on stitches for a video demonstration. These tools are fantastic for mastering a difficult Crochet Stitch- Pattern that involves complex maneuvers like front-post or back-post stitches, which add a 3D ribbed effect to the fabric.
Don’t be afraid to take notes directly on your Crochet Stitch- Pattern. Many experienced makers keep a “crochet journal” where they record which hook size they actually used, how many skeins of yarn were required, and any modifications they made to the original Crochet Stitch- Pattern. This personalized record is invaluable if you ever want to replicate the project in the future.
Even with a perfect Crochet Stitch- Pattern, mistakes happen. One of the most common issues is the “shrinking” or “growing” edge, where the piece accidentally becomes a trapezoid. This is usually caused by either skipping the first stitch of a row or accidentally adding an extra stitch at the end. Counting your stitches at the end of every row is the best way to keep your Crochet Stitch- Pattern perfectly rectangular.
If your Crochet Stitch- Pattern looks “holey” when it shouldn’t, your hook might be too large for the yarn you’ve chosen. This allows too much light to pass through the stitches. Conversely, if the fabric feels like a stiff board, your hook is likely too small. Finding the “sweet spot” for your Crochet Stitch- Pattern is a matter of trial and error and personal preference for the final texture.
For those looking to advance, the tapestry crochet technique allows you to carry multiple colors of yarn at once, creating intricate graphic designs within the Crochet Stitch- Pattern. By “working over” the unused yarn, you keep the back of the work clean and create a dense, sturdy fabric that is ideal for bags, wall hangings, and decorative pillows.
Another advanced technique is the use of linked stitches. This method eliminates the gaps typically found between tall stitches, creating a solid fabric that looks more like knitting. Incorporating linked stitches into a Crochet Stitch- Pattern is perfect for garments where you want maximum warmth and minimum transparency, offering a sleek, modern finish.
If you find that your Crochet Stitch- Pattern is curling at the edges, it is often a sign that your foundation chain was too tight. Many professionals use a hook one size larger than the pattern suggests just for the starting chain. This extra slack gives the rest of the Crochet Stitch- Pattern room to breathe and prevents the dreaded “rainbow curve” at the bottom of blankets.
Finally, don’t be afraid to “frog” your work. “Frogging” is a slang term in the community (because you “rip it, rip it”—ribbit) for pulling out stitches to fix a mistake. While it can be painful to undo hours of work, fixing a flaw in your Crochet Stitch- Pattern ensures that you will be truly proud of the finished product rather than seeing the error every time you look at it.
1. What is the easiest Crochet Stitch- Pattern for a total beginner?
The “Granny Stripe” or the “Garter Stitch” (single crochet rows) are usually the best starting points. They allow you to practice the basic movements of the Crochet Stitch- Pattern without having to worry about complex shaping or frequent color changes.
2. How do I know how much yarn a specific Crochet Stitch- Pattern will use?
Most patterns list the “yardage” required. However, remember that “yarn eater” stitches like the puff stitch, bobble stitch, or crocodile stitch use significantly more yarn than flat stitches. Always buy an extra skein if your Crochet Stitch- Pattern is highly textured.
3. Why is my Crochet Stitch- Pattern turning out much smaller than the photo?
This is almost always a tension or gauge issue. If you naturally pull the yarn tightly, your stitches will be smaller. Try using a larger hook than the one recommended in the Crochet Stitch- Pattern to compensate for your tight tension.
4. Can I mix different types of yarn in the same Crochet Stitch- Pattern?
You can, but it’s risky. Different fibers (like cotton and wool) react differently to washing. If one shrinks and the other doesn’t, your Crochet Stitch- Pattern will warp. If you do mix yarns, try to ensure they have similar care instructions.
5. How do I fix a dropped stitch in the middle of a row?
In crochet, it is much harder to “drop” a stitch than in knitting, but you can “skip” one. If you notice a hole a few rows down, the most secure fix is to undo the work back to that point. In a Crochet Stitch- Pattern, shortcuts often lead to visible lumps.
6. Is there a Crochet Stitch- Pattern that looks like knitting?
Yes! The “Waistcoat Stitch” (also known as the Knit Stitch) and the “Slip Stitch Ribbing” are two popular ways to mimic the look of knitted V-shapes while using a standard Crochet Stitch- Pattern technique.
In this guide, we have journeyed through the foundational elements, essential tools, and advanced troubleshooting of the Crochet Stitch- Pattern. We have learned that success in this craft is a combination of technical knowledge—such as understanding stitch height and reading charts—and the physical skill of maintaining consistent tension.
A Crochet Stitch- Pattern is more than just a set of instructions; it is a blueprint for creativity that allows you to express your personal style through color, texture, and shape.


