
Lily in Crochet - Pattern

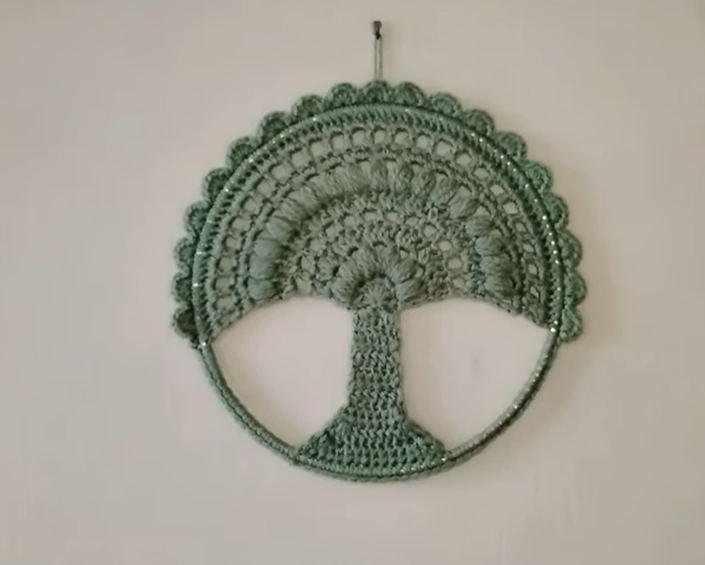
This Crochet Tree of Life Tutorial – Pattern is designed to guide you through the creation of one of the most symbolic and visually stunning projects in the fiber arts world. The Tree of Life represents growth, strength, and the interconnectedness of all things, making it a favorite for wall hangings, blankets, and even decorative pillows. By following this guide, you will learn how to manipulate crochet stitches to form intricate roots, a sturdy trunk, and a sprawling canopy that brings nature indoors through the art of yarn work.
Crafting a Crochet Tree of Life Tutorial – Pattern requires a blend of patience and a basic understanding of post stitches, which provide the 3D texture necessary for the “bark” of the tree. Many crocheters find this project therapeutic, as the repetitive nature of the stitch patterns mimics the organic growth of a real tree. Whether you are using a metal hoop for a dreamcatcher style or integrating the motif into a larger square, the crochet techniques involved are versatile enough to suit any skill level from ambitious beginner to advanced artist.
In this comprehensive Crochet Tree of Life Tutorial – Pattern, we will explore the essential materials, the logic behind the branching stitches, and how to customize your tree to reflect different seasons. The beauty of this crochet project lies in its lack of perfection; just as no two trees in the forest are identical, your crochet tree will have its own unique twists and turns. Let’s gather our crochet hooks and worsted weight yarn to begin this journey into botanical-inspired handiwork.
The Crochet Tree of Life Tutorial – Pattern serves as the blueprint for creating a circular or square motif that features a central tree design. This pattern often utilizes front post double crochet (fpdc) and back post double crochet (bpdc) to create the raised ridges that look like wood grain. Understanding the crochet chart or written instructions is the first step in ensuring your tree doesn’t warp as you increase the stitch count.
When we talk about the Crochet Tree of Life Tutorial – Pattern, we are referring to a specific sequence of increases and decreases. You start by building a solid foundation, usually at the roots or the base of the trunk. As you work your way up, you will “split” the stitches to form crochet branches, which requires a firm grasp of how to skip stitches without losing the structural integrity of the piece.
Selecting the right yarn fiber is crucial for this specific crochet pattern. A cotton yarn or a stiff acrylic blend is often recommended because it provides the “stitch definition” needed to make the tree stand out. If the yarn is too fuzzy or variegated, the intricate details of the Tree of Life might get lost in the texture, defeating the purpose of the 3D crochet effect.
The Crochet Tree of Life Tutorial – Pattern also emphasizes the importance of tension control. If you crochet too tightly, the tree may pucker; if too loose, the branches will look floppy and lose their definition. Practicing a gauge swatch with your chosen crochet hook size (usually a 4.0mm or 5.0mm) is a professional tip that ensures your finished wall hanging fits perfectly inside its intended frame or hoop.
A key element of the Crochet Tree of Life Tutorial – Pattern is the “Roots” section. In many versions, the roots are worked into a foundation chain or around the bottom of a metal ring. This provides the “anchor” for your project. Learning how to secure your yarn tails at this stage is vital for a clean, professional-looking finish that can withstand being hung on a wall for years.
Lastly, the Crochet Tree of Life Tutorial – Pattern is an excellent way to learn about cabled crochet. While traditional cables are found in knitting, this pattern uses “overlapping stitches” to mimic the way branches cross over each other. It’s a fantastic intermediate crochet skill that elevates your work from simple flat pieces to high-end textile art that looks far more complex than it actually is.
To successfully execute the Crochet Tree of Life Tutorial – Pattern, you need more than just any hook and thread. You will specifically need a tapestry needle for weaving in ends and potentially a metal or wooden hoop if you are making a wall hanging. Most enthusiasts prefer a natural color palette, such as browns, greens, or creams, to enhance the organic feel of the botanical crochet design.
The crochet hook you choose should be slightly smaller than what the yarn label suggests. This “down-sizing” technique is a secret in the Crochet Tree of Life Tutorial – Pattern community to ensure the stitches are dense and stiff. A dense stitch allows the tree to hold its shape against gravity, especially if you aren’t using a backing fabric for your finished crochet piece.
Markers are your best friend when following the Crochet Tree of Life Tutorial – Pattern. Since the branches often involve counting specific intervals, placing a stitch marker at the start of each branch split prevents errors. It is much easier to move a marker than to “frog” (rip out) several rows of complex post stitches because you missed a count in the middle of the trunk.
Blocking tools are also essential for the Crochet Tree of Life Tutorial – Pattern. Once you finish the crochet work, the piece might look a bit crumpled. Using blocking mats and T-pins to stretch the tree into a perfect circle or square is what gives it that “boutique” look. This process sets the yarn fibers in place, making the branches look straight and the leaves (if any) look crisp.
If you plan to add leaves to your Crochet Tree of Life Tutorial – Pattern, consider using beads or buttons. Some patterns integrate small green beads into the crochet stitches to represent fruit or foliage. This adds a multimedia dimension to your fiber art and makes the Tree of Life look even more vibrant and personalized to your specific home decor style.
Finally, keep a copy of the crochet abbreviations list handy. The Crochet Tree of Life Tutorial – Pattern often uses terms like fpsc (front post single crochet) or tr (treble crochet). Being comfortable with these terms will make the process much smoother and more enjoyable, allowing you to focus on the creative flow of the handmade project rather than constantly searching for definitions.
The most iconic part of the Crochet Tree of Life Tutorial – Pattern is undoubtedly the trunk. You usually begin with a series of double crochet stitches that are grouped together. By working into the “posts” of the previous row rather than the tops of the stitches, you create a ribbed texture. This ribbing technique is what gives the tree its bark-like appearance and three-dimensional depth.
As you move up the Crochet Tree of Life Tutorial – Pattern, you will encounter the “Split.” This is where the single trunk becomes two or three main branches. To do this, you will work clusters of stitches into certain areas while leaving others unworked or filled with chain stitches. This creates the negative space that allows light to pass through the crochet wall hanging.
The Crochet Tree of Life Tutorial – Pattern often utilizes treble crochet (tr) for the higher branches. Because treble stitches are taller, they allow the branches to reach out further toward the edges of the project. This variation in stitch height is a clever way to simulate the natural tapering of real tree limbs as they move away from the central source of nutrients.
One common challenge in the Crochet Tree of Life Tutorial – Pattern is maintaining symmetry. While trees in nature are asymmetrical, a crochet design needs a certain level of balance to hang straight. If one side of your tree has significantly more stitches than the other, the project might lean. Always count your post stitches on both sides of the center to ensure a professional result.
The “Crown” of the tree in the Crochet Tree of Life Tutorial – Pattern can be finished in several ways. Some patterns end with a simple sc (single crochet) border, while others use picot stitches to create the illusion of tiny buds or leaves. The way you finish the edges will determine how the piece interacts with a hoop or a blanket border, so choose a finish that matches your end goal.
In this Crochet Tree of Life Tutorial – Pattern, you also learn the art of “joining.” If you are working the tree inside a ring, you will need to slip stitch the ends of the branches directly onto the hoop. This joining technique requires you to maintain high tension so the tree stays centered. It’s a rewarding moment when the limp crochet piece suddenly becomes a taut, beautiful piece of art.
Once you have mastered the Crochet Tree of Life Tutorial – Pattern, the possibilities for customization are endless. You can change the “season” of your tree by simply switching yarn colors. Use white and silver for a winter “Ghost Tree,” or vibrant oranges and reds for an autumn version. This flexibility makes the Tree of Life pattern a year-round favorite for craft fairs and gifts.
Another way to enhance the Crochet Tree of Life Tutorial – Pattern is by varying the thickness of the yarn. Using a lace-weight yarn and a tiny hook will result in a delicate, jewelry-sized pendant. Conversely, using chunky yarn and a large hook allows you to create a massive rug or a focal-point wall piece. The stitch logic remains the same, but the scale changes the entire vibe.
Incorporating different crochet textures into the background of your Crochet Tree of Life Tutorial – Pattern can also add interest. If you are making a square, try using the waffle stitch or moss stitch for the area around the tree. This contrast between the smooth “sky” and the textured “tree” makes the central motif pop and provides a sophisticated look to any handmade blanket.
Many artists use the Crochet Tree of Life Tutorial – Pattern as a “Family Tree.” You can embroider names of family members onto the branches or attach small crochet hearts to represent loved ones. This turns a simple crochet tutorial into a cherished family heirloom that carries deep sentimental value and tells a story through needlework.
Adding fringe or tassels to the bottom of the hoop is a popular trend in the boho-chic crochet community. After completing the Crochet Tree of Life Tutorial – Pattern, you can loop long strands of yarn through the bottom of the ring to mimic the roots extending into the earth. This adds movement and length to the piece, making it a perfect statement for a bedroom or living room.
Finally, don’t be afraid to experiment with gradient yarn (ombre). When you use a cake of yarn that transitions from dark brown to light green, the Crochet Tree of Life Tutorial – Pattern automatically creates a beautiful transition from the earth to the leaves without you having to change yarn balls. This creates a professional, artistic look with much less effort in weaving in ends.
1. Is the Crochet Tree of Life Tutorial – Pattern suitable for beginners?
While it is labeled as intermediate due to the use of post stitches, a dedicated beginner who knows the basic double crochet can follow a slow-paced tutorial. It’s all about counting and patience!
2. What is the best yarn for a Tree of Life wall hanging?
Mercerized cotton is highly recommended. It has very little stretch and excellent stitch definition, which helps the tree maintain its shape when stretched inside a metal hoop.
3. How long does it take to complete the Crochet Tree of Life Tutorial – Pattern?
For an average-sized wall hanging (10-12 inches), it typically takes between 4 to 8 hours depending on your crochet speed and the complexity of the branching.
4. Can I wash my finished Crochet Tree of Life project?
Yes, but you should hand wash it gently in cold water and lay it flat to dry. If it is attached to a metal hoop, avoid soaking the hoop to prevent rust; instead, spot clean the yarn only.
5. Why is my tree looking “bunchy” or not laying flat?
This usually happens due to tension issues or adding too many stitches in the branch section. Ensure you are following the increase rounds exactly as stated in the Crochet Tree of Life Tutorial – Pattern.
6. Do I need to block my crochet tree?
Absolutely. Blocking is the “magic” step that transforms a slightly lumpy crochet piece into a crisp, professional work of art. It opens up the stitches and shows off the detail of the branches.
In this article, we have explored the intricate and beautiful world of the Crochet Tree of Life Tutorial – Pattern. We covered everything from the foundational post stitches that create the bark texture to the advanced techniques of branching and mounting your work in a hoop.
This project is more than just a crochet design; it is a symbolic representation of life and growth that allows you to express your creativity through fiber arts. Whether you choose to make a seasonal wall hanging, a family heirloom, or a textured blanket, the skills you’ve learned here will serve you well in all your future crochet endeavors.


