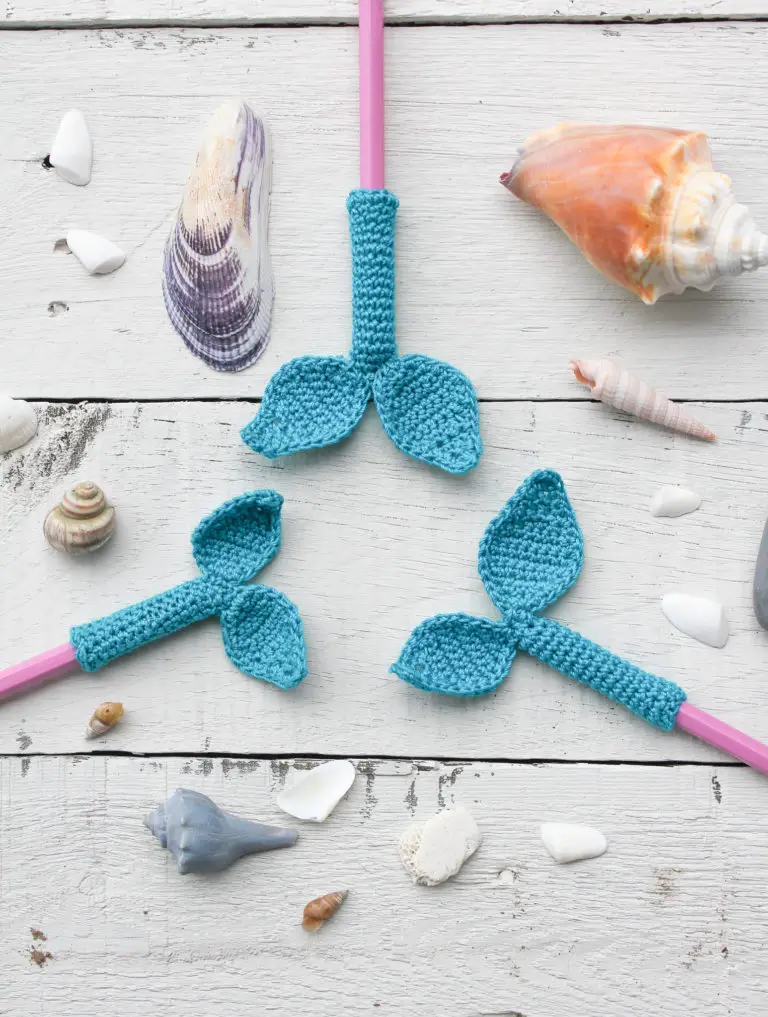
Mermaid Tail Pencil Topper Crochet - Pattern

Finding the perfect Crochet Y Top – Pattern is like discovering a hidden gem in the world of DIY fashion, offering a unique blend of geometric elegance and bohemian flair. This specific style has taken the crafting community by storm because it bridges the gap between traditional lacework and modern, structured silhouettes. Whether you are prepping for a summer festival or looking for a sophisticated layering piece, mastering the Crochet Y Top – Pattern allows you to create a high-end look with just a hook and some high-quality yarn.
The beauty of a Crochet Y Top – Pattern lies in its versatility and the way it flatters various body types through its distinctive “Y” shaped neckline or back detail. Unlike standard tank tops, this design draws the eye vertically, creating a lengthening effect that is both stylish and comfortable. As more enthusiasts turn toward slow fashion, the demand for a reliable Crochet Y Top – Pattern has grown, leading to a variety of interpretations ranging from minimalist solid colors to vibrant, multi-tonal masterpieces.
When you dive into a Crochet Y Top – Pattern, you aren’t just following instructions; you are engaging in a mindful practice that results in a custom-fitted garment. This article will guide you through the essential elements of creating your own piece, ensuring that your Crochet Y Top – Pattern journey is smooth, productive, and rewarding. From choosing the right fibers to understanding the technical nuances of the “Y” construction, we have gathered everything you need to succeed in this creative endeavor.
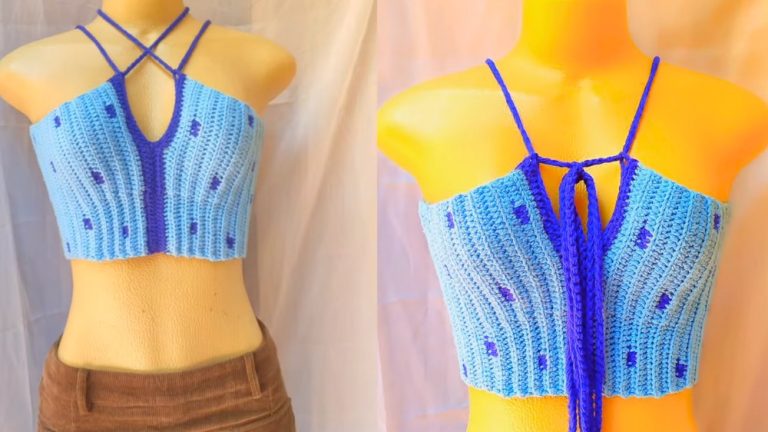
To begin your journey, you must understand that the Crochet Y Top – Pattern is defined by its central split. This “Y” shape usually forms the front bodice or the back straps, requiring a firm grasp of increases and decreases. When selecting a Crochet Y Top – Pattern, look for one that specifies the weight of the yarn, as this heavily influences the drape of the final garment.
Choosing the right material is the first step in any successful handmade project. For a summer-ready Crochet Y Top – Pattern, we highly recommend using 100% cotton or bamboo blends. These fibers are breathable and hold the structural integrity of the “Y” shape better than acrylic, which can sometimes stretch too much over time.
Before you start your first row, always check your gauge. A Crochet Y Top – Pattern is often form-fitting, meaning a small discrepancy in stitch size can lead to a top that is either too tight or far too loose. Spend those extra fifteen minutes making a swatch to ensure your tension matches the designer’s requirements.
The “Y” element itself is created by splitting the work into two separate panels or straps. In a well-written Crochet Y Top – Pattern, the instructions will clearly indicate where to drop stitches or begin working in rows rather than rounds. This transition is the most critical part of the construction process.
Don’t forget the importance of stitch markers. When working on a Crochet Y Top – Pattern, it is easy to lose track of where the central split begins. Placing a marker at the exact center helps maintain symmetry, ensuring both sides of your “Y” are identical in length and width.
Finally, consider the edge finishing. Many versions of the Crochet Y Top – Pattern include a decorative border, such as a crab stitch or a simple slip stitch edge. These small details provide a professional “store-bought” look while maintaining the charm of a handcrafted item.
The foundation of most Crochet Y Top – Pattern designs involves the double crochet (dc) and the chain stitch. These basic building blocks allow for the creation of “v-stitches” or “mesh” patterns that give the top its light, airy feel. If you are a beginner, look for a Crochet Y Top – Pattern that utilizes these fundamental movements.
Advanced crafters might prefer a Crochet Y Top – Pattern that incorporates the foundation single crochet (fsc). This technique allows you to start your project without a long, tight foundation chain, offering more elasticity at the waistline. This is particularly helpful for garments that need to pull over the head or shoulders.
The “Y” shape often requires decreases, specifically the “two-together” stitches (like dc2tog). In a Crochet Y Top – Pattern, these decreases are used to taper the straps or shape the neckline. Understanding how to hide these decreases within the pattern texture is a hallmark of a skilled maker.
Textured stitches like the puff stitch or bobble stitch can also be integrated into a Crochet Y Top – Pattern. These add visual interest and a 3D effect to the “Y” section, making the focal point of the shirt pop. However, remember that textured stitches use more yarn, so plan your yardage accordingly.
Negative ease is a term you will often see in a Crochet Y Top – Pattern. This means the finished garment is slightly smaller than your actual body measurements, allowing it to stretch and hug your curves. A good Crochet Y Top – Pattern will explain how much stretch to expect from the recommended stitch pattern.
Lastly, the slip stitch is your best friend for joining yarn and finishing armholes. In any Crochet Y Top – Pattern, the way you join your rounds or attach your straps determines the longevity of the piece. Using a seamless join technique will make your DIY fashion project look incredibly high-end.
One of the greatest advantages of working with a Crochet Y Top – Pattern is the ability to customize the length. If you prefer a cropped look, you can simply stop the bodice rows early. For a more conservative or “boho-chic” tunic style, continue the Crochet Y Top – Pattern rows until you reach your desired hip length.
Adjusting the “Y” depth is another way to personalize your Crochet Y Top – Pattern. A deep “Y” creates a bold, plunging neckline perfect for beach cover-ups. A shallow “Y” is more modest and suitable for everyday wear. Simply adjust the point where you split the work as indicated in the Crochet Y Top – Pattern notes.
Yarn selection also plays a role in customization. While the Crochet Y Top – Pattern might call for a specific brand, you can substitute it with any yarn of the same weight category. Using a variegated yarn can create beautiful color transitions, while a solid color emphasizes the intricate stitch definition.
Adding fringe or tassels to the bottom hem is a popular modification for the Crochet Y Top – Pattern. This gives the garment a festival vibe and adds movement. To do this, cut equal lengths of yarn and larks-head knot them into the final row of your Crochet Y Top – Pattern.
Blocking is a non-negotiable step for a professional Crochet Y Top – Pattern result. Wet blocking allows the fibers to relax and the stitches to settle into their final shape. This is especially important for the “Y” section, as it ensures the straps lay flat against the skin without curling.
Consider adding adjustable straps if you are unsure about the fit. Some Crochet Y Top – Pattern variations suggest making long chains that tie at the shoulders or back. This makes the top more versatile and easier to gift to friends since the fit is less rigid.
Success with a Crochet Y Top – Pattern starts with reading the entire document before you even pick up your hook. Understanding the logic of the construction—whether it is worked bottom-up or top-down—will prevent mistakes in the middle of the project. A well-organized Crochet Y Top – Pattern is your roadmap to a beautiful garment.
Keep your tension consistent throughout the project. Because the Crochet Y Top – Pattern relies on symmetry, a loose tension on the left side and a tight tension on the right side will make the “Y” look crooked. If you feel yourself getting tired, take a break to avoid changes in your stitch gauge.
Using high-quality ergonomic hooks can make the process of completing a Crochet Y Top – Pattern much more enjoyable. Since garments require thousands of stitches, protecting your hands from strain ensures you can finish the project without discomfort. Your Crochet Y Top – Pattern experience should be as relaxing as it is productive.
Always weave in your ends as you go, or at least every few inches. There is nothing more daunting than finishing a beautiful Crochet Y Top – Pattern and realizing you have fifty yarn tails to hide. Secure them properly to ensure your handmade top doesn’t unravel in the wash.
Check for symmetry frequently. Every few rows of the “Y” section, lay your work flat and fold it in half. This allows you to see if both sides of the Crochet Y Top – Pattern are progressing at the same rate. Catching a mistake early saves hours of “frogging” (ripping out stitches).
Finally, share your progress! The crochet community is incredibly supportive. Posting photos of your Crochet Y Top – Pattern on social media or craft forums can provide you with encouragement and even tips from others who have tackled the same design. Your journey might inspire someone else to start their own Crochet Y Top – Pattern.
Is the Crochet Y Top – Pattern suitable for beginners?
Yes, many versions of the Crochet Y Top – Pattern are designed with beginners in mind, using basic stitches like single and double crochet. However, it is important to be comfortable with increasing and decreasing before starting.
How much yarn do I need for a standard Crochet Y Top – Pattern?
Usually, for a size medium, you will need between 400 to 600 yards of yarn. This varies depending on the length of the top and the weight of the yarn specified in your Crochet Y Top – Pattern.
Can I use acrylic yarn for this pattern?
While you can use acrylic, cotton or bamboo is preferred for a Crochet Y Top – Pattern. Natural fibers provide better “breathability” and hold the shape of the garment more effectively over time.
How do I wash my finished Crochet Y Top?
Hand washing in cold water with a gentle detergent is always the safest bet for any handmade garment. Lay it flat to dry to prevent the “Y” straps from stretching out of shape.
What is the best hook size for a Crochet Y Top – Pattern?
Most patterns recommend a 3.5mm (E) to 5.0mm (H) hook, depending on the yarn weight. Always refer to the specific Crochet Y Top – Pattern instructions for the designer’s recommendation.
Can I sell the tops I make from this Crochet Y Top – Pattern?
Most designers allow you to sell finished items as long as you give credit to the original Crochet Y Top – Pattern creator. Always check the copyright notice at the end of the pattern.
In this article, we explored the intricate and beautiful world of the Crochet Y Top – Pattern. We covered the essential materials needed, the master stitches that form the foundation of the design, and ways to customize the fit to suit your unique style.
We also discussed technical tips to ensure your project looks professional, from maintaining tension to the importance of blocking. Creating a Crochet Y Top – Pattern is a rewarding way to expand your crochet skills while adding a timeless, handcrafted piece to your wardrobe.


