
Lily in Crochet - Pattern

Finding a high-quality Crochet apple- Pattern is a fantastic way to bring a touch of nature and handmade warmth into your home without needing a green thumb. Whether you are looking to create a bowl of everlasting fruit for your kitchen table, a cute teacher’s gift, or a soft toy for a child’s play kitchen, this project is the perfect choice. Using a Crocheted apple- Pattern allows you to experiment with vibrant shades of red, green, and yellow, making each piece unique and full of character.
The beauty of following a Crocheted apple- Pattern lies in its simplicity and the satisfaction of seeing a 3D shape emerge from a simple ball of yarn. Amigurumi, the Japanese art of knitting or crocheting small, stuffed yarn creatures and objects, is at the heart of this craft. By mastering a Crocheted apple- Pattern, you learn essential skills like working in the round, increasing and decreasing, and creating realistic textures that make your yarn fruit look almost good enough to eat.
In this comprehensive guide, we will dive deep into everything you need to know about the Crocheted apple- Pattern. We will discuss the best materials for the job, provide a step-by-step walkthrough of the assembly, and share expert tips to ensure your crochet fruit looks professional and polished. Following a Crocheted apple- Pattern is not just about the final product; it is about the relaxing, meditative process of stitching, and we are here to ensure your experience is as fruitful as possible.
The first step in successfully completing a Crocheted apple- Pattern is selecting the right yarn. For a realistic and durable finish, a 100% cotton yarn is often the preferred choice among hobbyists. Cotton holds its shape exceptionally well, which is crucial for a Crocheted apple- Pattern where you want the fruit to look plump and firm rather than saggy or misshapen.
In addition to yarn, you will need a crochet hook that is slightly smaller than what the yarn label recommends for this Crocheted apple- Pattern. Using a smaller hook creates a tighter fabric, which prevents the polyester fiberfill stuffing from peeking through the stitches. This is a vital technique in any Crocheted apple- Pattern to ensure the final result looks high-quality and professional.
Stuffing is what gives life to your Crocheted apple- Pattern. High-grade polyester fiberfill is the standard because it is washable and hypoallergenic. When stuffing your Crocheted apple- Pattern, the goal is to add enough to make the apple firm but not so much that the stitches stretch and show gaps, maintaining that smooth, skin-like appearance.
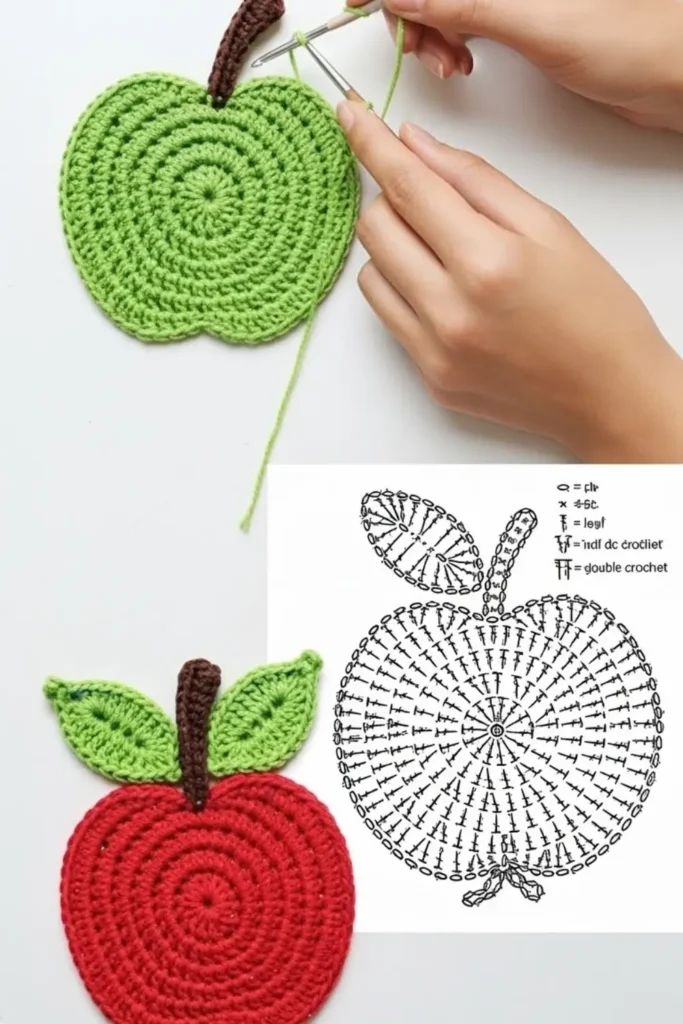
You will also need a small amount of brown and green yarn to complete the stem and leaf of your Crocheted apple- Pattern. These small details are what truly make the project come alive. Even in a Crocheted apple- Pattern, the finishing touches like the stem are just as important as the main body for creating a convincing and charming piece of decor.
A tapestry needle and sharp scissors are indispensable tools for any Crocheted apple- Pattern. You will use the needle to weave in your ends and, more importantly, to create the “dimples” at the top and bottom of the apple. This simple sculpting technique, often included in a Crocheted apple- Pattern, is what transforms a red sphere into a recognizable fruit shape.
Lastly, consider using a stitch marker to keep track of your rounds while working on your Crocheted apple- Pattern. Since amigurumi is worked in a continuous spiral, it is very easy to lose your place. A marker ensures that your Crocheted apple- Pattern stays symmetrical and that your increases and decreases happen exactly where they are supposed to.
The foundation of a great Crocheted apple- Pattern begins with the “Magic Ring” or “Magic Circle.” This technique allows you to pull the starting hole completely closed, which is essential for round objects. In our Crocheted apple- Pattern, starting with a tight center ensures that no stuffing escapes from the bottom of your fruit as you build upwards.
As you progress through the Crocheted apple- Pattern, you will use a series of increases to expand the circle into a bowl shape. The key to a smooth Crocheted apple- Pattern is to stagger your increases so that you don’t end up with a hexagonal shape. By following the pattern’s instructions carefully, you create a perfect, rounded surface that mimics the natural curves of a real apple.
The middle section of the Crocheted apple- Pattern usually consists of several rounds of plain single crochet. This provides the height of the apple. During this phase of the Crocheted apple- Pattern, it is important to maintain consistent tension to ensure the sides are straight and uniform, providing the perfect canvas for the iconic apple silhouette.
Decreasing is where the Crocheted apple- Pattern starts to close back up at the top. The “invisible decrease” is a secret weapon in the world of amigurumi. When working on your Crocheted apple- Pattern, using the invisible decrease method makes the shaping almost undetectable, resulting in a much smoother finish than standard decrease stitches.
Before you close the final hole in your Crocheted apple- Pattern, you must add the stuffing. It is often easier to stuff the apple gradually as you work the last few rounds of the Crocheted apple- Pattern. This allows you to distribute the fiberfill evenly and reach all the corners, ensuring there are no lumps or empty spots inside your handmade fruit.
The final closure of the Crocheted apple- Pattern is done by threading the yarn tail through the remaining stitches and pulling it tight. This creates the top of the apple. In a well-designed Crocheted apple- Pattern, this top area will later be indented to hold the stem, creating a realistic look that distinguishes your work from a simple round ball.
The stem of your Crocheted apple- Pattern is usually a simple cord made of a few stitches. Despite its small size, the stem adds a lot of personality. In this Crocheted apple- Pattern, we recommend using a dark brown or tan yarn to represent the woody texture of a real apple stem, giving it an authentic and rustic feel.
A single green leaf is the perfect accessory for any Crocheted apple- Pattern. The leaf is typically worked in rows or around a foundation chain to create a pointed oval shape. Adding a leaf to your Crocheted apple- Pattern not only adds a pop of color but also makes the project look more finished and “freshly picked” from a yarn orchard.
One of the most important steps in a Crocheted apple- Pattern is the needle sculpting. By passing a long strand of yarn from the top center to the bottom center and pulling it tight, you create the classic indented shape. This Crocheted apple- Pattern technique is what gives the apple its realistic dimples, making it look much more like a real piece of fruit.
You can also customize your Crocheted apple- Pattern by adding “spots” or “blushes.” Some crafters use fabric markers or even a bit of actual makeup blush to add color variations to the yarn. This artistic touch can turn a standard Crocheted apple- Pattern into a unique piece of art that reflects the beauty of different apple varieties like Granny Smith or Honeycrisp.
If you are making the Crocheted apple- Pattern for a child, you might consider adding safety eyes and a small embroidered smile. Turning your Crocheted apple- Pattern into a character makes it even more appealing to little ones. Just ensure that all additions are secure and safe, following the guidelines provided in the Crocheted apple- Pattern for toy safety.
Finally, consider the presentation of your finished Crocheted apple- Pattern. Placing several apples in a small wicker basket or a wooden bowl enhances the handmade aesthetic. A completed Crocheted apple- Pattern makes for a wonderful centerpiece, especially during the autumn season when the “back to school” and harvest themes are in full swing.
If your Crocheted apple- Pattern looks more like a flat pancake than a round fruit, you might be increasing too quickly or not working enough “even” rounds in the middle. Always count your stitches at the end of every round in the Crocheted apple- Pattern. Accuracy is the best way to ensure that the 3D geometry of the apple develops correctly.
Gaps in your stitches are a common frustration when following a Crocheted apple- Pattern. This usually happens because the hook is too large or the tension is too loose. If you see white stuffing through your red yarn, try restarting your Crocheted apple- Pattern with a hook that is 0.5mm or 1.0mm smaller to create a denser fabric.
If the “dimples” in your Crocheted apple- Pattern won’t stay indented, you might not be pulling the sculpting yarn tight enough or securing it properly at the base. In a Crocheted apple- Pattern, it’s often helpful to tie a very secure knot at the bottom and hide it inside the stuffing to keep that iconic shape locked in place.
Sometimes the leaf on a Crocheted apple- Pattern might curl or look limp. You can solve this by using a slightly stiffer yarn or even a tiny bit of fabric stiffener. When attaching the leaf to your Crocheted apple- Pattern, sew it close to the base of the stem to ensure it stands up or drapes realistically across the top of the fruit.
If you find that your Crocheted apple- Pattern is leaning to one side, it might be due to uneven stuffing. Take a moment to “massage” the apple after you have finished it. Since the Crocheted apple- Pattern is flexible, you can often push the stuffing around from the outside to fix any lumps and restore perfect symmetry.
Don’t be discouraged if your first attempt at the Crocheted apple- Pattern isn’t perfect. Crochet is a skill that improves with every stitch. Each Crocheted apple- Pattern you complete will look better than the last as you become more familiar with the shaping and the unique behavior of your chosen yarn and hook combination.
What is the best size hook for a Crocheted apple- Pattern?
For most worsted weight yarns used in a Crocheted apple- Pattern, a 3.25mm (D) or 3.5mm (E) hook is ideal. This ensures the stitches are tight enough to keep the stuffing inside while still being comfortable to work with.
Can I wash a finished Crocheted apple- Pattern?
Yes, if you use cotton or acrylic yarn and polyester stuffing. It is best to hand wash your Crocheted apple- Pattern in cool water and let it air dry. This prevents the stuffing from clumping and keeps the shape of the apple intact.
How long does it take to crochet one apple?
A Crocheted apple- Pattern is a relatively quick project. Depending on your speed, you can usually finish a complete apple, including the stem and leaf, in about 1 to 2 hours. This makes it a great project for a relaxing evening.
What are the best colors for a realistic Crocheted apple- Pattern?
While red is the classic choice, don’t forget about bright green for Granny Smith apples or a mix of red and yellow for a Gala apple. Variegated yarns can also create a beautiful, natural mottled effect on your Crocheted apple- Pattern.
Is this Crocheted apple- Pattern safe for pets?
While it’s soft, be careful with pets. If you include small parts like safety eyes, they could be a choking hazard. If making a Crocheted apple- Pattern for a pet, it is safer to embroider all details and ensure the yarn is durable enough to withstand chewing.
Can I make a giant version of this Crocheted apple- Pattern?
Absolutely! To scale up your Crocheted apple- Pattern, simply use a bulky or jumbo yarn and a correspondingly large hook. The pattern instructions remain the same, but the resulting apple will be much larger—perfect for a floor pouf or a large plushie.
In this article, we have journeyed through the delightful process of creating a handmade fruit using a Crocheted apple- Pattern. We’ve covered everything from selecting the best cotton yarns and hooks to mastering the art of invisible decreases and needle sculpting to create those perfect dimples.
Whether you are a beginner or an expert, a Crocheted apple- Pattern offers a wonderful opportunity to practice amigurumi techniques while creating something beautiful and functional for your home or as a gift.


