
Lily in Crochet - Pattern

The Crocheted bear hat – Pattern is one of the most heartwarming projects a crafter can take on, blending functionality with an irresistible “cuteness factor” that appeals to all ages. Whether you are looking to create a cozy accessory for a newborn’s first photo shoot or a whimsical winter accessory for a toddler, a well-designed Crocheted bear hat – Pattern provides the perfect foundation for a handmade gift that will be cherished for years. The beauty of this specific design lies in its simplicity; by mastering a few basic shapes, you can transform a standard beanie into a playful character that brings a smile to everyone who sees it.
When you start working on a Crocheted bear hat – Pattern, you are engaging in a creative process that allows for extensive customization through color choice and ear placement. Many artisans prefer this Pattern because it is a fantastic way to practice working in the round while learning how to attach 3D elements securely to a fabric base. In the world of modern fiber arts, the Crocheted bear hat – Pattern has become a staple for small business owners and hobbyists alike, as it remains a high-demand item during the colder months and serves as a versatile template for other animal-themed designs.
In this comprehensive guide, we will explore the essential steps to successfully complete your Crocheted bear hat – Pattern, focusing on everything from selecting the softest yarns to ensuring a perfect fit for different head sizes. We will break down the technical components of the hat’s body, the construction of the iconic bear ears, and the finishing touches that give the hat its unique personality. By following this Crocheted bear hat – Pattern, you will not only improve your technical crochet skills but also create a durable, professional-quality garment that combines the warmth of wool with the charm of a forest friend.
The first step in any Crocheted bear hat – Pattern is choosing a yarn that feels soft against the skin, especially since these hats are frequently made for babies and children. A high-quality acrylic-wool blend is often the preferred choice because it offers the warmth of natural fibers with the durability and “washability” of synthetic ones. When selecting your palette for the Crocheted bear hat – Pattern, classic “bear” colors like chocolate brown, honey gold, or even a soft cream are popular, but don’t be afraid to experiment with vibrant “fantasy” colors like teal or lavender for a modern twist.
Sizing is a critical component of a successful Crocheted bear hat – Pattern, as a hat that is too tight will be uncomfortable, while one that is too loose will slip over the wearer’s eyes. Most patterns provide a “size chart” ranging from preemie and newborn to adult large. To ensure your Crocheted bear hat – Pattern fits perfectly, it is vital to measure the head circumference of the intended recipient or follow standard industry measurements. Accurate sizing ensures that the bear ears sit in the correct anatomical position once the hat is being worn.
The choice of crochet hook size will directly impact the “drape” and density of your Crocheted bear hat – Pattern. For a winter hat, you want a dense fabric that blocks the wind, which usually means using a 5.0mm or 5.5mm hook (H or I in US terms) with worsted weight yarn. If your stitches are too loose, the hat will stretch out of shape quickly; if they are too tight, the fabric will be stiff and uncomfortable. Finding the right balance in your stitch tension is the key to a professional-looking result.
In addition to yarn and hooks, you will need a few essential notions to finish your Crocheted bear hat – Pattern. A large-eye tapestry needle is indispensable for weaving in ends and sewing the ears onto the crown of the hat. You might also want to use stitch markers to keep track of your rounds, especially when working the increases for the crown. Having these tools ready before you begin the Pattern makes the assembly process much smoother and prevents common mistakes like “spiraling” out of count.
Texture is another element you can play with in a Crocheted bear hat – Pattern. Some makers choose a “fuzzy” or “eyelash” yarn to give the hat a realistic fur-like appearance. However, for beginners, a smooth-spun yarn is recommended because it allows you to see your stitches clearly, making it easier to follow the Crocheted bear hat – Pattern instructions for increases and decreases. As you become more confident, you can mix textures to create a truly one-of-a-kind handmade bear hat.
Finally, consider the safety of your materials if the Crocheted bear hat – Pattern is intended for an infant. Avoid using small plastic buttons for eyes that could become a choking hazard; instead, use embroidery techniques or “safety eyes” that are specifically designed to be permanent. A safe Crocheted bear hat – Pattern is a beautiful one, and taking these precautions ensures that your gift is as practical as it is adorable for the youngest members of the family.
The foundation of every Crocheted bear hat – Pattern is the crown, which is usually started with a Magic Ring. This technique allows you to pull the center of the hat completely closed, leaving no gap at the very top. From this central point, you will work in rounds of double crochet or half-double crochet, increasing the number of stitches in each lap to create a flat circle. This stage of the Crocheted bear hat – Pattern is what determines the final diameter of the hat and ensures it sits correctly on the head.
As you progress through the Crocheted bear hat – Pattern, you will eventually stop increasing and begin working “even” rounds. This transition is what turns the flat circle into a bowl shape, forming the sides of the hat. It is important to maintain consistent tension during these rounds so that the sides of your Crocheted bear hat – Pattern are straight and uniform. Many crafters find this part of the project to be quite meditative, as the repetitive nature of the stitches allows for a relaxed and steady rhythm.
The height of the hat is another variable you can adjust within the Crocheted bear hat – Pattern. A shorter hat will sit just above the ears, while a longer “slouchy” version provides a more modern, relaxed look. If you are following a Pattern for a baby, the length is usually shorter to prevent the hat from covering the face. Checking the “length measurement” against the wearer as you work is a great way to ensure the Crocheted bear hat – Pattern is turning out exactly as intended.
Row endings can be handled in two ways in a Crocheted bear hat – Pattern: “joined rounds” or “continuous spirals.” Joining each round with a slip stitch creates a visible seam down the back of the hat, which can help you keep track of your rows. Continuous spirals, on the other hand, create a seamless look but require the constant use of a stitch marker. Both methods work perfectly well for a Crocheted bear hat – Pattern, depending on your personal preference for the final aesthetic of the piece.
Adding a “ribbed brim” is a popular modification for the Crocheted bear hat – Pattern. By using front-post and back-post double crochets for the last few rows, you create a stretchy, elastic edge that helps the hat stay securely on the head. This functional detail also adds a nice visual contrast to the smooth stitches of the hat’s body. A well-executed brim is a sign of a high-quality Crocheted bear hat – Pattern that focuses on both style and wearer comfort.
Once the body of the hat is complete, you should have a clean, symmetrical beanie ready for its animal transformation. Before moving on to the ears, it is a good idea to “block” the hat base. Blocking involves lightly steaming the fabric or wetting it and letting it dry over a mannequin head or a bowl. This sets the stitches and ensures the base of your Crocheted bear hat – Pattern is the perfect canvas for the decorative elements you are about to add.
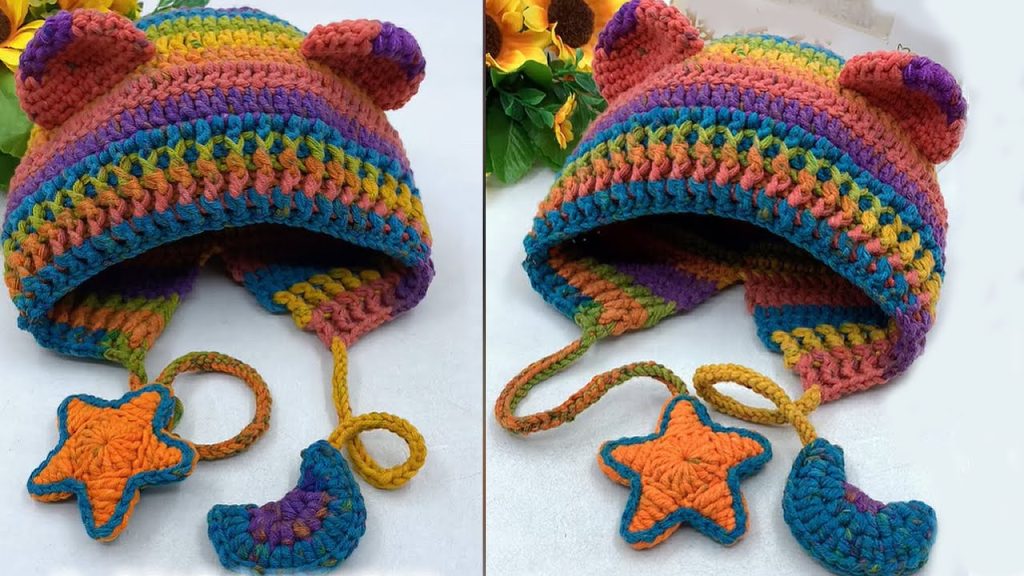
The “ears” are the defining feature of the Crocheted bear hat – Pattern, and they are typically made as two separate semi-circular units. To make them look like a bear’s ears, you want them to be thick and slightly curved. A good Crocheted bear hat – Pattern will instruct you to work two layers or use a tighter gauge to ensure the ears stand up on their own rather than flopping over. This structural integrity is what gives the bear its alert and cute expression.
Placement is everything when attaching the ears to your Crocheted bear hat – Pattern. If they are too close together, the hat might look more like a cat; if they are too far down the sides, it might look like a monkey. Most experts suggest placing the ears between the 3rd and 5th rounds from the top center. Using locking pins to hold the ears in place before you sew them onto the Crocheted bear hat – Pattern allows you to check for symmetry and make adjustments as needed.
When sewing the ears onto the Crocheted bear hat – Pattern, use a “whip stitch” or a “mattress stitch” for a clean, invisible join. It is helpful to leave a long yarn tail at the end of your ear pieces specifically for this purpose. Reinforcing the base of the ear with a few extra stitches ensures they remain upright even after multiple washes. This attention to assembly is what makes your Crocheted bear hat – Pattern durable enough for daily winter play.
For an extra touch of personality, you can add a “muzzle” to your Crocheted bear hat – Pattern. This is usually a smaller circle of a lighter-colored yarn sewn onto the front center of the hat. Adding a muzzle provides a place to embroider a nose and mouth, which can change the bear’s expression from happy to sleepy. Following a Pattern that includes a muzzle adds an extra layer of 3D depth to the design, making the hat look more like a professional plush toy.
Eyes can be added to the Crocheted bear hat – Pattern using black yarn or safety eyes. If you choose embroidery, the “satin stitch” or a “French knot” works beautifully to create expressive, twinkling eyes. In a minimalist Crocheted bear hat – Pattern, the ears alone are enough to convey the theme, but adding a full face makes the project a true character hat that children will love to wear for “dress-up” play as much as for warmth.
Finally, you can customize your Crocheted bear hat – Pattern with small accessories like a bow or a tiny flower. A pink bow placed near one ear can turn the design into a “girl bear,” while a striped “party hat” or a scarf can add a whimsical story to your creation. The Crocheted bear hat – Pattern is truly just a starting point; your imagination is the only limit to how you can embellish and personalize this classic forest-inspired design.
The final step in your Crocheted bear hat – Pattern journey is the “finishing work,” which involves weaving in all your loose ends. Use your tapestry needle to thread the yarn tails through the back of the stitches, following the direction of the rows to hide the yarn effectively. This ensures that the inside of your Crocheted bear hat – Pattern is as neat as the outside and prevents the ears or muzzle from becoming loose over time. A secure finish is essential for any garment that will be worn frequently.
If your Crocheted bear hat – Pattern includes braided earflaps, this is the time to attach them. Earflaps provide extra warmth for the cheeks and can be finished with long, colorful tassels. Adding earflaps to a Crocheted bear hat – Pattern is a great way to make the hat more functional for very cold climates. Braiding the yarn tails for the ties adds a professional, “boutique” look to the finished product, making it stand out from mass-produced winter gear.
Caring for your Crocheted bear hat – Pattern creation is vital to preserve its shape and softness. If you used a wool-blend yarn, it is best to hand-wash the hat in cool water with a mild wool detergent. Avoid wringing or twisting the fabric, as this can distort the shape of the bear ears. Instead, roll the hat in a clean towel to remove excess moisture and then lay it flat to dry. Proper care ensures your handmade crochet hat remains a keepsake for years.
If you find that the ears on your Crocheted bear hat – Pattern have become a bit limp after washing, you can lightly “re-shape” them while they are damp. Some crafters even use a tiny bit of fabric stiffener on the inside of the ear to help it maintain its rounded peak. However, for a soft, baby-friendly hat, simply air-drying the Crocheted bear hat – Pattern on a flat surface is usually enough to restore its original charming silhouette.
Giving your Crocheted bear hat – Pattern as a gift? Consider packaging it in a nice box with a small “handmade with love” tag. Including a care instruction card is also a thoughtful touch, letting the recipient know the best way to clean and store their new bear hat. The presentation of a Crocheted bear hat – Pattern project is the final act of the creative process, turning a bundle of yarn into a meaningful, heartfelt gesture for a friend or family member.
Ultimately, the Crocheted bear hat – Pattern is a testament to the joy of handmade crafting. Each stitch represents time and care spent creating something functional and beautiful. Whether you are making one for a donation to a local hospital or for your own little “bear,” the Crocheted bear hat – Pattern offers a satisfying and rewarding experience that celebrates the whimsy of childhood and the timeless art of crochet. Happy hooking!
Is a Crocheted bear hat – Pattern suitable for absolute beginners?
Yes! The Crocheted bear hat – Pattern is an excellent beginner-to-intermediate project. The base is a simple beanie, and the ears are just basic semi-circles. If you can do a chain, a single crochet, and a double crochet, you have all the skills needed to follow a Crocheted bear hat – Pattern successfully.
What is the best yarn for a baby’s Crocheted bear hat – Pattern?
For babies, look for a “baby-soft” acrylic or a superwash merino wool. These fibers are gentle on sensitive skin and are machine-washable. Always check the yarn label for a “baby” designation, which ensures the fiber has been tested for softness and safety in a Crocheted bear hat – Pattern.
How do I make the bear ears stand up?
To make the ears stand up on a Crocheted bear hat – Pattern, you should use a slightly smaller hook to create a stiffer fabric. Alternatively, you can crochet two identical ear pieces and sew them together back-to-back, which provides more structural support than a single-layer ear.
How many hours does it take to finish a Crocheted bear hat – Pattern?
For an experienced crocheter, an infant-sized Crocheted bear hat – Pattern can be finished in about 1.5 to 3 hours. An adult-sized hat might take 4 to 6 hours. This makes it a perfect “weekend project” or a quick last-minute gift for a baby shower.
Can I use this pattern to make other animals?
Absolutely! The Crocheted bear hat – Pattern is a versatile base. By changing the shape of the ears, you can easily turn this bear into a cat (pointed ears), a bunny (long ears), or a mouse (large round ears). It is one of the most adaptable Patterns in a crocheter’s library.
Why is my hat “pointy” at the top?
If the top of your Crocheted bear hat – Pattern looks like a cone, you may have increased too quickly in the first few rounds. To fix this, ensure your crown remains flat like a pancake for the first few rows before you stop increasing. Following the Crocheted bear hat – Pattern increase math carefully will solve this issue.
In this article, we have thoroughly explored the delightful world of the Crocheted bear hat – Pattern, a project that combines technical skill with pure creative joy. We discussed the importance of selecting soft, washable yarns and using the correct hook size to ensure a comfortable and professional fit. We broke down the construction of the hat’s body, starting with the Magic Ring and the strategic increases needed for a smooth crown.
We also delved into the artistic assembly of the bear ears and facial features, emphasizing that placement and embroidery are key to giving the character its unique personality. Furthermore, we covered essential maintenance tips, like blocking and hand-washing, to ensure your Crocheted bear hat – Pattern creation stays in perfect condition for years to come. By mastering this versatile design, you gain the ability to create endless variations of animal-themed headwear that are as practical for winter as they are adorable for play.your own two hands.


