
Lily in Crochet - Pattern

Finding the perfect Crocheted bow – Pattern is often the first step toward adding a touch of handmade charm to your wardrobe, home decor, or gift-wrapping projects. These delightful little accessories are incredibly versatile, allowing you to transform a simple hair clip into a statement piece or turn a plain baby blanket into a boutique-style heirloom. Whether you are a seasoned pro or a complete beginner, the beauty of a Crocheted bow – Pattern lies in its simplicity and the immediate gratification of finishing a project in just one sitting.
The creative potential of a Crocheted bow – Pattern is truly limitless when you consider the vast array of yarn weights and colors available today. You can create tiny, delicate bows using lace-weight thread for jewelry or chunky, oversized bows using super bulky yarn to serve as a decorative pillow accent. Many crafters enjoy using these patterns as a way to use up scrap yarn, making it an eco-friendly and cost-effective hobby that results in beautiful, functional art.
Beyond their aesthetic appeal, working on a Crocheted bow – Pattern is an excellent way to practice fundamental crochet stitches and maintain consistent tension. Because the project is small, any mistakes are easy to spot and correct, which helps build confidence for larger, more complex designs. In the following sections, we will explore everything you need to know to master the art of the Crocheted bow – Pattern, from selecting the right materials to finishing your work with a professional touch.
The success of your Crocheted bow – Pattern depends heavily on the type of yarn you choose. For a structured bow that holds its shape, a mercerized cotton yarn is often the best choice because it has very little stretch and a beautiful sheen. If you prefer a softer, fluffier appearance, an acrylic or wool blend can provide a cozy texture that looks wonderful on winter accessories like hats and scarves.
Selecting the correct crochet hook size is the next vital step in your Crocheted bow – Pattern journey. If your hook is too large, the stitches will be loose, and the bow may look floppy or lose its definition over time. Most patterns will suggest a hook size slightly smaller than what is recommended on the yarn label to create a dense, firm fabric that keeps the “wings” of the bow upright and crisp.
Don’t forget the importance of color selection when planning your project. A bright, solid color can make the stitch definition really stand out, while a variegated or “cake” yarn can create a fun, multi-colored effect without the need for frequent color changes. Think about where the bow will be used; a neutral palette of creams and greys is perfect for modern home decor, while vibrant pinks and blues are favorites for children’s accessories.
To complete your Crocheted bow – Pattern, you will also need a few basic notions. A sharp pair of scissors and a tapestry needle are essential for cutting the yarn and weaving in your ends securely. If you plan to turn your bow into a hair accessory, you’ll also want to have some alligator clips, hair ties, or even safety pins on hand to attach the finished piece to its final destination.
If you are aiming for a very specific look, consider the fiber content carefully. Natural fibers like bamboo or silk blends can give your Crocheted bow – Pattern a sophisticated, high-end feel that is perfect for wedding decor or formal events. On the other hand, a sturdy nylon blend might be better if the bow is going to be attached to a bag or shoes where it needs to withstand a bit more wear and tear.
Lastly, consider the weight of the yarn in relation to the size of the bow. A Crocheted bow – Pattern worked in fingering weight yarn will result in a dainty, elegant bow perfect for earrings. If you use the exact same pattern with t-shirt yarn, you will end up with a large, sturdy bow that could serve as a unique wall hanging or a decorative element on a storage basket.
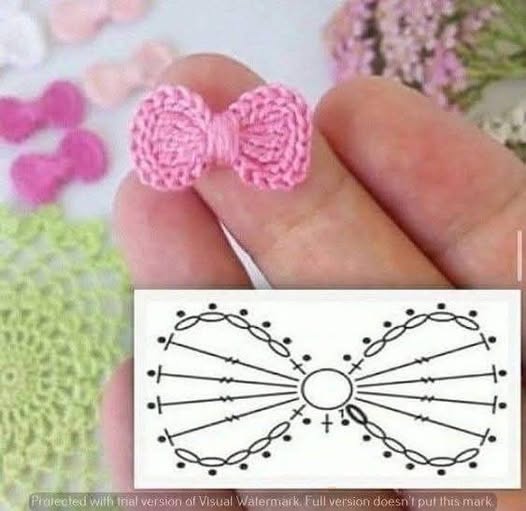
Most versions of a Crocheted bow – Pattern are constructed using one of two primary methods: the rectangular strip or the worked-in-the-round tube. The rectangular strip is the most common for beginners, as it involves simply crocheting a flat piece and then folding it. This method allows you to experiment with different textures like the waffle stitch or herringbone double crochet to give your bow a unique surface pattern.
The “center wrap” is what truly defines the silhouette of your Crocheted bow – Pattern. Once your main piece is finished, you will pinch the middle to create the pleats. You can then wrap yarn tightly around the center or crochet a small separate tab to sew around the middle. This step is crucial because the tightness of the wrap determines how much the “wings” of the bow flare out, giving it that classic look.
Mastering the turning chain is essential for keeping the edges of your Crocheted bow – Pattern straight and neat. If your edges are wonky, the bow will look asymmetrical when folded. Practice keeping your tension even, and always count your stitches at the end of every row to ensure you haven’t accidentally added or dropped a stitch, which is a common mistake for those new to the craft.
For a more seamless appearance, some choose a Crocheted bow – Pattern that is worked in a continuous spiral. This creates a double-layered bow that is naturally thicker and more durable. Using the invisible join technique at the end of your rounds will ensure that there are no unsightly bumps or seams, making the finished accessory look like it was purchased from a high-end boutique.
You can also add tails to your bow to create a more traditional “ribbon” effect. This involves crocheting two additional strips and attaching them to the bottom of the center wrap. When adding tails to a Crocheted bow – Pattern, it is often helpful to use a tapered stitch—starting with taller stitches and moving to shorter ones—to give the ends of the tails a pretty, angled finish.
The beauty of the Crocheted bow – Pattern is that it is a “living” project that you can scale up or down. Once you understand how the width and height of the rectangle affect the final shape, you can customize the pattern without needing to follow a guide. This freedom allows you to create custom sets of bows in various sizes for different uses, from tiny shoe clips to large gift toppers.
Once you are comfortable with the basics, you can start incorporating more advanced decorative stitches into your Crocheted bow – Pattern. Using the shell stitch or a picot border can add a romantic, vintage flair to the edges of the bow. These small details make your handmade items stand out and demonstrate a higher level of craftsmanship that is highly valued in the maker community.
Incorporating beads or sequins into your Crocheted bow – Pattern is another way to add a bit of sparkle. You can thread beads onto your yarn before you start crocheting and slide them into place as you work the stitches. This is particularly effective for holiday-themed bows or evening wear accessories, giving the crochet fabric a glamorous and sophisticated holiday-ready shimmer.
Another professional tip is to use surface crochet or embroidery on top of your finished Crocheted bow – Pattern. You can use a contrasting color of embroidery floss to stitch a small initial, a flower, or a simple border onto the wings of the bow. This level of customization makes your bows perfect for personalized gifts, such as monogrammed hair bows for bridesmaids or flower girls.
To ensure your Crocheted bow – Pattern maintains its shape forever, you might consider using a fabric stiffener or a light spray of starch. This is especially helpful if you are using a soft yarn that tends to sag. By blocking the bow and applying a stiffening agent, you ensure that the loops stay open and the center remains pinched, preserving the “boutique” look even after heavy use.
Experimenting with layered bows can also add incredible depth to your work. This involves making two different sized versions of the Crocheted bow – Pattern and stacking them on top of each other before wrapping the center. Using a solid color for the large bow and a patterned or metallic yarn for the smaller top bow creates a stunning dimensional effect that looks very intricate.
Finally, consider the attachment method as part of the design process. Instead of just sewing the bow onto a project, you can incorporate loops or buttons into the back of your Crocheted bow – Pattern. This makes the bow removable, which is great for washing the main garment or for swapping out different colored bows on a single headband to match various outfits.
One common issue when following a Crocheted bow – Pattern is the bow looking “scrunchy” or too tight in the middle. This usually happens if the center wrap is pulled too forcefully. To fix this, try wrapping the yarn around a small spacer (like a pencil) and then removing it to allow the pleats a bit more breathing room. This ensures the symmetry of the bow remains intact.
If your Crocheted bow – Pattern feels too flimsy, you can try crocheting with two strands of yarn held together. This “double-stranding” technique increases the gauge and makes the fabric much thicker and more robust. It is a great way to use up thinner yarns while still achieving the structured look required for a standing bow on a hat or a garment.
Size customization is easy once you know the math. For a standard Crocheted bow – Pattern, the width of your starting chain should be roughly twice the desired width of the finished bow if you are folding it, or the exact width if you are making a single layer. Knowing these proportions allows you to adapt the pattern for everything from a tiny doll accessory to a giant decorative bow for a front door wreath.
Pay close attention to your edges when working the rows. If you find your bow is turning into a trapezoid instead of a rectangle, you might be missing the very last stitch of the row. Using stitch markers at the beginning and end of each row can help you keep track of your count, ensuring that your Crocheted bow – Pattern comes out perfectly rectangular every single time.
For those who want a more “rustic” look, you can use jute or twine with a Crocheted bow – Pattern. While these materials are harder on the hands, the result is a beautiful, farmhouse-style decoration that works perfectly for rustic weddings or holiday gift wrapping. Just be sure to use a metal hook, as the friction of the twine can sometimes be tough on plastic or wooden hooks.
Lastly, remember that blocking is your friend. If your finished Crocheted bow – Pattern looks a bit twisted or uneven, a quick steam block can work wonders. Pin the bow into the perfect shape on a foam board and hit it with a bit of steam from an iron (without touching the yarn). Once it cools and dries, the fibers will “remember” that shape, giving you a professional, high-quality finish.
How long does it take to make a crocheted bow?
Depending on your speed and the complexity of the Crocheted bow – Pattern, most simple bows can be completed in 15 to 30 minutes. This makes them the perfect “instant gratification” project for busy crafters.
What is the best stitch for a bow?
The single crochet or half double crochet are usually the best stitches for a Crocheted bow – Pattern because they create a dense fabric that holds its shape well. However, you can use any stitch you like if you are looking for a specific texture.
Can I wash my crocheted bows?
Yes, but it depends on the yarn. If you used cotton or acrylic, you can usually hand wash them and lay them flat to dry. If the bow is attached to a metal clip, be sure to dry it quickly to prevent the clip from rusting.
How do I attach the bow to a hair clip?
The most secure way to attach your Crocheted bow – Pattern to a clip is by using a small amount of hot glue or by sewing the back of the bow’s center wrap directly onto the clip using matching thread.
Why does my bow look different from the photo in the pattern?
Usually, this is due to a difference in gauge or yarn weight. If your yarn is thinner than what the Crocheted bow – Pattern calls for, your bow will be smaller and more delicate. Always check your hook size and yarn weight before starting.
Can I make these to sell at craft fairs?
Absolutely! Crocheted bows are excellent items for craft fairs because they are quick to make, use very little yarn, and are very popular as “impulse buys” for parents and gift-shoppers.
In this guide, we have explored the wonderful world of the Crocheted bow – Pattern, covering everything from the selection of the perfect yarn and hooks to advanced techniques for adding sparkle and texture. We learned that the secret to a professional-looking bow lies in maintaining consistent tension, choosing the right construction method, and not skipping the final step of blocking.
Whether you are making these as gifts, hair accessories, or home decor, the versatility of the Crocheted bow – Pattern ensures that you will never run out of ways to express your creativity. Remember that even the simplest rectangle can be transformed into a work of art with the right finishing touches.


