
Lily in Crochet - Pattern

Crochet button covers – Pattern are a delightful way to breathe new life into your wardrobe or home decor by adding a personalized, handmade touch to everyday fasteners. Creating your own Crochet button covers allows you to transform plain, industrial buttons into vibrant focal points that can complement any fabric or project. Whether you are looking to refresh an old cardigan or add a rustic feel to a cushion cover, mastering this specific pattern is a rewarding skill that combines utility with artistic expression.
The beauty of a Crochet button covers – Pattern lies in its simplicity and the speed with which a project can be completed. Unlike large blankets or sweaters, Crochet button covers are small, portable projects that use very little yarn, making them the ultimate solution for utilizing those colorful scraps left over from larger works. This pattern is accessible to beginners who are just learning to work in the round, yet it remains engaging for experts who want to experiment with intricate textures and micro-crochet techniques.
When you dive into a Crochet button covers – Pattern, you are engaging in a tradition of “upcycling” that predates modern sustainable fashion trends. By using a Crochet button covers set, you can bridge the gap between vintage charm and contemporary style, ensuring that even the smallest details of your outfit reflect your unique personality. In this comprehensive guide, we will explore the materials, techniques, and creative applications for this versatile pattern, helping you achieve professional results every time you pick up your hook.
To begin your journey with the Crochet button covers – Pattern, the choice of yarn is paramount. Since Crocheted button covers need to be durable and hold their shape around a solid disk, mercerized cotton is often the preferred choice for this pattern. Cotton provides excellent stitch definition and does not pill over time, ensuring that your Crochet button covers look crisp and clean even after multiple washes.
The crochet hook you select for the Crochet button covers – Pattern should generally be a size or two smaller than what is recommended on the yarn label. This creates a tight, dense fabric that prevents the original button from peeking through the stitches of your Crochet button covers. Using a smaller hook ensures the pattern remains firm and keeps its tension, which is vital for a snug fit over the button form.
Standard plastic or wooden buttons serve as the “skeleton” for your Crochet button covers – Pattern. You can use flat buttons or shank buttons, but flat ones are often easier for beginners to cover as they provide a stable base for the Crochet button covers. Ensure the buttons are clean and free of sharp edges that could snag the yarn while you are working on the pattern.
In addition to yarn and hooks, you will need a tapestry needle to finish your Crochet button covers – Pattern. This tool is essential for weaving in ends and, more importantly, for the “cinching” process that secures the Crocheted button covers around the back of the button. A sharp pair of embroidery scissors is also necessary for making clean cuts that won’t fray within the pattern.
Stitch markers can be incredibly helpful when working on a Crocheted button covers – Pattern, especially if you are working in continuous rounds. Because the Crocheted button covers are so small, it is easy to lose track of where a round begins and ends. Using a marker ensures your increases and decreases are placed accurately within the pattern, maintaining perfect symmetry.
Lastly, consider having a measuring tape or ruler nearby while working on the Crocheted button covers – Pattern. You will need to measure the diameter of your base button to know when to stop increasing your stitches. A well-fitted Crocheted button covers depends on precise measurements, making this simple tool a vital part of the pattern workflow.
The assembly of Crocheted button covers – Pattern usually starts with a “Magic Ring” or a small chain loop. Starting your Crocheted button covers with a magic ring allows you to pull the center tight, leaving no hole in the middle of the button face. This is the foundation of a professional-looking pattern, providing a solid surface for any further embellishments.
Once the ring is established, the next phase of the Crocheted button covers – Pattern involves a series of increases. You will typically work in single crochet or half-double crochet to build a flat circle that matches the diameter of your button. It is important to keep your tension consistent throughout the Crocheted button covers so that the surface remains smooth and the pattern stays flat against the button.
After the circle reaches the desired size for your Crocheted button covers – Pattern, you will work one or two rounds without any increases. This creates the “sides” of the Crocheted button covers, allowing the crochet work to cup around the edge of the button. This stage of the pattern is where the transformation from a flat circle to a functional cover truly begins to take shape.
The most critical part of the Crocheted button covers – Pattern is the insertion of the physical button. You must place the button inside the “cup” you have created before starting the decrease rounds. If the Crocheted button covers are too loose, the button will wobble; if they are too tight, you won’t be able to close the pattern effectively over the back.
To finish the back of the Crocheted button covers – Pattern, you will perform a series of rapid decreases. This pulls the yarn tight behind the button, locking the Crocheted button covers in place permanently. In some variations of the pattern, you might leave a small opening for the button shank to poke through, allowing the button to remain functional for clothing.
The final step in this pattern is to secure the yarn tail with a sturdy knot and weave it into the back of the stitches. This ensures that the Crocheted button covers will not come undone during use. A well-executed Crocheted button covers – Pattern should look as beautiful from the back as it does from the front, reflecting high-quality craftsmanship.
One of the joys of the Crocheted button covers – Pattern is the ability to experiment with different stitch textures. Instead of plain single crochet, you can try using the “Bobble Stitch” or “Popcorn Stitch” to give your Crocheted button covers a 3D effect. These textural changes can make the pattern look much more sophisticated and high-end.
Colorwork is another fantastic way to customize your Crocheted button covers – Pattern. You can create stripes, “Gingham” effects, or even tiny “Fair Isle” designs within the small surface area of the Crocheted button covers. Using contrasting colors for the center and the edges of the pattern can add a vintage “Bullseye” look that is very popular in retro fashion.
For those who love extra sparkle, you can incorporate beads into your Crocheted button covers – Pattern. By threading small seed beads onto your yarn before you start the Crocheted button covers, you can stitch them into the face of the button as you work the pattern. This creates a luxurious finish that is perfect for formal wear or decorative pillows.
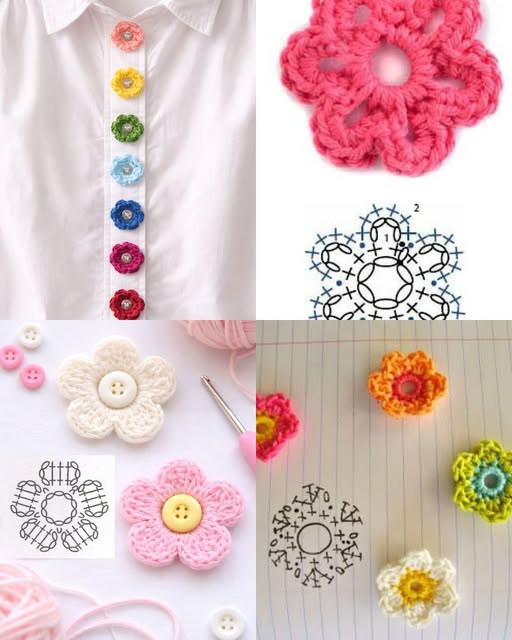
If you are a fan of floral motifs, you can easily adapt the Crocheted button covers – Pattern to look like a blooming flower. By adding a final round of “Petal Stitches” or shells around the outer edge, your Crocheted button covers can become miniature roses or daisies. This variation of the pattern is particularly lovely for children’s clothing or spring-themed decor.
The size of the button you choose can also change the vibe of the Crocheted button covers – Pattern. Oversized coat buttons covered in chunky wool create a bold, modern statement, while tiny shirt buttons covered in lace-weight thread offer a delicate, feminine touch. The pattern remains the same in theory, but the scale change completely alters the final Crocheted button covers.
Don’t be afraid to mix different fibers within the same Crocheted button covers – Pattern project. For example, using a metallic thread along with cotton can give the Crocheted button covers a subtle shimmer. Combining different materials within the pattern allows you to tailor the finished product to the specific garment or room you are decorating.
Proper care is essential to ensure that your Crocheted button covers – Pattern lasts for years to come. Because the Crocheted button covers are attached to items that are often washed, you should always check the care instructions of the yarn used in the pattern. Hand-washing garments with these buttons is usually the safest way to preserve the shape and color.
If you must use a washing machine for items featuring the Crocheted button covers – Pattern, it is highly recommended to turn the garment inside out. This protects the Crocheted button covers from rubbing against the drum or other clothes, which could cause the pattern stitches to fray or pill. Using a mesh laundry bag provides an extra layer of security for your handiwork.
Over time, the tension of the Crocheted button covers – Pattern may relax slightly due to frequent use. If the Crocheted button covers begin to feel loose on the button form, you can often “tighten” them by steam-blocking the fabric. This helps the fibers of the pattern contract back to their original size, keeping the cover snug and secure.
Staining can be a concern for Crocheted button covers, especially on cuffs or coat fronts. If your Crocheted button covers – Pattern gets soiled, use a mild detergent and a soft toothbrush to gently spot-clean the area. Avoid harsh chemicals that could weaken the yarn fibers or bleach the vibrant colors of your pattern.
For items that are used seasonally, such as winter coats with Crocheted button covers – Pattern, proper storage is key. Store these items in a cool, dry place and consider using cedar blocks or lavender sachets to protect the Crocheted button covers from moths. Keeping the pattern away from direct sunlight also prevents the colors from fading.
If a thread in your Crocheted button covers – Pattern ever snags or breaks, it is relatively easy to repair. Simply use a matching piece of yarn and a tapestry needle to “darn” the small hole. Because the Crocheted button covers are small, repairs are almost invisible, allowing you to enjoy your favorite pattern indefinitely.
Can I use any type of yarn for Crocheted button covers – Pattern?
While you can use many types, 100% cotton is the best choice for the Crocheted button covers – Pattern. It is less stretchy than wool or acrylic, which means the Crocheted button covers will stay tight against the button and won’t sag over time.
What size button should I use for this pattern?
The Crocheted button covers – Pattern is versatile and can be adapted for any size. However, standard 3/4 inch (20mm) or 1 inch (25mm) buttons are the most common. Beginners often find that medium-sized buttons are the easiest to handle when first learning the pattern.
Are Crocheted button covers durable enough for daily wear?
Yes, if made with a tight gauge and high-quality cotton, Crocheted button covers are very durable. Following the pattern correctly and securing the back tightly ensures that they can withstand the friction of being buttoned and unbuttoned daily.
Do I need to remove the covers before washing?
Usually, you do not need to remove the Crocheted button covers if they are sewn directly onto the garment. If you followed the Crocheted button covers – Pattern using washable yarn, you can wash the entire item together, following the yarn’s care guidelines.
How do I make the pattern fit a shank button?
When following the Crocheted button covers – Pattern for a shank button, you simply leave a small gap in your final decrease round. This allows the shank to protrude through the back of the Crocheted button covers, making it easy to sew onto your fabric.
Can I sell items made from this Crocheted button covers – Pattern?
Most designers allow you to sell the finished items you make using their pattern. Selling Crocheted button covers as sets or as part of a handmade garment is a popular way for crafters to monetize their skills.
In conclusion, the Crocheted button covers – Pattern is a fantastic project for anyone looking to add a touch of custom artistry to their sewing or crochet work. Throughout this article, we have learned that creating Crocheted button covers requires minimal supplies but offers maximum creative impact.
From choosing the right mercerized cotton to mastering the decrease rounds, every step of the pattern is an opportunity to practice precision and style. We explored how these covers can be customized with textures, beads, and colors, and how simple maintenance can keep them looking beautiful for years.


