
Lily in Crochet - Pattern

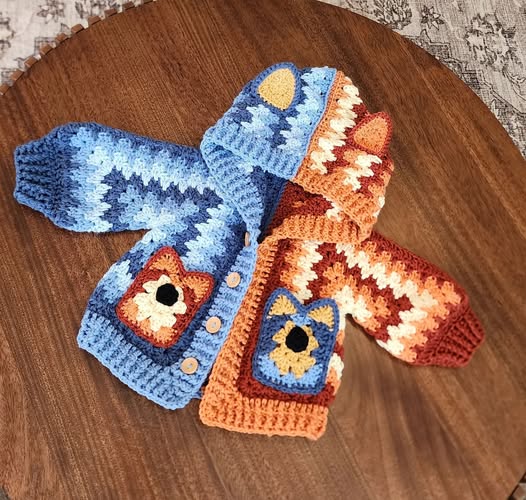
A Crochet cardigan – Pattern is more than just a set of instructions; it is the blueprint for creating a timeless piece of wearable art that combines comfort with personal style. There is something deeply satisfying about taking a few skeins of yarn and turning them into a functional garment that can be worn throughout the seasons, whether you are layering up for a chilly autumn evening or seeking a light cover-up for a breezy summer night. Finding the right Crochet cardigan – Pattern is the first step in a rewarding journey that allows you to express your creativity through every stitch, texture, and color choice you make.
When you decide to embark on a new project, a well-written Crocheted cardigan – Pattern serves as your expert guide, helping you navigate the complexities of garment construction such as shaping armholes, tapering sleeves, and creating a clean neckline. Many crafters find that a high-quality Crocheted cardigan – Pattern provides not only the technical steps but also the inspiration to customize the length or add unique borders. This versatility is why crochet has remained a beloved craft for generations, offering a modern twist on traditional techniques that results in a professional-looking cardigan you can be proud to wear or gift to a loved one.
The beauty of a Crocheted cardigan – Pattern lies in its accessibility to makers of all skill levels, from those who have just mastered the basic stitches to advanced artisans looking for intricate lace or cable work. By following a structured Crocheted cardigan – Pattern, you ensure that your finished garment has the correct drape and fit, which are essential for a piece that looks as good as it feels. Throughout this article, we will delve into the essential elements of choosing, starting, and finishing your project, ensuring that your experience with a Crocheted cardigan – Pattern is successful, enjoyable, and leads to a stunning addition to your handmade wardrobe.
The success of any Crocheted cardigan – Pattern begins with the choice of yarn, as the fiber content and weight will drastically change the final look and feel of the piece. For a classic, everyday look, many makers choose a worsted weight wool or acrylic blend, which provides durability and warmth without being overly heavy. If you are following a Crocheted cardigan – Pattern designed for warmer weather, a cotton or bamboo yarn might be more appropriate, offering breathability and a beautiful, elegant drape.
Beyond the fiber, you must pay close attention to the yarn weight specified in your Crocheted cardigan – Pattern. Using a yarn that is too thick or too thin compared to the recommendations can result in a garment that is either massive or tiny, regardless of the size you think you are making. A Crocheted cardigan – Pattern usually lists the recommended yarn category, such as Sport, DK, or Aran, to help you make an informed decision at the craft store.
Hook size is the next critical component when starting a Crocheted cardigan – Pattern. Most patterns will suggest a specific hook size, but it is important to remember that your individual tension might require you to go up or down a size. When working through a Crocheted cardigan – Pattern, having a full set of ergonomic hooks is a great investment, as it prevents hand fatigue during the many hours you will spend on your project.
Don’t overlook the importance of “notions” when preparing to use your Crocheted cardigan – Pattern. You will definitely need a set of stitch markers to keep track of row counts and the placement of sleeves or pockets. A sharp pair of scissors and a large-eye tapestry needle are also vital for the assembly phase of your Crocheted cardigan – Pattern, ensuring that your seams are strong and your yarn ends are neatly hidden.
Measurement is a key part of the preparation process for a Crocheted cardigan – Pattern. Before you even pick up your hook, use a flexible measuring tape to check your bust, waist, and arm length to ensure you are following the correct size instructions. Most Crocheted cardigan – Pattern designs provide a size chart, allowing you to choose a fit that is either “oversized” for comfort or “fitted” for a more tailored and formal appearance.
Lastly, consider the color story of your Crocheted cardigan – Pattern. Neutral tones like beige, grey, or navy are popular because they match almost everything, but a vibrant, multi-colored yarn can turn a simple Crocheted cardigan – Pattern into a bold statement piece. Take your time during this selection phase, as the materials you choose are the foundation upon which your entire Crocheted cardigan – Pattern journey will be built.
In the world of garment making, “gauge” is perhaps the most important word you will encounter in a Crocheted cardigan – Pattern. Gauge refers to the number of stitches and rows per inch, and it ensures that your cardigan actually fits the way the designer intended. If you skip the gauge swatch mentioned in your Crocheted cardigan – Pattern, you run the risk of finishing a beautiful sweater that is unfortunately unwearable due to incorrect sizing.
To check your gauge for a Crocheted cardigan – Pattern, you should crochet a small square (usually 4×4 inches) using the stitches specified in the instructions. Once completed, use a ruler to count how many stitches fit into those four inches horizontally and how many rows fit vertically. If you have more stitches than the Crocheted cardigan – Pattern requires, your tension is too tight and you should try a larger hook; if you have fewer, you should try a smaller hook.
Tension is the personal “signature” of every crocheter and it can fluctuate depending on your mood or environment while working on a Crocheted cardigan – Pattern. If you are stressed, your stitches might become tighter, whereas a relaxed setting might lead to looser work. Consistency is key when following a Crocheted cardigan – Pattern, so try to work in a comfortable environment where you can maintain a steady rhythm throughout the project.
A Crocheted cardigan – Pattern will often specify if the gauge should be measured “blocked” or “unblocked.” Blocking involves wetting your swatch or finished pieces and pinning them to shape, which often causes the yarn to relax and expand. Understanding this distinction in your Crocheted cardigan – Pattern is crucial for achieving a professional fit, especially when working with natural fibers like wool or alpaca.
If you find that your gauge is perfect for stitch width but off for row height, don’t panic. Many Crocheted cardigan – Pattern instructions allow you to adjust row counts by simply adding or subtracting a few rows of the main body. This flexibility is one of the reasons why a Crocheted cardigan – Pattern is so adaptable to different body types and personal style preferences, such as making the cardigan longer or shorter.
Finally, keep your gauge swatch as a reference point until your Crocheted cardigan – Pattern is fully completed. Sometimes, if you take a long break from a project, your tension might shift when you return. Having the original swatch from your Crocheted cardigan – Pattern allows you to quickly recalibrate your hands and ensure the rest of your cardigan matches the pieces you have already finished.
There are several ways to construct a garment, and your Crocheted cardigan – Pattern will likely follow one of three main methods: top-down, bottom-up, or seamed panels. A top-down Crocheted cardigan – Pattern is popular because it allows you to try on the piece as you go, making it very easy to adjust the length of the body and sleeves. This method usually starts at the neck and expands outward through a series of increases.
On the other hand, a bottom-up Crocheted cardigan – Pattern starts at the hem and works its way toward the shoulders. This method is excellent for maintaining a consistent stitch pattern across a large area before moving into the more detailed shaping of the yoke. Many traditional Crocheted cardigan – Pattern designs use this approach, providing a very stable structure for the weight of the yarn as the garment grows.
The “seamed panel” method involves crocheting a back panel, two front panels, and two sleeves separately, then sewing them together at the end. While some avoid this because of the sewing involved, a seamed Crocheted cardigan – Pattern often has the best structural integrity. The seams act as “skeletons” for the garment, preventing the Crocheted cardigan – Pattern from stretching out of shape over time or after multiple washes.
Understanding the anatomy of your Crocheted cardigan – Pattern is essential for success. Most patterns will include terms like “armhole shaping,” which involves decreasing stitches to create a curve where the sleeve will attach. If you are a beginner, look for a Crocheted cardigan – Pattern with “drop shoulders,” as these require very little shaping and are much easier to assemble for your first garment project.
Sleeves can be worked in the round or flat, depending on the specifics of your Crocheted cardigan – Pattern. Working in the round means you won’t have a seam running down your arm, but it requires a bit more focus on stitch counting. A Crocheted cardigan – Pattern that works sleeves flat is often simpler for those who prefer straightforward rows and don’t mind a bit of mattress stitch seaming at the end.
Finally, the finishing touches such as the button bands and collar are what truly bring a Crocheted cardigan – Pattern to life. These are usually added last by picking up stitches along the edges of the front panels. Following this section of the Crocheted cardigan – Pattern carefully is what gives the garment its clean, finished edge and provides the space for buttons or a stylish zip.
One of the greatest joys of using a Crocheted cardigan – Pattern is the ability to customize it to your heart’s content. You can easily add pockets to almost any Crocheted cardigan – Pattern by making two simple squares and sewing them onto the front. You can also experiment with different ribbing techniques on the cuffs and hem to give your Crocheted cardigan – Pattern a more modern or vintage aesthetic.
If the Crocheted cardigan – Pattern you are using feels a bit too plain, consider incorporating colorwork or texture. Adding stripes is a simple way to use up scrap yarn while following a Crocheted cardigan – Pattern, or you could substitute a basic stitch for a popcorn or waffle stitch to add depth. Just remember that changing the stitch in a Crocheted cardigan – Pattern will affect your gauge, so always test it first.
Buttons are the “jewelry” of your Crocheted cardigan – Pattern. You can choose classic wooden buttons for a rustic look, or sleek metal ones for something more contemporary. When your Crocheted cardigan – Pattern calls for buttonholes, make sure they are the right size for your chosen buttons; there is nothing more frustrating than finishing a cardigan and finding the buttons slip right through the holes!
Once your Crocheted cardigan – Pattern is complete, proper care is essential to ensure it lasts for years. Always check the yarn label you used for your Crocheted cardigan – Pattern for washing instructions. Most handmade cardigans benefit from hand washing in cool water with a gentle wool wash and laying flat to dry on a towel to prevent the weight of the water from stretching the stitches.
Storage is also important for a garment made from a Crocheted cardigan – Pattern. It is generally better to fold your crochet cardigans rather than hang them on hangers. Hangers can cause “shoulder bumps” and cause the Crocheted cardigan – Pattern to grow longer over time due to gravity. Keep them in a cool, dry place, perhaps with a cedar block or lavender sachet to keep moths away.
Finally, take pride in what you have accomplished with your Crocheted cardigan – Pattern. Every time you wear it, you are showcasing hours of dedication, skill, and creativity. Sharing photos of your finished Crocheted cardigan – Pattern on social media or in crafting groups is a wonderful way to connect with other makers and inspire them to start their own garment-making journey.
Is it hard to make a cardigan for the first time?
Not at all! If you choose a Crocheted cardigan – Pattern labeled for beginners, it will likely use simple shapes like rectangles. The most important part is to take your time and read the instructions carefully before starting.
How much yarn do I need for a Crocheted cardigan – Pattern?
The amount of yarn depends on the size and the weight of the yarn itself. Most Crocheted cardigan – Pattern designs for an adult medium will require between 1,200 and 1,800 yards. Always buy an extra skein just in case!
Can I use a different yarn than what the pattern suggests?
Yes, but you must match the gauge. If your Crocheted cardigan – Pattern calls for wool and you use cotton, the weight and drape will be different, so always make a swatch to see how the new yarn behaves.
What is the easiest stitch for a cardigan?
The Half Double Crochet (HDC) is a favorite for many Crocheted cardigan – Pattern designs because it is faster than a single crochet but denser and warmer than a double crochet, providing a perfect balance for garments.
How do I fix a mistake in my cardigan?
If you catch a mistake early, it’s best to “frog” (rip out) the stitches back to the error. However, if it’s a small tension issue in a large Crocheted cardigan – Pattern, sometimes you can hide it in the seams or with a bit of clever blocking.
Do I really need to block my cardigan?
Yes! Blocking is the “magic” step that evens out your stitches and sets the final dimensions. For any Crocheted cardigan – Pattern, blocking ensures the panels lay flat and the seams are much easier to sew together.
In this detailed guide, we have covered the essential steps to successfully completing a Crocheted cardigan – Pattern. From the initial excitement of selecting your yarn and tools to the technical importance of mastering gauge, we have seen how every detail contributes to the final masterpiece.
We explored the different ways a Crocheted cardigan – Pattern can be constructed and how you can add your own personal flair through customization and careful finishing. Remember, the goal of a Crocheted cardigan – Pattern is not just to finish the garment, but to enjoy the meditative process of making something with your own two hands.


