
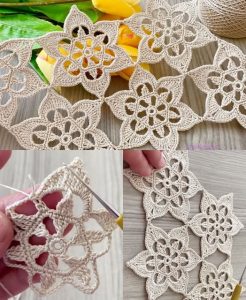
Lily in Crochet - Pattern

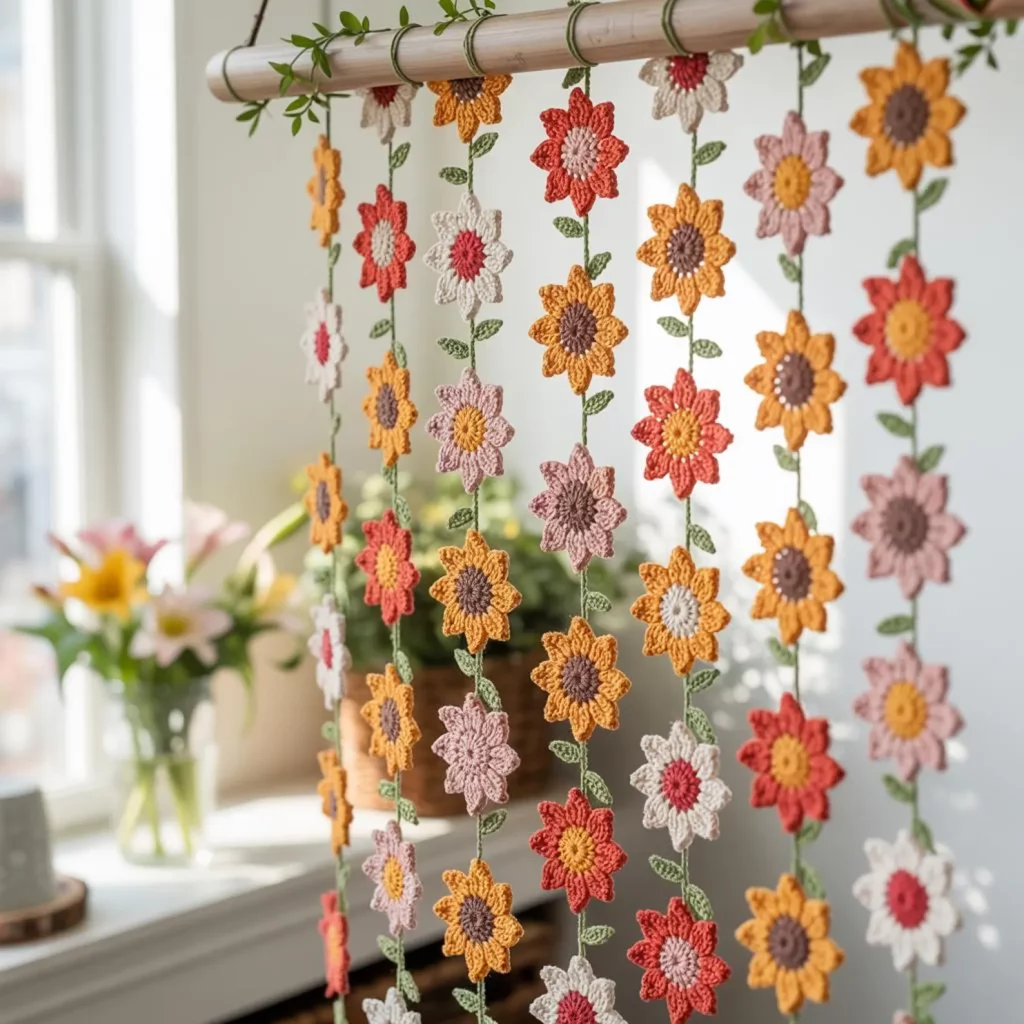
Creating a Crocheted curtain for hanging – Pattern is one of the most elegant ways to personalize your living space while embracing the timeless art of fiber craft. Unlike store-bought window treatments, a handmade curtain allows you to control the exact level of light filtration, texture, and color that enters your room. Whether you are aiming for a bohemian aesthetic with flowing fringe or a classic farmhouse look using crisp white cotton, mastering this specific project will elevate your interior design to a professional level.
The versatility of a Crocheted curtain for hanging – Pattern lies in its ability to adapt to any window size, from tiny kitchen clerestories to large patio doors. By selecting the right yarn weight and hook size, you can create a fabric that is either dense and private or light and airy. This project is not just about utility; it is a labor of love that transforms a simple household object into a piece of hanging art that catches the sunlight and casts beautiful, intricate shadows across your floors.
In this comprehensive guide, we will walk you through the essential steps to successfully complete a Crocheted curtain for hanging – Pattern, ensuring your final piece is both durable and stunning. We will explore the best materials for the job, the technical aspects of achieving the perfect “drape,” and how to properly mount your creation. By following these expert tips, you will gain the confidence to tackle large-scale home decor crochet projects and produce an heirloom-quality piece that will be admired for years to come.
The most important decision when starting your Crocheted curtain for hanging – Pattern is the choice of fiber. For curtains, mercerized cotton is the gold standard because it is strong, has a beautiful sheen, and does not stretch significantly over time. Unlike wool or acrylic, cotton can withstand the constant pull of gravity and the heat of direct sunlight without losing its shape or becoming “fuzzy” through the seasons.
When looking at a Crocheted curtain for hanging – Pattern, you must also consider the yarn weight or thickness. A “Size 10” crochet thread is traditional for delicate, lace-like cafe curtains, providing a vintage look that allows plenty of light to pass through. If you prefer a modern, chunky aesthetic, using a “Weight 4” worsted cotton will produce a heavier curtain that offers more privacy and a bold, textured presence in the room.
The term gauge is vital in this project to ensure your curtain actually fits your window once finished. Before starting the full Crocheted curtain for hanging – Pattern, always crochet a 4×4 inch swatch to see how many stitches and rows you produce per inch. Since curtains are large, being even slightly off in your gauge can result in a finished piece that is several inches too short or too wide for the intended window frame.
Another technical term to understand is stitch definition. Because curtains are often viewed against the light, every loop and knot is visible. Choosing a smooth, high-quality yarn ensures that your pattern work is crisp and clear. Avoid highly variegated yarns that might “muddy” the visual impact of a complex lace design; instead, opt for solid colors or subtle ombrés that highlight the architecture of the stitches.
A Crocheted curtain for hanging – Pattern often requires a larger hook than you might expect to ensure the fabric remains supple. If the stitches are too tight, the curtain will be stiff and won’t “bunch” or flow nicely when pushed to the side of the rod. Experimenting with a hook one size larger than recommended on the yarn label can help achieve that sought-after drape that makes professional window treatments look so sophisticated.
Finally, think about the mounting style before you begin the first row. Will the curtain have a “rod pocket,” or will you use clip rings? A rod pocket is built directly into the Crocheted curtain for hanging – Pattern by creating a wide band of solid stitches at the top, while clip rings allow for a more casual, adjustable look. Deciding this early ensures that your dimensions are accurate from the very start of the project.
Most designs for a Crocheted curtain for hanging – Pattern rely on a combination of basic stitches to create complex-looking lace. The Filet Crochet technique is particularly popular, as it uses a grid of double crochet stitches and open “spaces” (chains) to create pictorial designs or geometric motifs. This method is excellent for beginners because it only requires knowledge of two stitches but produces incredibly detailed and professional results.
To create a sturdy top edge for your Crocheted curtain for hanging – Pattern, you should start with a foundation row that can support the weight of the entire panel. Using a foundation double crochet (FDC) instead of a standard starting chain can provide more flexibility and strength. This technique prevents the top of your curtain from being too tight, which often causes the fabric to “smile” or curve upward at the corners.
The “body” of the Crocheted curtain for hanging – Pattern is where the artistic magic happens. Many patterns use the Pineapple Stitch or Fan Stitches to create a sense of movement and elegance. These stitches are airy, meaning they won’t use up as much yarn as solid stitches, and they allow air to circulate through the room, which is a functional benefit during the warmer summer months.
Increasing and decreasing are less common in a standard rectangular Crocheted curtain for hanging – Pattern, but they are essential if you are making a “valance” with a scalloped edge. A scalloped border adds a touch of romanticism and helps the bottom of the curtain hang more naturally. Mastering the “picot” stitch for the very final row can provide a delicate, “beaded” look to the edge that catches the light beautifully.
Managing yarn joins is another critical skill for a large-scale project like this. Since you will likely go through several balls of yarn, you must join new strands invisibly. The Russian Join or the “Magic Knot” are preferred methods for a Crocheted curtain for hanging – Pattern because they are secure and don’t leave bulky knots that would be visible when the sun shines through the lace.
Lastly, consider the repeat of the pattern. A good Crocheted curtain for hanging – Pattern will have a clear stitch repeat (e.g., a multiple of 10 + 3). Understanding the math behind the repeat allows you to easily customize the width of your curtain. If your window is extra wide, you simply add more repeats of the design until you reach the desired measurement, ensuring a perfectly tailored fit every time.
Once the actual crocheting of your Crocheted curtain for hanging – Pattern is complete, the fabric might look a bit rumpled or “crunchy.” This is where blocking comes in—a step that is absolutely non-negotiable for curtains. Blocking involves wetting the fabric and pinning it out to the exact final dimensions. This process “sets” the stitches, opens up the lace work, and ensures that the edges are perfectly straight and professional.
For a Crocheted curtain for hanging – Pattern, wet blocking is usually the most effective method. You submerge the panel in lukewarm water with a bit of wool wash, gently squeeze out the excess (never wring it!), and then pin it to foam mats. Using a T-pin and a long measuring tape, you can ensure that your 60-inch curtain is exactly 60 inches from top to bottom, preventing any lopsidedness once it is hung.
The “weight” of the curtain is a factor often overlooked in a Crocheted curtain for hanging – Pattern. If you find that the bottom of the curtain is curling or not hanging straight, you can incorporate curtain weights or even small decorative beads into the bottom hem. The added gravity helps pull the stitches down, emphasizing the vertical lines of your work and giving the curtain a high-end, heavy feel.
Starching is another traditional technique used for a Crocheted curtain for hanging – Pattern. If you want a very crisp, formal look, you can apply a light fabric starch during the blocking process. This makes the lace motifs stand out and prevents the curtain from blowing too wildly in a light breeze. However, for a more relaxed, “boho” look, many crafters prefer the soft, natural feel of unstarched cotton.
One common issue with the Crocheted curtain for hanging – Pattern is “vertical stretch.” Because curtains hang for long periods, the weight of the yarn can cause them to grow longer over time. To combat this, some experts recommend hanging the curtain while it is still slightly damp during the blocking phase. This allows the yarn to “find its home” and stretch to its maximum length before you finish the bottom edge.
Finally, always check the light transparency of your blocked piece. Hold your Crocheted curtain for hanging – Pattern up to a window at different times of the day. You might find that you want to add a fabric liner for privacy in a bedroom, or keep it sheer for a dining room. Knowing how the light interacts with your stitches is the final step in ensuring your project meets your home’s functional and aesthetic needs.
Installing your Crocheted curtain for hanging – Pattern requires a sturdy rod. Because a full-sized crochet panel can be surprisingly heavy (especially if made of 100% cotton), ensure your curtain rod brackets are securely anchored into the wall. A tension rod might work for a small cafe curtain, but for a floor-length masterpiece, a permanent wooden or metal rod is a much safer and more stylish choice.
Maintenance is key to keeping your Crocheted curtain for hanging – Pattern looking new. Since curtains act as a filter for dust and pollen, they should be cleaned at least once a year. Hand washing in a large basin is the safest route. Avoid the washing machine’s agitator, which can snag the delicate loops of your crochet lace and cause permanent damage to the structural integrity of the stitches.
If you want to add a modern twist to your Crocheted curtain for hanging – Pattern, consider dip-dyeing the bottom third of the panel. This creates a beautiful “ombre” effect that can match your room’s accent colors. Because most curtains are made of cotton, they take reactive dyes very well, allowing you to create a one-of-a-kind art piece that blends traditional craft with contemporary color trends.
For those who enjoy a bit of extra detail, adding tassels or fringe to the bottom of your Crocheted curtain for hanging – Pattern can provide extra length and movement. Tassels are very easy to make from the same yarn used in the project and can be tied onto the final row. This small addition can hide minor imperfections in the bottom edge and give the entire room a more lived-in, cozy atmosphere.
Troubleshooting a Crocheted curtain for hanging – Pattern often involves fixing “snags.” If a pet or a piece of furniture pulls a loop out of place, don’t panic. Use a smaller crochet hook to gently work the excess yarn back into the surrounding stitches. Because crochet fabric is made of a single interlocking thread, you have a lot of flexibility to “massage” the stitches back into their original position without leaving a trace.
Ultimately, a Crocheted curtain for hanging – Pattern is a project that grows with you. You can start with a simple valance and, as your skills improve, add more panels or even create matching crocheted tie-backs. The beauty of this craft is that it allows you to be the architect of your own environment, creating a home that is literally woven with your own hands and creative spirit.
1. How much yarn do I need for a full-sized Crocheted curtain for hanging – Pattern?
The amount varies significantly based on the yarn weight and window size. For a standard window using lace weight thread, you might need 2,000 to 3,000 yards. Always buy an extra ball of the same dye lot to ensure color consistency across the entire panel.
2. Can I use acrylic yarn for this project?
While you can, it is not recommended for a Crocheted curtain for hanging – Pattern. Acrylic tends to stretch and “pill” over time, and it may not hang as straight as cotton. Cotton’s weight and heat resistance make it a much better long-term choice for window treatments.
3. How do I adjust the width of a Crocheted curtain for hanging – Pattern?
You adjust the width by adding or subtracting “stitch repeats.” Check your pattern for a note like “Multiple of 12 + 2.” This means you can add 12 stitches at a time to the starting chain to make the curtain wider while keeping the design intact.
4. How long does it take to finish a curtain?
A Crocheted curtain for hanging – Pattern is a “slow-burn” project. Depending on the complexity and size, it can take anywhere from 20 to 60 hours of active crochet time. It’s a perfect project to work on while listening to audiobooks or watching movies.
5. Do I need to line my crocheted curtains?
It depends on your privacy needs. A Crocheted curtain for hanging – Pattern is naturally sheer. If you are using it in a bathroom or bedroom, you might want to sew a simple fabric backing or hang a separate blackout blind behind your crochet work.
6. Is this pattern suitable for beginners?
Yes! If you choose a Filet Crochet style or a simple repetitive stitch, it is very beginner-friendly. The most challenging part is the sheer size of the project and maintaining consistent tension, rather than the complexity of the stitches themselves.
In this guide, we have explored the intricate world of creating a Crocheted curtain for hanging – Pattern. We’ve discussed the importance of selecting the right mercerized cotton, the technical necessity of blocking to achieve a professional drape, and the creative ways you can customize your piece through fringe or dip-dyeing. Crafting your own window treatments is a rewarding way to marry functionality with high-level artistry.
The journey of completing a Crocheted curtain for hanging – Pattern is as much about the process as it is the result. It teaches patience, precision, and the joy of seeing a large-scale project come to life row by row. Once your curtain is finally hung, you will notice how it transforms the light in your home, making every morning feel a little more special and every evening a bit more cozy.


