
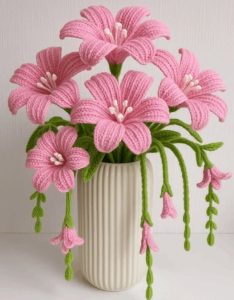
Lily in Crochet - Pattern

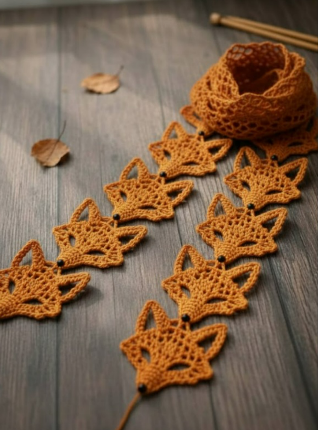
Creating a Crocheted fox scarf – Pattern is one of the most rewarding projects for crafters who love blending functionality with whimsical design. This charming accessory has gained immense popularity in recent years, serving not just as a warm layer for chilly days but also as a standout fashion statement for children and adults alike. Whether you are a seasoned pro or a curious beginner, embarking on a journey to create a handmade fox scarf allows you to customize colors, textures, and sizes to fit your specific needs while mastering essential stitching techniques.
The beauty of a Crocheted fox scarf – Pattern lies in its clever construction, where the fox’s head and tail serve as the decorative ends that often “bite” or loop together to secure the scarf. By using high-quality yarns and the right crochet hooks, you can transform a simple skein of orange and white wool into a lifelike woodland creature. In this comprehensive guide, we will explore the nuances of selecting materials, understanding the stitch patterns, and executing the assembly process to ensure your finished product looks professional and lasts for years.
Working with a Crocheted fox scarf – Pattern is also an excellent way to practice shaping techniques such as increasing and decreasing, which are vital for creating the pointed ears and the tapered tail. As you dive into this project, you will find that the amigurumi-style details added to the face give the scarf its unique personality. This article is designed to walk you through every step of the process, ensuring you have all the knowledge necessary to complete your very own handmade fox scarf while optimizing your workflow for the best possible results.
When you begin your Crocheted fox scarf – Pattern, the first decision is selecting the perfect yarn weight. For a cozy, winter-ready feel, a worsted weight yarn (Category 4) or a bulky yarn is highly recommended because it provides the necessary structure and warmth.
The color palette is essential for achieving that classic woodland look. You will typically need a vibrant burnt orange or rust color for the main body, a crisp white or cream for the muzzle and tail tip, and a small amount of black yarn for the paws and nose.
Your choice of crochet hook size will directly impact the drape of the scarf. Using a slightly smaller hook than recommended on the yarn label can create a tighter fabric, which is ideal for the fox head section to prevent the stuffing from peeking through.
Don’t forget the notions and tools that make the finishing touches possible. You will need a tapestry needle for weaving in ends, stitch markers to keep track of your rounds, and safety eyes or black buttons to give your fox an adorable expression.
Fiber content matters significantly for comfort and durability. Acrylic yarn is a popular choice for a Crocheted fox scarf – Pattern because it is machine washable and affordable, whereas wool blends offer superior warmth and a more natural aesthetic for outdoor wear.
Lastly, consider the “squish factor” of your material. Since this crocheted accessory will be worn close to the neck, look for yarns labeled “soft” or “anti-pilling” to ensure the wearer stays comfortable without any itchiness or irritation throughout the day.
To successfully execute a Crocheted fox scarf – Pattern, you must be comfortable with the single crochet (sc) stitch. This stitch creates a dense, sturdy fabric that is perfect for the fox’s face and ears, providing the durability needed for a garment that sees frequent use.
Another vital technique is the half double crochet (hdc) or double crochet (dc), which are often used for the main body of the scarf. These stitches allow the project to grow faster and result in a more flexible, “drapier” fabric that wraps easily around the neck.
The magic of the Crocheted fox scarf – Pattern often happens during the color changes. Learning how to carry your yarn or join a new color invisibly is key to making the transition between the white tail tip and the orange body look seamless and professional.
Increasing and decreasing are the foundational skills used to shape the fox’s anatomy. You will use inc (two stitches in one) to widen the head and dec (invisible decrease) to taper the tail, giving the scarf its iconic animal silhouette.
For those who want to add extra texture, the ribbing technique can be applied to the scarf’s body. By working in the back loops only (BLO), you create a stretchy, accordion-like effect that adds depth and a modern twist to the traditional fox scarf design.
Finally, mastering the magic ring (or magic circle) is a game-changer for starting the fox’s ears and snout. This technique ensures there is no hole at the beginning of your work, resulting in a clean, polished look that is hallmark of a high-quality crocheted pattern.
The journey of your Crocheted fox scarf – Pattern usually begins at the tail. Starting with white yarn, you will create a small cone shape that gradually expands, mimicking the snowy tip of a fox’s tail before transitioning into the main orange yarn.
Once the tail is complete, you move into the scarf body, which is essentially a long rectangle. Depending on whether you are making this for a child or an adult, you will continue your stitch repeats until the piece reaches the desired length, usually between 40 to 60 inches.
Consistency in tension is crucial during this middle phase. If your stitches are too tight, the scarf will be stiff; if they are too loose, it may lose its shape over time, so try to maintain an even rhythm as you work through the orange yarn sections.
As you reach the end of the body, you will begin the most exciting part: the fox head. This section involves a series of strategic increases to create a rounded shape, followed by a section of white yarn to form the underside of the fox’s face.
The Crocheted fox scarf – Pattern often incorporates a “keyhole” or a fastening mechanism. This can be achieved by creating a small loop under the fox’s head or by using the legs of the fox as a way to tuck the tail through, ensuring the scarf stays snug.
Attention to detail during this stage ensures the scarf is functional. Double-check your stitch count at the end of each row or round to prevent the head from looking lopsided, which is a common challenge when working on animal-themed crochet projects.
Assembly is where your Crocheted fox scarf – Pattern truly comes to life. You will start by stuffing the head lightly with polyester fiberfill, ensuring it holds its shape without being too heavy or bulky for the wearer to carry comfortably.
Next, you will crochet the ears and paws. The ears are usually small triangles sewn onto the top of the head, while the paws can be added to the ends of the scarf to give the impression of the fox “hugging” the person wearing it.
The facial features require a delicate touch. Using your tapestry needle, embroider a small black nose and attach the eyes. Proper placement is vital; placing the eyes slightly lower and further apart often results in a “cuter” and more kawaii-style fox.
To make your fox scarf even more realistic, consider adding surface crochet or embroidery for whiskers. These tiny details may seem insignificant, but they elevate the crochet pattern from a simple craft project to a piece of wearable art.
Weaving in your ends is the final technical step. Make sure to secure all yarn tails hidden inside the work, especially since scarves undergo a lot of movement and stretching, which can cause loose ends to pop out if not fastened properly.
Once finished, a light blocking of the scarf can help even out the stitches and settle the shape. Now your Crocheted fox scarf – Pattern is ready to be gifted or worn, showcasing your hard work and creativity to everyone who sees this adorable woodland accessory.
1. Is this Crocheted fox scarf – Pattern suitable for absolute beginners?
Yes! While it involves some shaping and color changes, many versions of this pattern use basic stitches like the single crochet. If you know the basics, this is a great project to level up your skills.
2. How long does it take to finish a fox scarf?
For an intermediate crocheter, it typically takes between 6 to 10 hours. Beginners might take a bit longer, especially when working on the detailed facial features and assembly.
3. What is the best yarn for a child’s fox scarf?
A soft, high-quality acrylic or a cotton-acrylic blend is best. It needs to be durable, machine-washable, and non-itchy for sensitive skin.
4. Can I adjust the size of the fox scarf?
Absolutely. To make the scarf longer or shorter, simply add or subtract rows in the middle “body” section of the pattern before starting the head.
5. Do I have to use safety eyes?
Safety eyes are great for adults, but if the scarf is for a baby or a very young child, it is safer to embroider the eyes using black yarn to prevent any choking hazards.
6. How do I care for my handmade crocheted scarf?
It is best to hand wash your crochet items in cold water with mild detergent and lay them flat to dry. This preserves the shape of the fox head and the integrity of the fibers.
In this article, we have explored the delightful process of creating a Crocheted fox scarf – Pattern, covering everything from material selection to the final decorative stitches. We learned that choosing the right yarn weight and hook size is the foundation of a great project, and that mastering increasing and decreasing is essential for shaping your fox. We also discussed the importance of assembly and how small details like eye placement can change the entire character of your handmade accessory.
Creating your own garments is a rewarding experience that allows for endless personalization. We hope this guide inspires you to pick up your hook and start your own woodland adventure. Please leave your sincere opinion and any suggestions in the comments below! We would love to hear about your progress or any tips you have for fellow crafters.


