
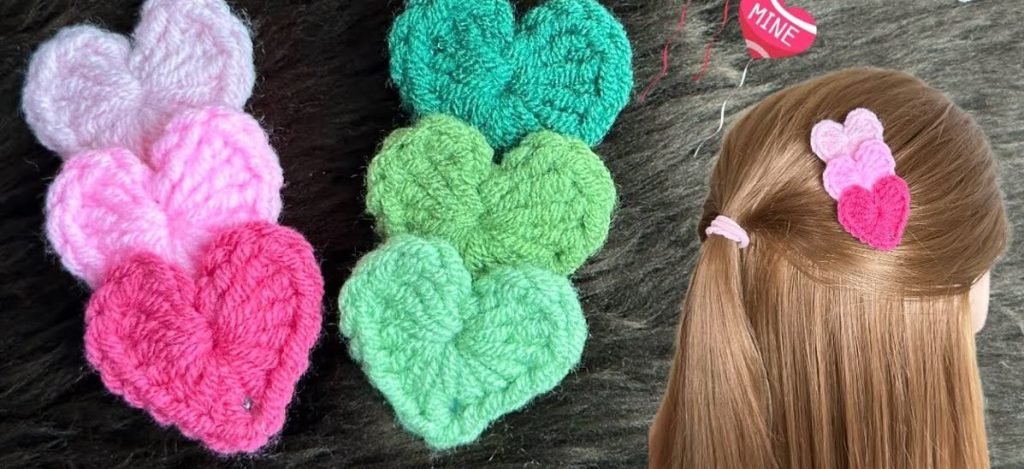
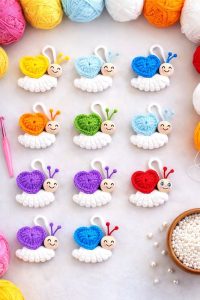
Lily in Crochet - Pattern

This Crochet heart-shaped hair clip Tutorial – Pattern is the perfect project for anyone looking to combine their love for fiber arts with practical, everyday fashion accessories. Creating your own hair accessories allows for a level of customization that store-bought items simply cannot match, giving you the freedom to choose colors and textures that suit your personal style. By following a dedicated Crochet heart-shaped hair clip Tutorial – Pattern, you can transform simple yarn into a romantic and charming gift or a stylish addition to your own wardrobe.
The beauty of a Crochet heart-shaped hair clip Tutorial – Pattern lies in its accessibility; it is a “one-sitting” project that provides instant gratification for makers of all skill levels. Whether you are looking to clear out your yarn stash or want to create a bulk set of party favors, the Pattern is designed to be repetitive enough to be relaxing but detailed enough to produce a professional-looking result. In this guide, we will explore the nuances of stitch tension, yarn selection, and the assembly techniques required to make your hair clips durable and beautiful.
As you dive into this Crochet heart-shaped hair clip Tutorial – Pattern, you will discover that the small details, such as the type of clip used or the weight of the thread, make a significant difference in the final product. Using a high-quality Pattern ensures that the heart maintains its iconic symmetrical shape without curling at the edges. This article will walk you through every stage of the process, ensuring that your Crochet heart-shaped hair clip is not just a craft project, but a high-quality accessory that can withstand daily wear while looking absolutely adorable.
The first step in any successful Crochet heart-shaped hair clip Tutorial – Pattern is gathering the right supplies to ensure a clean finish. You will need a small amount of mercerized cotton yarn, which is highly recommended for hair accessories because it has a slight sheen and does not pill over time. Unlike acrylic, cotton provides the structural integrity needed to keep the heart-shaped design crisp and defined even after multiple uses.
A crucial component of the Pattern is the crochet hook size, typically ranging from 2.0mm to 3.5mm depending on your yarn weight. Using a smaller hook than what is suggested on the yarn label is a common secret in the Crochet heart-shaped hair clip Tutorial – Pattern world; it creates tighter stitches that prevent the metal clip from showing through the fabric. This creates a more polished, high-end look for your finished hair clip.
You will also need metal snap clips or alligator clips, which serve as the foundation for your Crochet heart-shaped hair clip. When selecting your clips, look for lead-free and nickel-free options to ensure they are safe for all skin types, especially if you are making these for children. The Pattern will guide you on how to either sew or glue the crocheted heart onto these bases for maximum security.
Adhesives play a vital role in the Crochet heart-shaped hair clip Tutorial – Pattern if you choose not to sew. A high-quality hot glue gun or fabric-specific permanent glue is necessary to bond the textile to the metal. It is important to apply the glue sparingly but effectively to avoid any messy overflow that could ruin the look of the crochet heart.
The term Pattern refers to the specific sequence of stitches—such as chains, double crochets, and slip stitches—that form the heart shape. A well-written Crochet heart-shaped hair clip Tutorial – Pattern will provide a clear stitch count for each round, helping you maintain symmetry. This is especially important for the “lobes” of the heart, which must be identical to look professionally made.
Lastly, keep a pair of sharp embroidery scissors and a tapestry needle nearby for weaving in your ends. In a project as small as a Crocheted heart-shaped hair clip, there is nowhere to hide messy yarn tails. Following the finishing instructions in your Pattern will ensure that the back of the clip looks just as neat as the front, which is a hallmark of quality craftsmanship.
To successfully execute a Crochet heart-shaped hair clip Tutorial – Pattern, you must be familiar with a few fundamental stitches. Most heart patterns start with a Magic Ring (or Magic Circle), which allows you to pull the center tight, leaving no visible hole. This technique is essential for making the center of your Crochet heart-shaped hair clip look seamless and professional.
The “Pattern” often utilizes a variety of stitch heights to create the sloping curves of the heart. You will likely use double crochet (dc) and treble crochet (tr) stitches to build the height of the heart’s top arches, while using single crochets (sc) and slip stitches (sl st) to taper down to the bottom point. Mastering these transitions is the core of any Crochet heart-shaped hair clip Tutorial – Pattern.
One of the unique aspects of a Crochet heart-shaped hair clip is the need for consistent tension. If your stitches are too loose, the heart will become floppy and lose its shape; if they are too tight, the fabric might curl inward. The Pattern acts as your guide, but your personal “hand” or tension style will determine the final diameter and feel of the accessory.
In many versions of the Crochet heart-shaped hair clip Tutorial – Pattern, you will encounter the “picot stitch” at the very bottom. This tiny decorative point adds a bit of extra definition to the tip of the heart, making it look more refined. Small details like these are what separate a generic crochet pattern from a specialized tutorial designed for fashion accessories.
If you are a beginner, the Pattern may seem intimidating, but it is actually a great way to learn how to work into the same stitch multiple times. Most heart designs require you to work several stitches into a single chain space to create the rounded “humps.” This Crochet heart-shaped hair clip Tutorial – Pattern technique is a fundamental skill that applies to many other decorative crochet projects.
Finally, the Pattern will usually conclude with an invisible join or a slip stitch. This finalizes the perimeter of the heart. For those who want a bit more flair, some Crochet heart-shaped hair clip Tutorial – Pattern variations suggest adding a second round in a contrasting color to create a “border” effect, which adds depth and visual interest to the clip.
Once you have completed the stitching according to your Crochet heart-shaped hair clip Tutorial – Pattern, you are ready for assembly. The first task is to securely weave in all loose ends using your tapestry needle. In a Crochet heart-shaped hair clip, it is best to weave the yarn through the densest part of the stitches to ensure the ends don’t pop out after the clip is worn a few times.
The Pattern usually provides two options for attaching the heart to the clip: sewing or gluing. If you choose to sew, you will use a matching thread to wrap around the metal bar of the clip and through the back loops of the crochet heart. This method is incredibly durable and is often preferred for Crocheted heart-shaped hair clips intended for toddlers or active children.
If you prefer the gluing method mentioned in the Crochet heart-shaped hair clip Tutorial – Pattern, ensure the metal surface is clean and dry. Apply a thin line of glue along the top of the clip and press the heart firmly into place. Hold it for at least thirty seconds to ensure a strong bond, as the Pattern relies on this connection to keep the accessory functional.
Some crafters like to add a small piece of matching felt to the back of the heart before attaching it to the clip. This creates a flatter surface for the glue to adhere to and provides a soft cushion against the head. This extra step in the Crochet heart-shaped hair clip Tutorial – Pattern adds a touch of professional quality often seen in high-end handmade boutiques.
The “Crocheted heart-shaped hair clip” can also be embellished further at this stage. You might consider sewing a small pearl or bead into the center of the heart for a touch of elegance. Following the Pattern is just the beginning; these final assembly steps allow you to put your own creative stamp on the project, making each piece unique.
After the glue has fully cured or the sewing is finished, give the heart a gentle tug to test the security. A well-assembled Crocheted heart-shaped hair clip Tutorial – Pattern project should feel like one solid piece. If the heart feels wobbly, add a few more “anchor stitches” or a tiny drop of glue to the edges to ensure the crocheted element stays perfectly centered.
One of the best things about the Crocheted heart-shaped hair clip Tutorial – Pattern is how easily it can be adapted for different looks. By simply changing your yarn weight, you can create various sizes of hearts. Using embroidery floss with a 1.0mm hook will result in a tiny, delicate heart, while using bulky yarn will create a large, statement Crochet heart-shaped hair clip.
You can also experiment with “multi-tonal” or variegated yarn to give your heart a colorful, marbled appearance without having to switch balls of yarn. The Pattern remains the same, but the color shifts in the yarn create a dynamic look that makes each hair clip one-of-a-kind. This is a popular technique for those who find solid colors too plain.
Adding a “stiffening agent” is another professional tip often found in advanced Crocheted heart-shaped hair clip Tutorial – Pattern guides. By dipping the finished heart in a mixture of water and fabric stiffener (or white glue), you can ensure the Crocheted heart-shaped hair clip remains perfectly flat and doesn’t bend or wilt over time. This is particularly useful for larger heart designs.
The Pattern can also be used to create sets. Many people use the Crocheted heart-shaped hair clip Tutorial – Pattern to make matching pairs for pigtails or “mommy and me” sets. Because the project is so fast, you can easily produce a dozen clips in an afternoon, making it a very cost-effective way to build inventory for a craft business or online shop.
For a festive twist, consider using metallic or glitter yarn during the holidays. A red glittery Crocheted heart-shaped hair clip is perfect for Valentine’s Day, while a white and silver version works beautifully for winter weddings. The versatility of the Pattern means it is a year-round staple in your crochet repertoire.
Don’t be afraid to combine the heart with other elements, such as a small crochet leaf or a tiny bow. By layering the results of your Crocheted heart-shaped hair clip Tutorial – Pattern with other small motifs, you can create complex, 3D hair decorations. This encourages you to move beyond the basic Pattern and start designing your own unique accessory line.
1. What is the best type of clip to use for a Crocheted heart-shaped hair clip?
Snap clips (also known as sleepies) are generally the best because they have a flat surface that is easy to glue or sew onto. Alligator clips are also great for thicker hair or for clipping onto headbands.
2. Can I use scrap yarn for this Crocheted heart-shaped hair clip Tutorial – Pattern?
Yes! This is one of the best “scrap buster” projects available. You only need a few yards of yarn to complete one heart, making it perfect for using up those leftover bits from larger projects.
3. How do I prevent the heart from curling?
Curling usually happens if your tension is too tight or if you are using a very soft, limp yarn. Try using a slightly larger hook or applying a fabric stiffener to the back of the heart once the Pattern is finished.
4. Is this project safe for babies?
If making these for babies, it is vital to sew the heart onto the clip very securely rather than using glue, as glue can fail and become a choking hazard. Always supervise small children when they are wearing hair accessories.
5. How long does it take to make one Crocheted heart-shaped hair clip?
For most intermediate crocheters, a single heart takes about 10 to 15 minutes. Including assembly and finishing, you can have a completed Crocheted heart-shaped hair clip in under half an hour.
6. Do I need to block the crocheted heart?
Blocking isn’t always necessary for such small items, but if your heart looks a bit wonky, a quick steam iron (using a press cloth) can help set the shape and make the Crocheted heart-shaped hair clip Tutorial – Pattern results look much neater.
In this Crocheted heart-shaped hair clip Tutorial – Pattern, we have explored the essential steps to creating a beautiful, handmade accessory from scratch. We discussed the importance of choosing the right mercerized cotton yarn and hook size to achieve a professional finish, and we delved into the specific stitches that give the heart its iconic shape.
Furthermore, we covered the critical assembly phase, comparing sewing and gluing methods to ensure your Crocheted heart-shaped hair clip remains durable and secure during use.


