
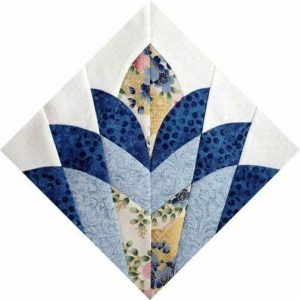
Lily in Crochet - Pattern

Crochet leaf – Pattern is an essential skill for any fiber artist looking to bring a touch of nature-inspired beauty to their handmade creations and decorative projects. Whether you are aiming to create a lush botanical garland, embellish a winter hat, or add a realistic touch to a crochet flower bouquet, mastering the Crochet leaf – Pattern allows you to bridge the gap between simple shapes and organic art. The beauty of this specific design lies in its versatility; by simply changing your hook size or yarn weight, you can transform a single set of instructions into anything from a delicate fern frond to a sturdy, broad maple leaf.
The allure of a Crochet leaf – Pattern is found in its clever use of stitch graduation, where the height of the stitches increases and decreases to mimic the natural curves of real foliage. Unlike standard square or circular motifs, a crochet leaf requires a bit of focus on symmetry and “working in the round” or around both sides of a foundation chain. When you follow a high-quality Crochet leaf – Pattern, you learn how to manipulate yarn into points, veins, and serrated edges, providing a level of detail that makes your work look truly professional and sophisticated.
In this comprehensive guide, we will dive deep into every technical aspect of the Crochet leaf – Pattern, ensuring you have the confidence to create stunning botanical accents for any occasion. We will discuss the best fiber choices for realistic textures, the step-by-step logic of the “double-sided” construction, and how to troubleshoot common issues like curling or blunt tips. By focusing on the Crochet leaf – Pattern as our primary blueprint, we will show you how to turn a few yards of green yarn into a masterpiece of texture and light that will enhance your crochet repertoire for years to come.
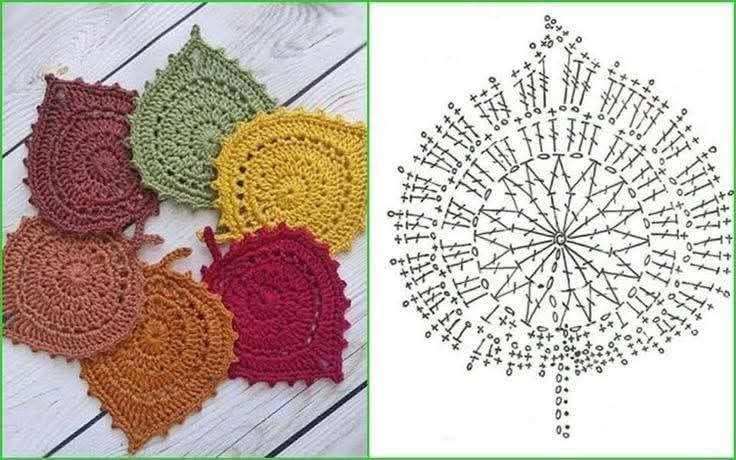
The foundational secret to a successful Crochet leaf – Pattern is the use of a “foundation chain” that acts as the central vein of the leaf. Unlike a blanket that grows in rows, the leaf grows by working stitches along one side of the chain, turning the corner at the tip, and then working back down the opposite side of the same chain. This “mirroring” technique is what gives the crochet leaf its organic, symmetrical shape, and it is a core skill taught in almost every botanical crochet pattern.
To create the tapered look of a leaf, the Crochet leaf – Pattern utilizes a sequence of stitches with increasing heights, such as moving from a slip stitch to a single crochet, then a half-double, and finally a double crochet. By placing the tallest stitches in the center of the row and the shortest stitches at the ends, the pattern naturally creates a bulging middle and a sharp point. Mastering this “stitch graduation” is essential for anyone who wants their Crochet leaf – Pattern to look realistic and graceful.
The “point” of the leaf is another critical area where the Crochet leaf – Pattern requires precision. Usually, this is achieved by working a “picot stitch” or a cluster of stitches into the very last chain before turning. This creates a sharp, defined tip that prevents the leaf from looking like a simple oval or a spoon. A well-designed pattern will provide clear instructions on how to navigate this turn without creating a bulky hole in the center of your work.
Texture can be added to the Crochet leaf – Pattern by working in the “back loops only” (BLO). This technique creates a raised ridge down the center of the leaf, perfectly mimicking the midrib found in real plant life. When you incorporate these small technical details into your Crochet leaf – Pattern, you add a three-dimensional quality that catches the light and adds a sense of “life” to your crochet projects, making them stand out in any display.
Symmetry is the hallmark of a high-quality Crochet leaf – Pattern, and it requires the maker to be diligent with their stitch count. If you put five double crochets on the left side but only four on the right, your leaf will appear lopsided and unnatural. Following the pattern‘s count ensures that the “visual weight” of the leaf is balanced, which is particularly important if you are creating a set of leaves for a symmetrical project like a wreath or a framed piece of art.
Finally, the Crochet leaf – Pattern often includes instructions for a “stem,” which is usually a simple continuation of the yarn in the form of a small chain or a row of slip stitches. This small addition makes the leaf much easier to attach to other objects or to bundle together in a “sprig.” By completing the stem as part of the pattern, you ensure that your crocheted foliage is functional and ready for assembly as soon as it leaves the hook.
Choosing the right yarn for your Crochet leaf – Pattern is the first step in achieving a realistic look. Many crafters prefer mercerized cotton because it has a slight sheen and excellent stitch definition, which helps the “veins” and “points” of the crochet leaf pop. However, if you are looking for a softer, more “forest-like” texture, a wool or acrylic blend with a bit of “halo” can give your Crochet leaf – Pattern a fuzzy, organic feel that is perfect for autumn-themed decor.
The weight of the yarn will determine the “scale” of your Crochet leaf – Pattern. Using a “fingering weight” yarn will produce a tiny, delicate leaf suitable for jewelry or scrapbooking, while a “bulky” yarn will create a large, statement leaf that could be used as a coaster or a decorative table accent. The pattern usually provides a recommended weight, but part of the fun of a Crochet leaf – Pattern is experimenting with different thicknesses to see how the design adapts.
Hook selection is vital for maintaining the “stiffness” required in a Crochet leaf – Pattern. Leaves generally look better when the stitches are tight and firm, as this allows the leaf to hold its shape without drooping. Most crochet leaf patterns suggest using a hook that is half a size smaller than what is listed on the yarn label. This “tight-gauge” approach ensures that the intricate details of your Crochet leaf – Pattern remain crisp and defined over time.
Color choice is where you can truly express your creativity with the Crochet leaf – Pattern. While various shades of green are the traditional choice, using “variegated” yarns that shift from green to yellow or brown can create a stunning “changing of the leaves” effect. When you use a high-quality pattern, the stitch structure will interact with the color changes in the yarn to create a natural-looking “mottled” appearance that is very difficult to achieve with solid colors.
In addition to yarn and hooks, you will need a few basic notions to finish your Crochet leaf – Pattern professionally. A sharp tapestry needle is essential for weaving in your ends, especially near the “tip” of the leaf where the yarn can be prone to unraveling. Some makers also like to have “fabric stiffener” or “blocking pins” on hand to help the crochet leaf maintain its flat, sharp shape, especially if it is being used as a freestanding decoration.
Lastly, consider using “stitch markers” if your Crochet leaf – Pattern involves complex increases or multiple rounds. Because the leaf is a small object, it is very easy to lose track of where the “center” is as you turn the corners. Marking the “tip” stitch or the “base” stitch of the pattern will save you a lot of time and prevent the frustration of having to “frog” your work because the symmetry was lost during the transition between sides.
The first active phase of the Crochet leaf – Pattern is the “central spine” construction. You will chain a specific number and then work back down the chain with a series of slip stitches or single crochets. This creates a sturdy “bone” for the leaf. A good pattern will tell you to leave a long “tail” of yarn at the start, which can later be used to sew the crochet leaf onto a hat, a bag, or a stem wire for a bouquet.
As you move into the “flesh” of the leaf in the Crochet leaf – Pattern, you will be working into the foundation stitches you just made. This is where the “stitch graduation” comes into play. By working a sequence like “sc, hdc, dc, tr, dc, hdc, sc,” you create a smooth arc. The Crochet leaf – Pattern is designed to guide your hand through these transitions so that the curve is gradual and natural, preventing the leaf from looking “blocky” or jagged.
To create “serrated” or “toothed” edges, some variations of the Crochet leaf – Pattern will instruct you to work a series of “picots” along the final round. A picot is a small loop of chains that creates a tiny point. When spaced out according to the pattern, these picots mimic the edges of a rose leaf or a nettle. This is an advanced touch that takes your Crochet leaf – Pattern from a simple craft to a high-fidelity replica of nature.
The “veining” effect can be enhanced after the main shape of the Crochet leaf – Pattern is finished by using a “surface slip stitch.” This involves taking a slightly darker or lighter shade of green and “crocheting” directly onto the surface of the leaf. Following the pattern‘s guide for vein placement ensures that the lines radiate naturally from the center, adding a layer of sophisticated detail that makes the crochet leaf look incredibly realistic and artistic.
If your Crochet leaf – Pattern results in a leaf that is too “floppy,” you can use a technique called “doubling.” This involves making two identical leaves and sewing them together back-to-back. Not only does this make the leaf thicker, but it also allows you to hide a piece of floral wire in between the layers. This modification to the pattern allows you to “pose” your crochet leaf, bending it at natural angles to create a more dynamic and lifelike arrangement.
Finally, the Crocheted leaf – Pattern concludes with the “fastening off” process. Because leaves are often seen from both sides, it is important to weave in your ends very neatly. A professional pattern will show you how to hide the final knot inside the bulk of the stitches so that the leaf looks “finished” no matter which side is facing up. This attention to detail is what makes a Crochet leaf – Pattern project so rewarding for those who value craftsmanship and quality.
Once you have mastered the Crochet leaf – Pattern, the applications for your handmade foliage are nearly endless. You can create a “nature-inspired” nursery mobile by hanging various sizes of leaves from a wooden hoop. Because the Crochet leaf – Pattern is so quick to complete, you can easily make dozens of leaves in a single weekend, allowing you to create large-scale installations that bring a sense of the outdoors into your home decor.
Another popular use for the Crocheted leaf – Pattern is as a “topper” for gift wrapping. Instead of using a plastic bow, you can tie a few crocheted leaves and a small crochet flower onto a package with twine. This eco-friendly alternative to traditional gift wrapping is not only beautiful but also provides the recipient with a small, permanent keepsake they can reuse. The Crocheted leaf – Pattern is a perfect “zero-waste” crafting solution.
In the world of fashion, the Crocheted leaf – Pattern can be used to create stunning “botanical” jewelry. By using very thin crochet thread and a tiny hook, you can make miniature leaves that work perfectly as earrings or charms on a necklace. When you follow the pattern at this micro-scale, the details become even more impressive, making your hand-crocheted jewelry a true conversation piece that showcases your fine motor skills.
You can also use the Crocheted leaf – Pattern to enhance your holiday decor. For Christmas, make the leaves in a deep forest green and pair them with red “popcorn stitch” berries to create a holly garland. For Thanksgiving, use the pattern with burnt orange and gold yarns to create a “scatter” for your dining table. The versatility of the Crocheted leaf – Pattern ensures that it is a “year-round” design that never goes out of style.
For those who enjoy “amigurumi” or crochet toys, the Crocheted leaf – Pattern is an essential accessory. You can add leaves to the “hair” of a forest fairy doll, or place a large leaf in the hands of a crochet turtle. The pattern provides the perfect “context” for your characters, helping to build a world around them. Using a Crocheted leaf – Pattern to add these small details is what gives your toys a unique personality and a professional finish.
Lastly, the Crocheted leaf – Pattern can be used to create “functional” art like coasters or placemats. By using a thick cotton cord and a large hook, the leaf pattern can be scaled up to protect your surfaces from hot mugs and plates. This “practical” application of the Crocheted leaf – Pattern makes it a great choice for making housewarming gifts that are both beautiful and useful, proving that botanical crochet has a place in every room of the house.
1. Is the Crocheted leaf – Pattern suitable for beginners?
Yes! Most Crocheted leaf – Pattern designs are categorized as “Easy” or “Intermediate.” If you know the basic stitches (single, double, and triple crochet) and how to work on both sides of a chain, you can successfully complete this project.
2. How long does it take to make one leaf?
Depending on the complexity of the pattern and your crochet speed, a single leaf usually takes between 10 to 20 minutes. It is a perfect “pocket project” for when you have a small amount of time.
3. What is the best yarn for a realistic leaf?
Mercerized cotton is the top choice for a Crocheted leaf – Pattern because of its crisp stitch definition and natural-looking sheen. It holds the shape of the points and veins much better than fuzzy yarns.
4. Why is my leaf curling up at the edges?
Curling often happens if your tension is too tight or if you aren’t using enough “increase” stitches at the curves. Blocking your Crocheted leaf – Pattern with a bit of steam or water will usually fix this and make the leaf lay perfectly flat.
5. Can I use this pattern to make different types of leaves?
Absolutely. To make a “skinnier” leaf, use fewer double crochets in the center. To make a “rounder” leaf, increase the number of stitches in the middle of the pattern. The Crocheted leaf – Pattern is a flexible template for your creativity.
6. How do I attach the leaf to another project?
You can use the long yarn “tail” left over from the Crocheted leaf – Pattern to sew it directly onto your work. For a more temporary attachment, you can use a safety pin or a small dab of fabric glue.
In conclusion, the Crocheted leaf – Pattern is a versatile and rewarding technique that allows you to infuse your fiber arts with the timeless beauty of the natural world. Throughout this guide, we have explored the structural logic of “double-sided” stitching, the importance of selecting high-quality mercerized cotton, and the technical steps needed to create sharp picot tips and realistic veining.
We also discussed how the Crocheted leaf – Pattern can be adapted for everything from jewelry to home decor and seasonal garlands. By mastering this pattern, you are gaining a foundational skill that enhances every project it touches, turning simple yarn into a vivid expression of botanical art.


