
Lily in Crochet - Pattern

The Crocheted soccer ball – Pattern is a delightful project that combines the precision of geometry with the soft, tactile comfort of handmade fiber arts. For many crafters, creating a spherical object can seem intimidating, but the secret lies in the assembly of individual polygons that fit together perfectly, just like a professional sports ball. This project is perfect for parents wanting a safe, indoor-friendly toy for their children, or for sports fans who appreciate a unique, artisanal piece of memorabilia for their office or living room.
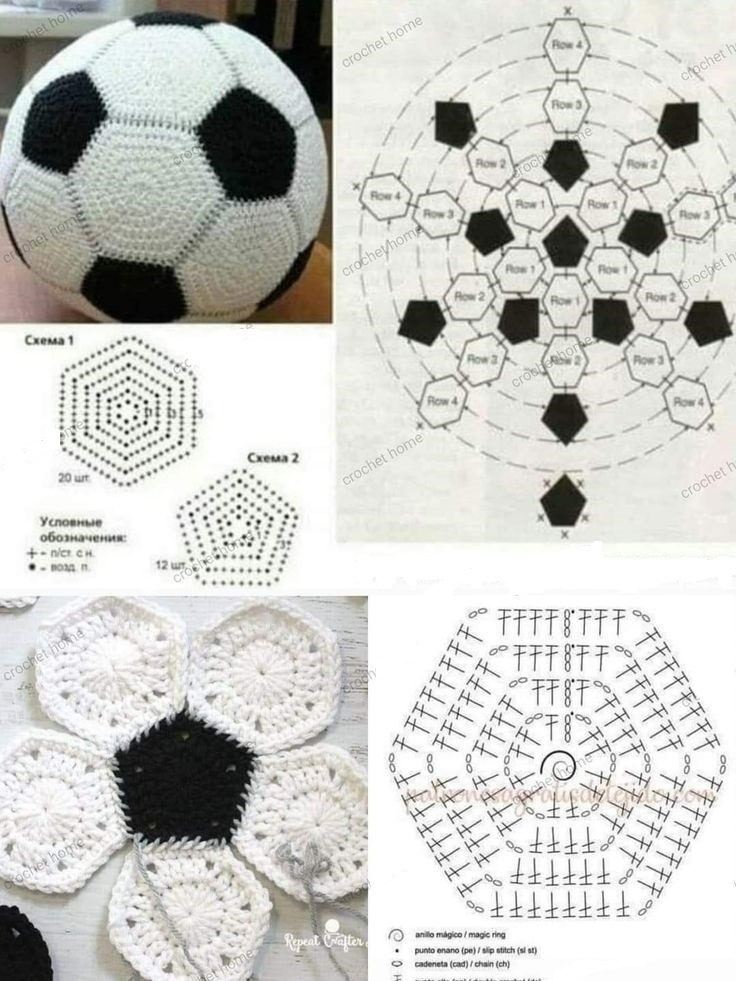
When you embark on a Crocheted soccer ball – Pattern, you aren’t just stitching a simple round ball; you are engaging in the classic Archimedean solid construction known as a truncated icosahedron. This design traditionally consists of twelve black pentagons and twenty white hexagons. By using crochet techniques, we can replicate this iconic look using soft yarn and stuffing, resulting in a lightweight, washable, and durable toy that is far more charming than its plastic or leather counterparts.
In this comprehensive guide, we will break down the complexities of the Crocheted soccer ball – Pattern, ensuring that your stitches are tight and your assembly is seamless. We will explore the best yarn choices, the importance of consistent tension, and the step-by-step logic of joining the polygons. Whether you are an intermediate crocheter looking to test your skills or a dedicated beginner ready for a challenge, this humanized masterclass will provide you with all the professional tips needed to finish your DIY soccer ball with pride.
The success of your Crocheted soccer ball – Pattern depends heavily on the type of yarn you select. We highly recommend using a 100% cotton yarn or a high-quality cotton blend. Cotton has very little “stretch,” which is vital when you are stuffing a ball firmly; a stretchy acrylic yarn might allow the stuffing to poke through the stitches over time. Cotton also offers excellent stitch definition, making the geometric edges of your pentagons and hexagons look sharp and professional.
To achieve the classic look, you will need two contrasting colors, typically black and white, though you can customize your Crocheted soccer ball – Pattern with team colors or bright neons. The weight of the yarn should be consistent for both colors—usually a worsted weight (Category 4) is the easiest to handle. If you mix yarn weights, your hexagons will be larger than your pentagons, and the ball will not close properly, leading to a lumpy and misshapen final product.
The crochet hook size is perhaps the most important technical detail in this pattern. You should use a hook that is one or even two sizes smaller than what the yarn label suggests. For a worsted weight yarn, a 3.25mm or 3.5mm hook is ideal. This creates a “dense” fabric. In a Crocheted soccer ball – Pattern, we want the fabric to be stiff enough to hold a spherical shape and tight enough to contain the polyester fiberfill stuffing without any gaps.
Understanding the “Geometry of the Ball” is the next step. A standard soccer ball is made of 32 panels. You must crochet 12 pentagons (5-sided shapes) and 20 hexagons (6-sided shapes). It is a good idea to crochet all your shapes first before starting the assembly. This allows you to check that they are all uniform in size. If your tension changes halfway through, your shapes won’t match, and the soccer ball pattern will become difficult to join.
The term tension refers to how tightly you hold the yarn. For this project, you want a firm, consistent tension throughout. If you are a “loose” crocheter, your shapes will be floppy. A helpful tip for the Crocheted soccer ball – Pattern is to count your stitches on every single round. Each side of your hexagon and pentagon must have the exact same number of stitches so they can be “zippered” together during the assembly phase.
Lastly, you will need high-quality stuffing and a sturdy tapestry needle. Polyester fiberfill is the most common choice because it is washable and hypoallergenic. For the assembly of the Crocheted soccer ball – Pattern, a metal tapestry needle with a blunt tip is better than a plastic one. It will allow you to weave through the stitches easily without splitting the yarn fibers, ensuring that your seams are strong enough to withstand being kicked or thrown around.
The construction of each piece in the Crocheted soccer ball – Pattern starts with a magic ring. This technique allows you to pull the center of the shape completely closed, leaving no hole for the stuffing to escape. For the pentagons, you will work 5 repeats into the ring; for the hexagons, you will work 6. This initial foundation sets the math for the entire shape, ensuring that the angles are correct for a perfect fit later on.
Within each round of the Crocheted soccer ball – Pattern, you will use increases at the corners to maintain the flat, geometric shape. An increase usually involves placing two single crochet stitches into the same stitch at the corner, often separated by a chain stitch. This creates a sharp point. Keeping these corners crisp is essential; if the corners are too rounded, the pieces won’t sit flush against each other, and your handmade soccer ball will look more like a bumpy potato.
Using a stitch marker is highly recommended for this stage. Since you are working in rounds, it is easy to lose track of where a side ends and a corner begins. In a Crocheted soccer ball – Pattern, accuracy is your best friend. Mark the first stitch of every round so you can verify your stitch count at the end of each shape. For example, if your final side is 5 stitches long on a pentagon, it must also be 5 stitches long on the hexagons.
The “Right Side” vs. “Wrong Side” of crochet is a distinction you must maintain. Most crafters prefer the look of the “Right Side” facing out on the Crocheted soccer ball – Pattern. When you are finishing your pieces, make sure all your yarn tails are on the “Wrong Side.” This keeps the exterior of the ball clean and professional. Consistency across all 32 panels is what gives the finished crochet toy its high-quality, boutique appearance.
A technical term you might encounter is invisible finish. Instead of a standard slip stitch to close the round, the invisible finish mimics a regular stitch, making the edge of the polygon perfectly smooth. This is particularly useful for the Crocheted soccer ball – Pattern because it eliminates the “bump” that can occur at the end of a round. A smooth edge makes the sewing process much easier and results in nearly invisible seams.
As you finish each piece, it is a good idea to steam block them lightly. Blocking involves using a steam iron held an inch away from the fabric to “set” the shape. For the Crocheted soccer ball – Pattern, this ensures that your pentagons and hexagons are perfectly flat and ready for assembly. This extra step might seem tedious, but it significantly reduces the frustration of trying to sew together curled or wavy edges during the final construction.
Joining the 32 panels of the Crocheted soccer ball – Pattern is like solving a three-dimensional puzzle. The golden rule is: Every pentagon must be surrounded by five hexagons. You will never have two pentagons touching each other. By following this rule, the ball will naturally begin to curve as you sew the pieces together. Start by sewing one black pentagon to five white hexagons, creating a “flower” shape that forms the top of the ball.
The best joining method for a Crocheted soccer ball – Pattern is the mattress stitch or the whip stitch. The mattress stitch is preferred because it is worked from the right side and creates a hidden seam that looks like the panels are growing out of each other. Using the same color yarn as one of the panels—usually the white—ensures that the stitches disappear into the fabric. This creates a durable bond that can handle the internal pressure of the stuffing.
As you work through the Crocheted soccer ball – Pattern, you will notice the project becoming heavy and cumbersome. It is helpful to use locking stitch markers to pin the panels together before you sew them. This acts like a “basting” step in sewing, preventing the pieces from shifting. If you find that the corners of your hexagons don’t line up with the corners of your pentagons, stop and recount your stitches; a small error early on will grow as the ball closes.
The “Halfway Point” is a great time to check your progress. Once you have joined about 16 to 20 pieces, you should see a clear “cup” shape forming. In the Crocheted soccer ball – Pattern, this is a sign that your geometry is correct. If the project still looks flat, you may have accidentally sewn two hexagons together where a pentagon should have been. The repetitive nature of the 32-panel assembly requires constant focus to maintain the correct sequence.
When you have only three or four panels left to attach, it is time to start stuffing. In a Crocheted soccer ball – Pattern, the stuffing should be added gradually. Don’t just shove one big clump of fiberfill inside; instead, add small handfuls and push them toward the edges. You want the ball to be firm enough to bounce slightly but soft enough to be safe. Firm stuffing is what “inflates” the crochet fabric and reveals the beautiful geometric structure you’ve worked so hard on.
The final panel of the Crocheted soccer ball – Pattern is the most challenging to sew. You will be working against the tension of the stuffing. Use your fingers to push the stuffing away from the edges as you do your final mattress stitches. Once the last side is closed, insert your needle through the ball and out the other side several times before cutting the yarn. This “buries” the tail deep inside the stuffing, ensuring that your DIY soccer ball will never unravel.
Once the ball is closed, you might notice some minor unevenness in the shape. A professional trick for the Crocheted soccer ball – Pattern is to “roll” the ball between your hands or on a clean floor with some pressure. This helps the stuffing distribute evenly into all the corners of the pentagons and hexagons. It also helps the seams settle into place, making the ball more spherical and balanced for play or display.
If you want to add a personalized touch to your Crocheted soccer ball – Pattern, you can embroider a name or a team logo onto one of the white hexagons before assembly. This turns a standard project into a custom heirloom. Using a satin stitch for embroidery provides a smooth, raised texture that complements the crochet fabric. Just be sure to do this before the ball is stuffed, as it is much easier to work on a flat piece of fabric.
Maintenance is important for any handmade crochet toy. Because soccer balls are often handled and tossed around, they can get dirty. If you used cotton yarn for your Crocheted soccer ball – Pattern, you can usually machine wash the ball on a delicate cycle. We recommend placing the ball inside a mesh laundry bag to prevent the stitches from snagging on the machine’s agitator. Always air-dry the ball to prevent the stuffing from clumping due to high heat.
The term pilling refers to the small balls of fuzz that can form on the surface of the yarn over time. If your Crocheted soccer ball – Pattern begins to pill after heavy use, you can gently remove them with a fabric shaver or a pair of small scissors. High-quality cotton is less prone to pilling than acrylic, which is another reason why material choice is so critical at the start of your crochet journey.
For storage, avoid placing the Crocheted soccer ball – Pattern in direct sunlight for long periods, as this can fade the vibrant black and white contrast. If the ball is being used for display, a simple acrylic ring or a “ball stand” can keep it from rolling away. It makes a fantastic addition to a nursery shelf or a sports-themed bedroom, serving as a soft reminder of the hours of creative labor that went into its making.
Finally, consider the versatility of the Crocheted soccer ball – Pattern. Once you have mastered the 32-panel assembly, you can experiment with different sizes by changing your yarn weight. A bulky yarn and a large hook will result in a giant, floor-pillow-sized ball, while a fine thread crochet will create a tiny keychain version. This pattern is a fundamental skill in the “amigurumi” world, proving that math and art can play together perfectly on the same field.
1. Is the Crocheted soccer ball – Pattern suitable for absolute beginners?
This project is best suited for “confident beginners” or intermediate crafters. While the stitches themselves (single crochet) are simple, the assembly requires a good understanding of 3D construction and very consistent stitch counts. If you have made a few hats or scarves and are ready to try shaping, this is a great next step.
2. How long does it take to finish the ball?
Depending on your speed, crocheting the 32 individual panels can take 10 to 15 hours. The assembly is often the most time-consuming part, taking another 3 to 5 hours to ensure the seams are perfect. It is a wonderful “slow craft” project that you can work on over the course of a week or two.
3. What happens if my hexagons and pentagons don’t fit?
This usually happens due to inconsistent tension or a missed stitch on one of the sides. Before sewing, lay your pieces out and compare them. If one is significantly larger, it is better to “frog” it (unravel it) and redo it with the correct count than to try and force it into the soccer ball pattern.
4. Can I use a different color for the pentagons?
Absolutely! While black and white is the classic “Telstar” look, you can use any colors you like. Many people use their favorite team’s colors. As long as you have 12 of one color for the pentagons and 20 of another (or a mix) for the hexagons, the Crocheted soccer ball – Pattern will work perfectly.
5. Is the ball safe for dogs to play with?
While it is soft, cotton yarn and stuffing are not indestructible. If a dog chews through the yarn, they could ingest the fiberfill, which is unsafe. This crochet soccer ball is intended as a toy for humans or as a decorative piece. Always supervise pets around handmade items.
6. Do I need to use a specific type of stuffing?
Polyester fiberfill is the best for a Crocheted soccer ball – Pattern because it doesn’t hold moisture and stays springy. Avoid using cotton batting or fabric scraps for stuffing, as these can make the ball heavy, lumpy, and difficult to dry if it ever needs to be washed.
The Crocheted soccer ball – Pattern is a masterclass in geometric assembly and consistent craftsmanship. Throughout this article, we have explored the essential nature of 100% cotton yarn, the precision required for pentagon and hexagon increases, and the puzzle-like logic of the 32-panel assembly. By focusing on tight stitches and firm stuffing, you have created a piece that is both a functional toy and a beautiful example of modern fiber art.
Creating this ball is a rewarding experience that teaches you the value of tension control and accurate stitch counting. It turns a simple hobby into a way to create high-quality, safe, and personalized items for your loved ones. Whether it’s being kicked around the living room or sitting proudly on a shelf, your handmade soccer ball stands as a testament to your dedication to the craft and your ability to bring complex patterns to life.


