
Lily in Crochet - Pattern

A Crocheted square – Pattern is arguably the most iconic and versatile foundation in the entire world of needle arts, offering a gateway for beginners and a canvas for masters. These small, modular units of fabric are the building blocks for a vast array of projects, ranging from cozy heirloom blankets and fashionable cardigans to modern home decor like pillow covers and wall hangings. The beauty of working with this specific design lies in its portability; you can carry your yarn and hook anywhere, completing individual motifs during a commute or while relaxing at a cafe, eventually joining them together into a large-scale masterpiece.
Mastering a Crocheted square – Pattern allows you to experiment with an infinite variety of colors, textures, and stitch combinations without the overwhelming commitment of a massive, single-piece project. Whether you are following a traditional granny square design or exploring contemporary geometric motifs, the mathematical symmetry of a square provides a satisfying sense of order and progress. In this guide, we will delve into the technical nuances of creating these motifs, ensuring that your edges are straight, your corners are sharp, and your finished items have a professional, high-quality look that stands the test of time.
This comprehensive exploration of the Crocheted square – Pattern is designed to take you from the very first slip knot to the final invisible join. We will discuss the essential materials needed, the core stitches that form the structure of the square, and advanced troubleshooting tips to keep your work from curling or warping. By focusing on humanized, clear instructions and professional fiber art techniques, this article serves as your ultimate resource for elevating your craft. Prepare your favorite yarn and a comfortable hook as we unlock the creative potential of the most beloved shape in the crochet community.
The first step in executing a successful Crocheted square – Pattern is selecting a yarn that complements the intended use of your finished project. For blankets and garments, a mercerized cotton or a soft acrylic blend is often preferred due to their durability and ease of care. The fiber you choose will dictate the “drape” and weight of the square, so it is important to consider if you want a stiff, structural motif or something soft and flowing. Choosing a high-quality yarn ensures that your hard work doesn’t pill or lose its vibrant color after the first wash.
When following a Crocheted square – Pattern, your crochet hook size must be perfectly calibrated to your yarn weight to maintain a consistent gauge. If your hook is too small, the square will feel dense and may begin to curl at the corners; if it is too large, the stitches will look loose and lack the necessary definition to showcase the pattern’s geometry. Most yarn labels provide a recommended hook size, but advanced crafters often create a small “swatch” square first to ensure the tension is exactly where they want it before starting a large set of motifs.
The term stitch definition is a vital concept for anyone working on a decorative Crocheted square – Pattern. It refers to how clearly each individual stitch can be seen within the finished fabric. Smooth, multi-ply yarns offer excellent definition, making them ideal for complex patterns involving texture and lace. On the other hand, “fuzzy” or “eyelash” yarns can hide your stitches, making it difficult to find where to insert your hook, which can be frustrating when working on the precise corner increases required for a square motif.
Color coordination is where the Crocheted square – Pattern truly shines as an artistic endeavor. Many crafters use a color wheel to select complementary or analogous shades that create a harmonious visual flow across a blanket. Using “scraps” for the center rounds and a consistent neutral color for the final round—a technique often called the “Solid Border Method”—is a brilliant way to make a diverse collection of squares look intentional and professionally curated. This approach turns a stash of leftover yarn into a cohesive and stunning DIY project.
Don’t overlook the importance of dye lots when purchasing yarn for a large Crocheted square – Pattern project. Because you might be making dozens of squares, you need to ensure that the color is identical across all skeins of yarn. Even a slight variation in the dye lot can cause a visible “stripe” or “patch” in your finished blanket. Always check the labels for matching numbers, and if you are unsure, buy one extra ball of yarn at the start to avoid the heartbreak of running out mid-way through your assembly.
Finally, having the right notions on hand will make the process of completing a Crocheted square – Pattern much more efficient. A sharp pair of scissors, a soft measuring tape, and a set of stitch markers are essential tools. Stitch markers are particularly helpful for identifying the corner spaces in more complex patterns, ensuring that you never miss an increase. Being organized from the beginning allows you to focus on the rhythmic, meditative qualities of the crochet process, leading to a more enjoyable and successful crafting experience.
The foundation of nearly every Crocheted square – Pattern is the magic ring or a small chain circle. This center point must be worked tightly to ensure that the middle of the square doesn’t have a large, unsightly hole. The “Magic Ring” technique is favored by modern designers because it allows you to pull the center completely shut, providing a clean and professional start. Once the center is secure, you begin working in rounds, gradually expanding the shape from a circle into a four-sided polygon through strategic increases.
In a standard Crocheted square – Pattern, the magic happens at the corners. To create a 90-degree angle, you must place multiple stitches into a single space, usually separated by a chain space. For example, a common corner sequence is “two double crochets, two chains, and two double crochets” all worked into the same corner gap. This expansion is what allows the fabric to grow outward while maintaining its flat, square shape. If your corners are not identical, the square will begin to look like a trapezoid or a diamond, which makes joining very difficult.
Stitch height is another technical factor to master when working on a Crocheted square – Pattern. Whether you are using single crochet, half-double crochet, or double crochet, your stitches must be uniform in height across all four sides. If your tension fluctuates, one side of the square may end up longer than the others. This is why many instructors emphasize “tension control”—the ability to pull your yarn through the loops with the same amount of force every time—as the most important skill for a consistent and high-quality finish.
A common issue encountered in the Crocheted square – Pattern is “twisting.” This occurs when the square looks like it is swirling in one direction. To prevent this, many patterns suggest turning your work after every round. By flipping the square over and working the next round in the opposite direction, you counteract the natural slant of the stitches. This technique results in a perfectly square motif with straight edges and corners that don’t lean, which is essential for garments that need to hang correctly on the body.
The term weaving in ends is often the least favorite task for crafters, but it is critical for a durable Crocheted square – Pattern. Because a square often involves multiple color changes, you will have several yarn tails to hide. Use a tapestry needle to weave the tail through the “meat” of the stitches in three different directions. This “zig-zag” method locks the yarn in place, ensuring that your blanket or sweater won’t unravel even after years of use and frequent trips through the washing machine.
As you finish the final round of your Crocheted square – Pattern, consider the “Invisible Join” technique. Instead of a standard slip stitch, which leaves a small visible bump, the invisible join mimics the top of a regular stitch using a needle. This creates a seamless perimeter around the square, making the transition between the end of the round and the beginning nearly impossible to see. This level of detail is what separates a beginner’s project from a boutique-quality handmade heirloom that people will admire.
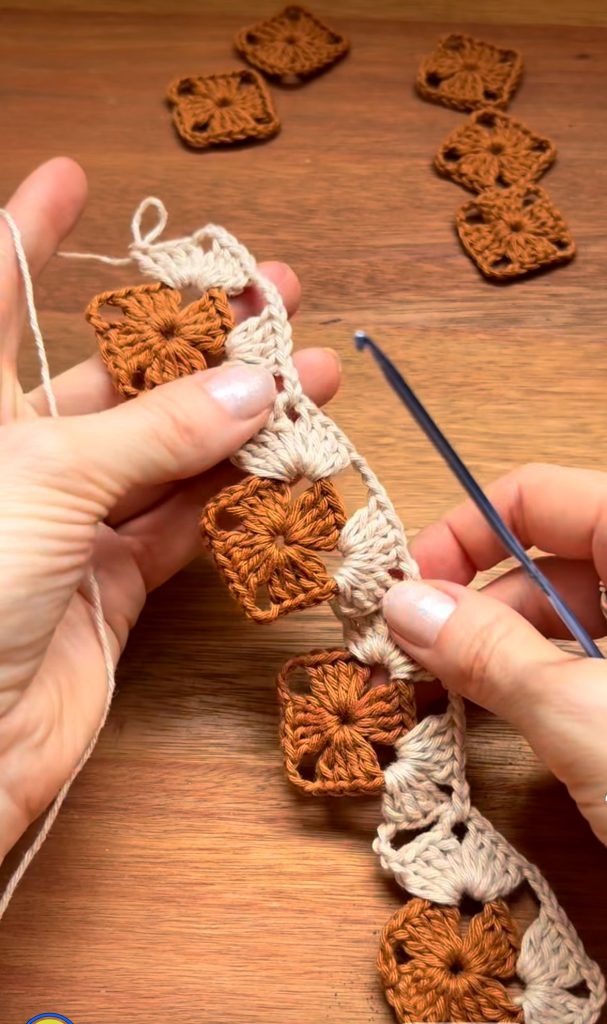
Once you have a stack of motifs from your Crocheted square – Pattern, the next challenge is joining them together. The method you choose will significantly impact the final look and feel of your project. The Whip Stitch is the most traditional and simplest method; it involves sewing the edges together with a yarn needle. It creates a flat, functional seam that is almost invisible if you use the same color yarn as the border of your squares, making it a favorite for classic granny square blankets.
For a more modern and decorative look, many crafters use the Slip Stitch Join or the Single Crochet Join. These methods are worked with a crochet hook rather than a needle. The slip stitch join creates a delicate, braided ridge between the squares, while the single crochet join adds a bold, textured line. These techniques are excellent for adding a “grid-like” structure to your Crocheted square – Pattern project, giving it a sturdy and contemporary aesthetic that works well for home decor.
The “Join-As-You-Go” (JAYG) method is a revolutionary way to handle a Crocheted square – Pattern. Instead of making all your squares first and sewing them together at the end, you attach the current square to the previous ones during its final round of crochet. This method is incredibly satisfying because once you finish your last square, your entire blanket is already assembled. It eliminates the daunting pile of unjoined squares and ensures that your joining tension matches your stitching tension perfectly.
The term nesting seams is often used in quilting but applies to the Crocheted square – Pattern as well. It involves aligning the corners of four different squares so they meet at a single, perfect point. To achieve this, use stitch markers to pin the corners together before you begin joining. This prevents the fabric from shifting and ensures that your vertical and horizontal lines remain straight across the entire surface of the blanket, which is the hallmark of professional craftsmanship.
When joining your Crocheted square – Pattern units, you must decide whether to work through the “front loops,” “back loops,” or “both loops.” Working through the back loops only (BLO) creates a very flexible and flat seam, whereas working through both loops creates a stronger, more rigid bond. For garments like sweaters, a back-loop-only join is usually preferred to allow for more movement and a better fit, while both loops are ideal for heavy blankets that need to withstand weight.
Finally, always consider the color of your joining yarn. Using a contrasting color for the joins can turn the seams of your Crocheted square – Pattern into a design feature in their own right. Conversely, using the same color as the final round of your squares makes the joins disappear, creating the illusion of a single, continuous piece of fabric. Regardless of the method, taking your time during the assembly phase is what ensures your crochet project looks balanced and intentional.
The secret weapon of professional crocheters is a process called blocking. When you finish a Crocheted square – Pattern, it may look a bit puckered or uneven. Blocking involves wetting the fabric and pinning it to a specific shape (a square, in this case) until it dries. This “sets” the fibers and opens up the lace-work, ensuring that every square in your project is the exact same size. This step is non-negotiable if you want your final blanket to be perfectly rectangular and lay flat on a bed.
For a Crocheted square – Pattern, using a “blocking board” with wooden pegs is the most efficient method. You can stack multiple squares on the same pegs, ensuring they are all stretched to the same dimensions simultaneously. This is particularly important for geometric motifs where symmetry is key. Once the yarn is dry, it “remembers” its new shape, making the joining process much easier because you are no longer fighting with curled edges or wonky corners.
The term fiber memory is essential to understand when blocking your Crocheted square – Pattern. Natural fibers like wool and cotton have great memory, meaning they will hold their blocked shape for a long time. Synthetic fibers like acrylic have less memory and may require “steam blocking”—using a steam iron held an inch above the fabric—to permanently set the shape. Knowing the properties of your yarn will help you choose the best finishing technique for a lasting result.
Caring for a finished project made from a Crocheted square – Pattern requires a gentle touch. To prevent the joins from stretching and the colors from bleeding, it is best to hand-wash your items in cool water with a mild detergent. Avoid hanging a large crocheted blanket to dry, as the weight of the water will pull on the squares and distort the shape. Instead, lay it flat on a clean towel in its original square dimensions to air-dry naturally.
If you find that your Crocheted square – Pattern begins to “pill”—forming small balls of fuzz on the surface—you can use a fabric shaver to gently remove them. This is common with wool and certain acrylics. Regular maintenance ensures that your handmade gift or personal heirloom continues to look new and vibrant for many years. Proper storage, such as folding rather than hanging, also prevents the gravity-induced stretching that can plague large fiber art pieces.
Ultimately, the Crocheted square – Pattern is a journey of precision and creativity. From the initial selection of yarn to the final steam block, every step is an opportunity to refine your skills and express your personal style. Whether you are creating a simple classic or a complex modern motif, the humble square remains the most rewarding and versatile shape in the world of crochet. By applying these professional techniques, you ensure that your work is not just a hobby, but a lasting legacy of your artistic vision.
1. How do I keep my Crocheted square – Pattern from curling?
Curling is usually caused by tension that is too tight or a hook that is too small for the yarn weight. To fix this, try using a hook one size larger than recommended, or ensure you are doing enough corner increases to allow the fabric to lay flat as it expands.
2. Can I mix different types of yarn in one square?
It is generally best to stick to the same yarn weight (e.g., all worsted or all DK) within a single square to ensure it stays symmetrical. You can mix different colors, but try to use fibers with similar washing instructions (like all cottons or all acrylics) so the square doesn’t warp when laundered.
3. How many squares do I need for a full-sized blanket?
This depends on the size of your square and your target blanket dimensions. For a standard 50″ x 60″ throw using 5-inch squares, you would need 120 squares (10 rows of 12). Always make a test square first to calculate your specific needs accurately.
4. What is the “Magic Ring” and why should I use it?
The Magic Ring (or Magic Circle) is a starting technique that allows you to pull the center of your Crocheted square – Pattern completely closed. It provides a much cleaner and more professional look than the traditional “chain 4 and join” method, which often leaves a visible hole in the center.
5. How do I join squares without a visible seam?
The Invisible Seam (or Mattress Stitch) is the best way to join motifs without a visible ridge. By sewing through the back loops of both squares using a yarn needle, the stitches pull together flatly, making the join nearly impossible to see on the front side of the work.
6. Do I really need to block every single square?
While it is an extra step, blocking is highly recommended for a professional finish. It ensures all your squares are uniform in size, making the joining process much smoother and resulting in a blanket that lays perfectly flat rather than waving at the edges.
Mastering the Crocheted square – Pattern is a fundamental skill that opens up a world of endless creative possibilities in the realm of fiber arts. Throughout this article, we have explored the critical importance of selecting high-quality mercerized cotton, the technical precision required for corner increases, the various joining methods for a seamless finish, and the transformative power of blocking. These modular units are not just simple shapes; they are the versatile foundation for heirlooms that carry warmth, history, and personal expression.
By following a structured approach to your Crocheted square – Pattern, from consistent tension to organized color management, you elevate your work from a casual pastime to professional-level craftsmanship.
The beauty of the square lies in its simplicity and its ability to be combined into complex, stunning designs. Whether you are making your first granny square or your hundredth geometric motif, the techniques discussed here will ensure your projects are beautiful, durable, and truly unique.


