
Lily in Crochet - Pattern

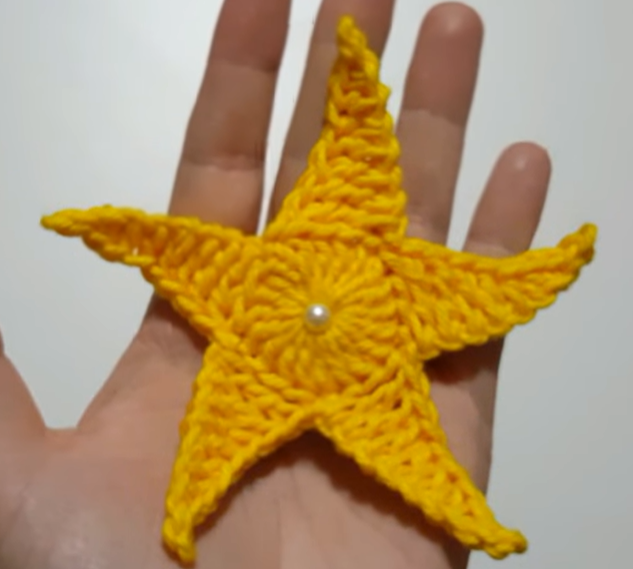
This Crochet starfish Tutorial – Pattern is your ultimate guide to creating a charming, seaside-inspired masterpiece that brings the beauty of the ocean right into your home. Whether you are looking to create a nursery mobile, a coastal-themed garland, or simply want a fun project to use up your scrap yarn, learning how to master a crochet starfish is a rewarding experience for any crafter. The versatility of this pattern allows you to experiment with different textures and colors, ensuring that every single star you hook is as unique as the creatures found in the deep blue sea.
Working on a Crochet starfish Tutorial – Pattern is the perfect way to practice your shaping skills, specifically increasing and decreasing to create those iconic pointed arms. Many beginners find this project approachable because it usually starts with a simple magic ring and expands outward, providing a quick sense of accomplishment. Because the crochet starfish is relatively small, it serves as an excellent “palette cleanser” between larger projects like blankets or sweaters, giving you a fast finish that looks professional and intricate.
When you follow a well-structured Crochet starfish Tutorial – Pattern, you aren’t just making a toy; you are engaging in a mindful practice that improves hand-eye coordination and relieves stress. The repetitive nature of the stitches used in this pattern allows you to zone out and enjoy the rhythm of the hook. By the end of this article, you will understand the essential materials, the stitch abbreviations, and the assembly techniques required to produce a high-quality crochet starfish that looks like it was plucked straight from a coral reef.
Before you dive into the stitches, it is vital to understand that a Crocheted starfish Tutorial – Pattern is essentially a mathematical exercise in geometry. Most starfish have five arms, which means your initial round must be divisible by five to ensure perfect symmetry across the entire pattern. By mastering the foundation, you ensure that your crocheted starfish won’t look lopsided or irregular when finished.
The beauty of a crocheted starfish lies in its texture, so choosing the right yarn is the first step in your pattern journey. For a realistic look, many crafters prefer cotton yarn because it offers great stitch definition and holds its shape well without drooping. If you want a more whimsical or cuddly crocheted starfish, a plush chenille or acrylic blend can add a soft, fuzzy dimension to your work.
In any Crocheted starfish Tutorial – Pattern, the hook size plays a crucial role in the final tension of the piece. Usually, you want to use a hook that is slightly smaller than what the yarn label recommends; this creates a tight fabric that prevents the stuffing from peeking through. A tight gauge is the secret to making a crocheted starfish that looks high-end and store-bought rather than loose and messy.
Key terms you will encounter in this pattern include the magic ring (or magic circle), which is the standard way to start circular projects without leaving a hole in the center. In a Crocheted starfish Tutorial – Pattern, the magic ring allows you to pull the center tight, creating a seamless starting point for the body of your crocheted starfish. Without this technique, the center of your star might look unfinished.
Another essential element is the use of stitch markers to keep track of your rounds, especially since this pattern is often worked in a continuous spiral. If you lose your place in a Crocheted starfish Tutorial – Pattern, the arms may end up uneven, ruining the aesthetic of the final product. Always mark the first stitch of every round to maintain the integrity of your crocheted starfish design.
Finally, remember that the “right side” and “wrong side” of your work matter significantly in this pattern. Most people prefer the look of the “v” shaped stitches on the outside of their crocheted starfish. As you work through the Crocheted starfish Tutorial – Pattern, make sure your piece isn’t accidentally turning inside out as it grows, which is a common mistake for those new to amigurumi-style projects.
To get started with your Crocheted starfish Tutorial – Pattern, you will need a few basic supplies that most crocheters already have in their stash. You’ll need a 3.5mm (E) or 4.0mm (G) crochet hook, depending on your yarn weight, to ensure the crocheted starfish remains firm. Additionally, having a sharp pair of scissors and a tapestry needle is essential for weaving in ends and assembling the pattern pieces.
The yarn choice is the soul of your crocheted starfish. While traditional orange and sand colors are popular, don’t be afraid to try variegated yarns that mimic the natural color shifts of sea life. When following this Crocheted starfish Tutorial – Pattern, having about 50 grams of medium-weight yarn is usually more than enough to complete one or even two small crocheted starfish projects.
Stuffing is what gives your pattern its three-dimensional life, so high-quality polyester fiberfill is recommended for this crocheted starfish. You want to stuff the arms firmly but not so much that the stitches stretch out and show the white fluff inside. A well-stuffed crocheted starfish feels substantial in the hand and maintains its iconic star shape even after being handled or washed.
Optional but highly recommended are safety eyes or black embroidery thread if you want to give your crocheted starfish a cute “kawaii” face. Adding a face transforms the pattern from a simple home decor item into a lovable character for children. If you are making this crocheted starfish for a baby, always opt for embroidered eyes over plastic safety eyes to ensure there are no choking hazards.
A row counter can also be a lifesaver when working through a Crocheted starfish Tutorial – Pattern. Since you have to repeat the same arm construction five times, it is easy to forget which row you are on. Keeping a consistent count ensures that all five arms of your crocheted starfish are exactly the same length, which is the hallmark of a well-executed pattern.
Lastly, consider having some blocking mats and pins ready once your crocheted starfish is complete. Blocking is the process of wetting your finished pattern and pinning it into the perfect shape to dry. This step isn’t always necessary, but it can help sharpen the points of your crocheted starfish arms, making the final result look much more professional and crisp.
The most exciting part of the Crocheted starfish Tutorial – Pattern is watching the arms emerge from the central disc. Usually, the pattern involves working around a specific number of stitches from the foundation rounds to create a small tube that tapers as you move toward the tip. This tapering effect is achieved through strategic decreases, which give the crocheted starfish its organic, lifelike appearance.
In this Crocheted starfish Tutorial – Pattern, you will often use the “invisible decrease” technique (inv dec). Unlike a standard decrease, the invisible version is much harder to spot, ensuring that the surface of your crocheted starfish remains smooth and uniform. This is a pro-tip for anyone looking to elevate their pattern work to a commercial or gift-quality level.
As you work down the arm in your pattern, the number of stitches will get smaller and smaller, which can be a bit fiddly. It is important to stay patient during this stage of the Crocheted starfish Tutorial – Pattern. Slowing down helps you maintain even tension, preventing the tips of your crocheted starfish from looking bunched up or messy.
Once you reach the end of an arm in the pattern, you will usually fasten off and leave a long tail for sewing. However, some versions of the Crocheted starfish Tutorial – Pattern are “no-sew,” meaning the arms are joined as you go. Regardless of the method, the goal is to create a seamless transition from the body to the limb of the crocheted starfish.
Repetition is key in this pattern. You will repeat the arm process five times, and by the third arm, you will likely have the Crocheted starfish Tutorial – Pattern memorized. This is the “flow state” of crochet, where your hands move automatically, and you can truly relax while creating your crocheted starfish army.
After all arms are complete, you will notice the crocheted starfish starting to take its final form. If your pattern involves two separate flat stars sewn together, this is the moment where you align the edges. If it is a 3D amigurumi Crocheted starfish Tutorial – Pattern, you will be closing the small gaps between the arms to ensure the stuffing stays securely inside your crocheted starfish.
Customization is where you can truly make the Crocheted starfish Tutorial – Pattern your own. You might consider adding “bumps” or “tubercles” to the surface of your crocheted starfish using French knots or small surface slip stitches. This adds a realistic texture that mimics the rough skin of a real starfish, adding a layer of sophistication to your pattern.
Another way to enhance your crocheted starfish is through the use of color-work. You can change colors at the tips of the arms or create a striped pattern throughout the body. Following a Crocheted starfish Tutorial – Pattern doesn’t mean you have to stick to one solid color; feel free to experiment with “shrimpy” pinks, deep purples, or sandy beiges.
If you want your crocheted starfish to be part of a larger display, you can integrate beads or sequins into the pattern. Sewing small clear beads onto the surface can simulate water droplets or the natural shimmer of sea scales. Just ensure that the decorations are securely attached, especially if the Crocheted starfish Tutorial – Pattern is intended for a child’s toy.
For those who enjoy mixed media, you can back your crocheted starfish with felt or fabric instead of crocheting a second side. This creates a different aesthetic and can make the pattern work up even faster. A felt-backed crocheted starfish makes for an excellent Christmas tree ornament or a fridge magnet if you glue a small magnet to the back.
You can also vary the size of your crocheted starfish simply by changing the yarn weight and hook size. Use a bulky yarn and a large hook to create a crocheted starfish pillow, or use embroidery floss and a tiny hook to create pattern earrings. The Crocheted starfish Tutorial – Pattern is incredibly scalable, making it a versatile tool in your crochet repertoire.
Finally, consider the presentation of your finished crocheted starfish. Placing it on a bed of real seashells or inside a glass jar creates a beautiful coastal vignette. Whether you are using the pattern for profit, gifts, or personal joy, the Crocheted starfish Tutorial – Pattern offers endless opportunities for creativity and coastal charm in every stitch.
What is the best yarn for a crocheted starfish?
The best yarn is generally a 100% cotton or a cotton-blend. Cotton provides the stiffness needed to hold the star shape and offers excellent stitch definition, which is essential for the Crocheted starfish Tutorial – Pattern.
How long does it take to complete one starfish?
For an intermediate crocheter, a standard-sized crocheted starfish usually takes between 45 minutes to 90 minutes. It is a perfect “one-sitting” project.
Can a beginner try this pattern?
Absolutely! While it requires knowledge of increases and decreases, most Crocheted starfish Tutorial – Pattern guides are beginner-friendly. If you can make a magic ring and a single crochet, you can make this.
How do I make my starfish arms pointed and not rounded?
The secret is in the final stitches of the arm. Most pattern instructions will have you finish with a very small number of stitches or even a slip stitch to create a sharp point. Blocking the finished crocheted starfish also helps sharpen those tips.
Is this pattern worked in rounds or rows?
Most crocheted starfish are worked in continuous rounds (spirals) to avoid a visible seam. Using a stitch marker is highly recommended so you don’t lose your place in the pattern.
Can I wash my crocheted starfish?
Yes, as long as you use washable yarn and stuffing. We recommend hand-washing your crocheted starfish in cool water and letting it air dry to maintain the shape of the pattern.
In this Crocheted starfish Tutorial – Pattern, we have explored everything from the essential materials and hook sizes to the specific techniques used to create tapered arms and realistic textures.
We’ve seen how a crocheted starfish can be a simple toy, a piece of sophisticated home decor, or even a piece of jewelry depending on the yarn you choose. This pattern is a fantastic way to sharpen your amigurumi skills while creating something beautiful and timeless.


