
Lily in Crochet - Pattern

A Crochet vest Tutorial – Pattern is the ultimate gateway project for anyone looking to bridge the gap between simple accessories and full-scale garment making. There is something deeply satisfying about transforming a few skeins of yarn into a functional, stylish piece of clothing that fits your body perfectly. Whether you are a seasoned pro or a curious beginner, mastering a Crochet vest allows you to experiment with texture, drape, and silhouette without the intimidation of complex sleeve shaping.
The beauty of following a specific Pattern lies in the versatility it offers for your wardrobe throughout the seasons. A lightweight Crochet vest can be the perfect boho-chic layer for a summer festival, while a chunky, wool-based Pattern provides that essential extra layer of warmth during the biting winter months. Because these garments are often worked in simple geometric shapes, they serve as an excellent canvas for practicing new stitches and colorwork techniques.
In this comprehensive Crocheted vest Tutorial – Pattern guide, we will walk through every essential step to ensure your finished project looks professional and feels comfortable. From selecting the right fibers to understanding how to read a Pattern effectively, our goal is to empower you with the skills needed to create a handmade heirloom. By focusing on the Crocheted vest construction, you will learn how to customize lengths and widths to suit your unique style.
When embarking on a Crocheted vest Tutorial – Pattern, the first decision you face is the fiber content of your yarn. For a breathable, summertime Crocheted vest, cotton or bamboo blends are highly recommended because they offer excellent stitch definition and a cool touch against the skin. If you are following a Pattern designed for autumn, consider using merino wool or acrylic blends to ensure your Crocheted vest remains cozy and retains its shape over time.
The weight of the yarn is equally important when looking at a Crocheted vest Tutorial – Pattern. Most modern designs utilize a DK weight or Worsted weight yarn to strike a balance between a quick workup time and a delicate, non-bulky finish. Always check the Pattern requirements to see if the designer suggests a specific brand, as the “halo” or fuzziness of the yarn can drastically change the final look of your Crocheted vest.
Your crochet hook size is the next critical tool in your Crocheted vest journey. Even if the Pattern specifies a 5.0mm hook, your personal tension might be tighter or looser than the designer’s. Using the correct hook ensures that the Crocheted vest has the intended “drape,” meaning it hangs naturally on the body rather than standing stiffly like cardboard.
Don’t forget the small but mighty notions needed for a successful Crocheted vest Tutorial – Pattern. You will definitely need stitch markers to keep track of your rows and armhole placements, a sharp pair of scissors, and a blunt-tipped tapestry needle for weaving in those inevitable ends. Having these ready before you start your Crocheted vest will prevent frustrating interruptions once you get into a flow.
Many people overlook the importance of buttons or toggles when selecting a Crocheted vest Tutorial – Pattern. If your chosen Pattern features an open-front design, you might want to source vintage buttons to give your Crocheted vest a unique, personalized flair. The weight of the buttons should match the weight of the fabric so they don’t pull or sag the front panels.
Finally, consider the color palette for your Crocheted vest. Neutral tones like cream, charcoal, or tan make a Crocheted vest incredibly easy to style with existing items in your closet. However, a vibrant, multicolored Pattern can turn your Crocheted vest into a statement piece that draws compliments wherever you go.
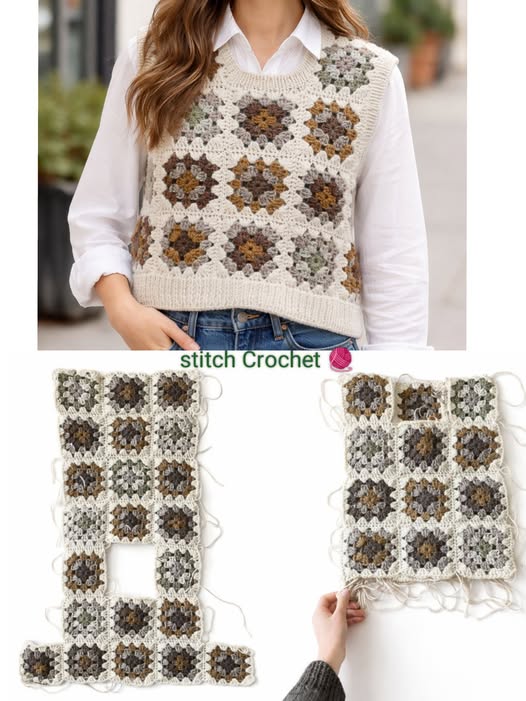
The architecture of a Crocheted vest Tutorial – Pattern is generally much simpler than that of a sweater or cardigan. Most beginners appreciate that a Crocheted vest is typically composed of three main parts: one back panel and two narrower front panels. This modular approach makes the Pattern easy to follow and allows you to check the fit as you progress through each section.
Before you make your first slip knot, it is vital to understand the gauge swatch mentioned in the Pattern. A gauge swatch is a small sample square you crochet to ensure your stitches match the size intended by the Crocheted vest designer. If your swatch is too small, your Crocheted vest will be tight; if it’s too large, the garment will be oversized and baggy.
In this Crocheted vest Tutorial – Pattern, we focus on the bottom-up construction method. This means you start at the waist or hip and work your way up to the shoulders. This method is favored for a Crocheted vest because it allows you to easily adjust the length—simply add more rows to the body before reaching the armhole shaping section of the Pattern.
Stitch selection is what gives a Crocheted vest its character. Many patterns use a combination of Double Crochet (dc) and Chain spaces to create a mesh-like texture, or Half Double Crochet (hdc) for a more solid, warm fabric. Reading the Pattern glossary carefully will help you identify any special stitches, like clusters or puffs, that add visual interest to the Crocheted vest.
As you move up the panels, you will encounter decreases to create the armholes and the neckline. This is the “shaping” phase of the Crocheted vest Tutorial – Pattern. Following these instructions precisely is key to ensuring that the armholes are deep enough for comfort and that the V-neck or scoop-neck of the Crocheted vest sits symmetrically on your chest.
The final stage of construction involves seaming the pieces together. Most Crocheted vest designs use the Whip Stitch or the Slip Stitch Join to connect the shoulders and sides. This is where your Crocheted vest Tutorial – Pattern truly comes to life, transforming from flat pieces of fabric into a wearable, three-dimensional garment.
To begin the actual work on your Crocheted vest Tutorial – Pattern, start by creating the foundation chain for the back panel. Ensure your tension is consistent, as a tight foundation chain can cause the bottom of your Crocheted vest to curl or pucker. Follow the stitch count provided in the Pattern for your specific size to ensure a perfect fit from the start.
Once the foundation is set, you will work the body of the Crocheted vest in rows. It is helpful to count your stitches every few rows to make sure you haven’t accidentally gained or lost any at the edges. Consistency is the secret to a high-quality Crocheted vest; keeping your edges straight will make the later seaming process much easier and cleaner.
When you reach the height indicated in the Crocheted vest Tutorial – Pattern for the armholes, you will begin the shaping. This usually involves skipping stitches at the beginning of rows or using slip stitches to move the yarn across. This creates the “indent” needed for your arms to move freely within the Crocheted vest, a crucial comfort factor for any handmade garment.
The front panels of the Crocheted vest are worked similarly to the back but are much narrower. You will make two of these, often mirrored. If the Pattern includes a slanted neckline, pay close attention to which side the decreases are on. Marking the “right side” of your fabric with a stitch marker helps you keep track of your progress on the Crocheted vest panels.
After the three main panels are complete, it is highly recommended to block your pieces before joining. Blocking involves wetting the crochet pieces and pinning them to specific measurements. This step relaxes the fibers and levels out the stitches, giving your Crocheted vest Tutorial – Pattern a polished, boutique-quality look that sets it apart from amateur projects.
The assembly is the most rewarding part of the Crocheted vest process. Align the shoulder seams first, then work your way down the sides. If you want a more breathable Crocheted vest, you can even leave small side slits at the bottom. Once joined, your Crocheted vest is ready for the finishing touches, such as a ribbed border or a decorative edging.
Personalization is why we love the Crocheted vest Tutorial – Pattern community. You can easily add pockets to the front panels by crocheting two small squares and sewing them on after the Crocheted vest is assembled. This adds both functionality and a cozy aesthetic to your finished Pattern, making it even more practical for daily wear.
Another popular customization is adding a ribbed border around the armholes and the front opening. Using Front Post Double Crochet (fpdc) and Back Post Double Crochet (bpdc) creates a stretchy, knit-like texture. This finishing technique makes the Crocheted vest look more structured and helps prevent the edges from rolling inward over time.
For those who enjoy a bit of whimsy, adding fringe to the bottom edge of a Crocheted vest is a fantastic idea. This works especially well with a festival-style Pattern. Simply cut lengths of yarn, fold them in half, and pull them through the bottom stitches of the Crocheted vest using your hook to create a bohemian vibe.
Think about the length of your Crocheted vest Tutorial – Pattern. While many designs are waist-length, you can easily turn a standard Pattern into a “longline” vest by continuing the body rows until it reaches your thighs. This creates a slimming silhouette and makes the Crocheted vest a great companion for leggings or skinny jeans.
Don’t overlook the importance of weaving in ends securely. In a garment like a Crocheted vest, which experiences movement and stretching, ends can easily pop out if not woven in properly. Use a “zig-zag” motion with your tapestry needle to lock the yarn tails into the back of the stitches, ensuring your Crocheted vest lasts for years of washing and wearing.
The final step in your Crocheted vest Tutorial – Pattern journey is the final fitting. Try on your Crocheted vest and see how it sits. If the front panels feel too open, you can add a simple crochet chain tie or a beautiful brooch. Congratulations, you have successfully navigated the Crocheted vest process and created a piece of art you can actually wear!
How long does it take to complete a Crocheted vest?
The time required depends on your skill level and the complexity of the Pattern. On average, a simple Crocheted vest can take between 10 to 20 hours of active crochet time. Using thicker yarn and a larger hook can significantly speed up the process.
Can a beginner really make a Crocheted vest?
Absolutely! Because a Crocheted vest lacks sleeves, it is considered one of the best “first garments” for beginners. If you know how to chain, single crochet, and double crochet, you can successfully follow a basic Crocheted vest Tutorial – Pattern.
What is the best yarn for a Crocheted vest?
For durability and ease of care, a cotton-acrylic blend is often the best choice for a Crocheted vest. It provides the softness of cotton with the “memory” and lightness of acrylic, ensuring your Pattern doesn’t stretch out of shape after one wear.
How do I choose the right size for my Crocheted vest?
Always refer to the “finished bust” measurement in the Pattern. Measure yourself at the widest part of your chest and choose a size that offers 2-4 inches of “positive ease” (extra space) for a comfortable, relaxed Crocheted vest fit.
Do I need to block my Crocheted vest?
While not strictly mandatory, blocking is highly recommended. It smooths out your stitches and ensures the panels meet the exact measurements of the Crocheted vest Tutorial – Pattern, giving the finished garment a professional drape.
Can I wash my handmade Crocheted vest in a machine?
This depends entirely on the yarn you chose. If you used “Superwash” wool or acrylic, you might be able to use a gentle cycle. However, to keep your Crocheted vest looking its best, hand-washing and laying flat to dry is always the safest method.
In this Crocheted vest Tutorial – Pattern, we have explored everything from the initial yarn selection and the importance of gauge to the intricate details of shaping armholes and adding professional finishes. A Crocheted vest is more than just a piece of clothing; it is a testament to your patience and creativity.
By following a structured Pattern, you have learned how to construct a garment that is both functional and fashionable. We hope this guide has given you the confidence to start your next (or first!) wearable project and that you enjoy every stitch of the journey.


