Crochet Rose - Pattern

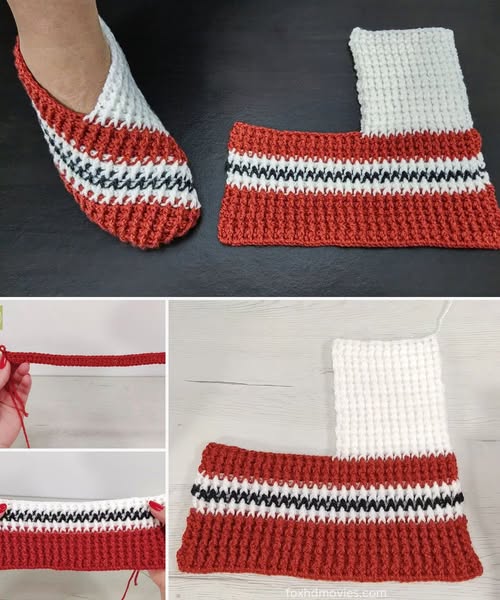
If you’re just starting out in the world of crochet and looking for a practical yet fun first project, the Easy Crochet Shoe for Beginners – Pattern is exactly what you need. Creating your first pair of handmade shoes is not only satisfying, but also a great way to practice basic stitches while crafting something truly useful. This beginner-friendly project combines simplicity, comfort, and creativity all in one.
Whether you’re making shoes for yourself, a friend, or even a baby or toddler, this pattern offers the perfect entry point into wearable crochet. The Easy Crochet Shoe for Beginners – Pattern focuses on minimal shaping, easy-to-follow instructions, and basic yarn types that you likely already have at home. It’s also a project that doesn’t take long to complete, making it ideal for new crocheters who want quick wins to boost confidence.
In this comprehensive guide, you’ll learn everything you need to know about crocheting your first pair of shoes — from choosing the right materials to following step-by-step instructions. We’ll also explore customization tips, styling ideas, and how to avoid common beginner mistakes. Let’s dive into the world of comfort and creativity with the Easy Crochet Shoe for Beginners – Pattern.
Starting your crochet journey with a shoe pattern might seem ambitious, but it’s actually a smart and rewarding choice. The Easy Crochet Shoe for Beginners – Pattern is designed to teach you essential crochet techniques while giving you something functional to wear or gift.
One of the reasons this pattern is great for beginners is its repetitive stitch work, which helps reinforce foundational techniques. You’ll likely be using stitches like single crochet (SC), half double crochet (HDC), and slip stitch (SL ST) — all perfect for gaining stitch control and tension consistency.
Unlike more complex crochet clothing items that require shaping and advanced sizing, shoes are relatively straightforward. Most easy crochet shoe patterns involve a flat sole and a simple upper structure, making it easier to visualize your progress and identify mistakes early.
Shoes also offer a tangible reward. When you’re finished, you get something you can actually wear — a cozy, soft shoe perfect for lounging around the house. This sense of completion can be incredibly motivating for beginners.
Another great aspect is how customizable the pattern is. You can change colors, add embellishments, or adjust the size with just a few simple tweaks. That makes it perfect for practicing creativity while staying within a safe and simple framework.
And finally, crochet shoes make excellent handmade gifts. Once you master the basic version, you can make pairs for family and friends, adjusting sizes and styles to fit different personalities and preferences.
Before you begin your Easy Crochet Shoe for Beginners – Pattern, make sure you’ve gathered the right materials. Having everything ready ahead of time will make the process smoother and more enjoyable.
First, choose a soft, durable yarn. Worsted weight yarn (category 4) is a common choice for beginner shoe patterns. It provides enough structure for the shoes to hold their shape without being too stiff. Cotton yarn is great for breathability, while acrylic is softer and more budget-friendly.
You’ll need a crochet hook appropriate for your yarn weight. A 4.0 mm or 5.0 mm hook usually works well. Check your yarn label for hook recommendations, and make a quick gauge swatch if possible to ensure proper sizing.
Stitch markers are helpful when working in the round or counting rows. They help beginners avoid losing track of stitches, especially around heel and toe sections where shaping may occur.
You’ll also need a tapestry needle for sewing parts together and weaving in ends. These are blunt-tipped needles with large eyes, perfect for working with yarn.
For added comfort and durability, consider adding foam or felt soles to the bottom of your shoes. These can be glued or sewn on and help protect your crochet work while giving the shoes a longer lifespan.
Lastly, make sure to have scissors on hand and a measuring tape for checking your sizing. Correct measurements are key to ensuring your shoes fit comfortably and stay on your feet securely.
Once you’ve prepared your materials, it’s time to get started with the Easy Crochet Shoe for Beginners – Pattern. Below are simplified steps most beginner-friendly shoe patterns will follow. Always check your chosen pattern’s instructions for specific details.
Start by crocheting the sole of the shoe. This is typically worked in an oval shape, beginning with a foundation chain. From there, you’ll crochet around both sides of the chain, increasing at both ends to form a rounded shape. Repeat for several rows to get the desired length and width.
Next, you’ll begin the upper part of the shoe. This section covers the top of your foot and is often worked directly onto the sole. Begin crocheting in rows or rounds, depending on the pattern, and use simple stitches like SC or HDC to build the height of the shoe.
For the heel and back, you may crochet short rows or create a separate heel piece and stitch it onto the sole. This part helps secure the shoe and gives it shape, so take your time to make it even and snug.
The toe area often involves some decreasing to create a rounded front. Be mindful of stitch count here to maintain symmetry. Try on the shoe as you go (if making for yourself) to check fit and comfort.
Once the main body is done, you can add finishing touches. This might include a border around the opening, a strap or button closure, or even a simple decorative bow. This is a great opportunity to make the shoe your own.
Finally, weave in all loose ends securely and give your shoe a gentle stretch to shape it properly. If making a pair, repeat the steps for the second shoe, ensuring both are identical in size and shape.
The Easy Crochet Shoe for Beginners – Pattern is highly customizable, which means you can make multiple versions of the same basic design, each with its own unique flair.
A fun way to customize is by changing yarn colors. Try two-tone shoes, striped patterns, or color blocks to match your wardrobe or reflect the seasons. Neutral tones work well for everyday wear, while bold colors can make a statement.
Add texture with different stitch patterns. While SC and HDC are common, you can incorporate bobble stitches, puff stitches, or textured rows for visual interest. These also add warmth and padding to the shoe.
Consider adding accessories or embellishments like buttons, faux flowers, or pom-poms. These tiny touches elevate your shoe from basic to beautiful and give it a more boutique-style finish.
To improve durability and wearability, try adding non-slip soles. You can sew on leather patches, use puffy fabric paint on the bottoms, or glue rubber pads — especially helpful if the shoes will be worn on smooth surfaces.
For those interested in making baby or toddler shoes, adjust the size by using thinner yarn and smaller hooks. You can also attach a soft strap or elastic band to help them stay on little feet.
Finally, take the time to block your finished shoes. Lightly mist them with water and stuff them with socks or cloth to shape. Let them dry completely to maintain their form — a small step that makes a big difference in the final look.
Q1: How long does it take to make a pair of crochet shoes for beginners?
For most beginners, it takes about 3 to 5 hours to complete a pair, depending on your speed and the complexity of the pattern.
Q2: Can I wash crochet shoes?
Yes, but it’s best to hand wash them in cold water and air dry. Avoid using a dryer unless your yarn is specifically labeled as machine-safe.
Q3: Do I need to make a left and right shoe separately?
Many beginner patterns are symmetrical and work for either foot, but you can add subtle shaping to differentiate left and right if desired.
Q4: Can I wear crochet shoes outside?
Most crochet shoes are intended for indoor use, but you can reinforce the soles with rubber or leather for light outdoor wear.
Q5: What size should I make?
Measure your foot and compare it with the pattern’s size guide. Crochet tends to stretch, so it’s often best to size slightly down for a snug fit.
Q6: What if my shoes don’t fit correctly?
You can often adjust sizing by using a smaller or larger hook, changing your yarn weight, or adding/removing a few rows or stitches.
The Easy Crochet Shoe for Beginners – Pattern is a fantastic entry point into the world of crochet. Not only does it teach you valuable skills like working in the round and shaping fabric, but it also results in a comfortable, wearable item you’ll be proud to use or gift. With just a few basic tools and some yarn, you can create something cozy, cute, and completely handmade.
Whether you’re crocheting for fun, fashion, or function, this pattern allows room to explore your creativity while staying beginner-friendly. We hope this guide helped you feel more confident about starting
your own pair of shoes.
If you’ve tried this pattern or plan to, we’d love to hear your experience. Please leave a sincere opinion or share suggestions in the comments. Your feedback helps us and other readers grow the crochet community with creativity and kindness.
Happy hooking!


