
Lily in Crochet - Pattern

Creating a Flower blanket in crochet – Pattern is one of the most fulfilling journeys a fiber artist can undertake, blending the structural logic of needlework with the organic beauty of a blooming garden. This type of project has captivated crafters for generations because it offers an endless canvas for color experimentation and texture play, allowing you to bring a touch of eternal spring into your living space. Whether you are aiming to create a vibrant heirloom for a family member or a subtle, monochromatic accent for a modern bedroom, mastering a floral crochet design provides a sense of accomplishment that few other DIY projects can match.
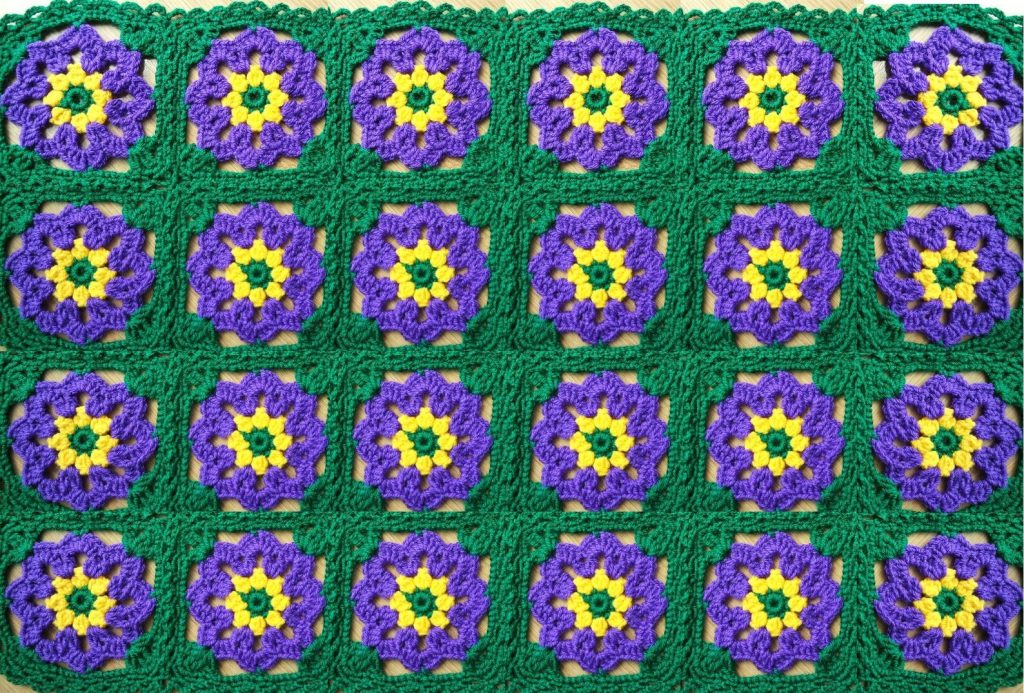
The versatility of a Flower blanket in crochet – Pattern lies in its modular nature, typically composed of individual flower motifs or granny squares that are later joined together to form a cohesive whole. This approach is perfect for busy individuals who want to work on small, manageable pieces during a commute or while relaxing in the evening, eventually seeing those tiny blossoms evolve into a majestic, warm covering. In this comprehensive guide, we will explore the nuances of yarn selection, the technical execution of various stitches, and the artistic assembly methods that ensure your finished blanket is as durable as it is beautiful.
Embarking on a Flower blanket in crochet – Pattern also allows you to dive deep into the world of 3D crochet textures, where petals literally lift off the surface of the fabric to create a rich, tactile experience. By understanding the relationship between yarn weight, hook size, and stitch tension, you can customize the drape and warmth of your blanket to suit any season. This article is meticulously crafted to walk you through every stage of the process, providing expert insights and creative tips that will help you navigate the complexities of floral pattern construction with confidence and ease.
The first and perhaps most vital step in your Flower blanket in crochet – Pattern is choosing the right yarn fiber. For blankets that require frequent washing, such as those for children or pets, a high-quality acrylic yarn or a cotton blend is ideal because these materials maintain their color brilliance and structural integrity over time. If you are looking for a more luxurious, high-end feel, consider a merino wool or an alpaca blend, which offers superior warmth and a soft, professional drape that elevates the entire aesthetic of the project.
Color theory plays a massive role in the success of a Flower blanket in crochet – Pattern. You can choose a “wildflower” look by using a diverse scrap collection of yarns, or a “botanical” look by sticking to a strict palette of soft pastels or deep jewel tones. The contrast between the flower centers, the petals, and the background color of the squares will determine how much the floral design “pops.” Neutral backgrounds like cream, sand, or slate grey are popular choices because they allow the vibrant hues of the crocheted flowers to take center stage.
Your crochet hook selection is equally important, as it dictates the gauge and size of your motifs. Most Flower blanket in crochet – Pattern guides recommend a hook size between 4.0mm and 5.5mm, depending on the yarn thickness. It is often helpful to use a slightly smaller hook for the flowers themselves to give them more structure and “perkiness,” while using a standard hook for the surrounding squares to ensure the blanket remains soft and flexible enough to wrap around your shoulders.
Don’t overlook the importance of notions and tools like stitch markers and tapestry needles. When working on a project with dozens of individual motifs, keeping track of your stitch counts is essential to ensure every square is uniform. High-quality metal needles with large eyes are necessary for weaving in the numerous yarn tails that come with multi-color floral crochet work, ensuring that your connections are secure and invisible from both the front and back of the blanket.
The weight of the yarn, often referred to as ply or category, should be consistent throughout the entire Flower blanket in crochet – Pattern. Mixing a chunky yarn with a fine sport-weight yarn in the same blanket can cause the fabric to buckle or pull unevenly. Stick to a worsted weight (Category 4) or DK weight (Category 3) for the best balance between a project that works up quickly and one that isn’t too heavy for the user to enjoy comfortably on a sofa.
Lastly, consider the “squish factor” or the elasticity of the yarn. Some cottons can be quite stiff, which is great for wall hangings but might be less cozy for a handmade blanket. Look for yarns that have a bit of “give” to them, as this will make the crochet stitches more forgiving and the final product much more inviting. Taking the time to touch and feel different yarn samples at your local craft store is a great way to ensure you’ll love the tactile result of your hard work.
To create a stunning Flower blanket in crochet – Pattern, you must become comfortable with working in the round. Most flowers start with a magic ring (or magic circle), which allows you to pull the center tight and eliminate any unsightly holes in the middle of your blossom. From there, you will use a combination of basic crochet stitches like the double crochet (dc) and treble crochet (tr) to build out the layers of petals, creating height and dimension within the motif.
One of the standout features of a high-quality Flower blanket in crochet – Pattern is the use of 3D crochet stitches like the popcorn stitch, puff stitch, or cluster stitch. These techniques involve grouping multiple stitches together to create a raised, “bubbly” texture that mimics the center of a daisy or the thick petals of a rose. Mastering these stitches adds a professional, sophisticated touch to your crochet pattern that distinguishes it from simpler, flatter designs.
The transition from a circular flower to a square border is a critical skill in this Flower blanket in crochet – Pattern. This is usually achieved by using stitches of varying heights—such as using single crochets (sc) on the sides and treble crochets in the corners—to level out the rounds into a perfect square. Learning how to “square the circle” is a foundational technique that allows you to join your floral motifs together seamlessly, creating a clean and organized grid layout.
Color changing is another technique you will use frequently. In a Flower blanket in crochet – Pattern, you often change colors between the center, the petals, and the outer edge of the square. Using the invisible join method or carrying the yarn behind your work can help minimize the number of ends you have to weave in later. These small technical adjustments significantly improve the “wrong side” of your blanket, making it look almost as good as the front.
Texture can also be added through front post or back post stitches. By working around the stem of a stitch from the previous row rather than through the top loops, you can create ridges that look like leaf veins or the edges of a petal. This level of detail in your Flower blanket in crochet – Pattern creates a more realistic and artisan-looking piece that will capture the light beautifully when draped over a chair or bed.
Finally, practicing consistent tension is key. If some flowers are stitched tightly and others are loose, your squares will be different sizes, making the assembly process a nightmare. Using a blocking board once your motifs are finished is a professional secret; by pinning your squares to a specific dimension and steaming them, you ensure every piece of your floral quilt is identical, resulting in a much flatter and more symmetrical final blanket.
Once you have a collection of beautiful motifs, the next phase of your Flower blanket in crochet – Pattern is joining them. There are several ways to do this, each offering a different look. The whipstitch is a classic hand-sewing method that creates a flat, nearly invisible seam, while the slip stitch join creates a slightly raised, braided ridge between the squares that can add a nice geometric frame to each individual flower.
For those who want to avoid a massive sewing task at the end, the Join-As-You-Go (JAYG) method is a game-changer. This technique involves connecting your current motif to the previous one during the final round of crochet. It is a highly efficient way to work through a Flower blanket in crochet – Pattern, as it allows you to see the blanket grow in real-time and eliminates the need for pins and needles during the final construction stage.
The layout of your Flower blanket in crochet – Pattern is where your inner designer truly shines. You can arrange your flowers in a gradient (ombré) effect, a random “field of flowers” style, or a structured repeating pattern. Laying all your finished motifs out on a large table or the floor before you start joining them is a crucial step to ensure the colors are balanced and there aren’t too many dark or light patches in one area.
If you find that your squares are slightly uneven despite your best efforts, using a crocheted mesh join can help. By creating a small “net” of chains between the squares, you provide a bit of stretch and flexibility that masks minor size differences. This method also gives the Flower blanket in crochet – Pattern a more lace-like, airy feel, which is particularly lovely for lightweight summer throws or baby blankets.
Durability is a major factor during assembly. Since a blanket is a heavy item that will be pulled and stretched, your joins must be strong. When using a Flower blanket in crochet – Pattern, always ensure you are catching both loops of the stitches on both squares. This prevents the seams from “gapping” over time and ensures that the weight of the crocheted fabric is distributed evenly across all the connections.
Finally, don’t forget about the inner borders or sashing. Adding a simple row of single crochet in a contrasting color around each individual flower square before joining them can create a “framed” look that makes each blossom stand out. This extra step in your Flower blanket in crochet – Pattern adds a level of complexity and polish that is often seen in high-end designer crochet pieces and boutique home decor.
A Flower blanket in crochet – Pattern is never truly complete without a beautiful border to “frame” the garden you’ve created. A simple scalloped or shell border is a popular choice because it echoes the rounded shapes of the petals within the blanket. If you want something more elaborate, a picot edge or a pom-pom border can add a playful, whimsical touch that is perfect for a nursery or a creative workspace.
The border also serves a functional purpose: it helps to stabilize the edges of the blanket and prevents them from curling. When working the border on a Flower blanket in crochet – Pattern, you may need to adjust your stitch count along the sides to ensure the edges stay flat. A good tip is to work a “base row” of single crochet all the way around the perimeter before starting your decorative stitches to create a clean, even foundation.
Weaving in ends is the final “rite of passage” for any crochet project. To ensure your Flower blanket in crochet – Pattern doesn’t unravel, weave your yarn tails in multiple directions—up, down, and across—through the densest part of the stitches. Using a “doubling back” technique where you change direction with the needle will lock the yarn in place, making it safe for the blanket to be used and laundered frequently.
If you want to add a bit of extra flair, consider adding surface crochet or embroidery to the finished blanket. You can use a yarn needle to add “whiskers” or “vines” between the flowers, connecting the motifs visually. These small, artistic details make your handmade blanket feel like a cohesive piece of art rather than just a collection of joined squares, elevating the overall crochet design.
Blocking the entire finished blanket is the final step in the Flower blanket in crochet – Pattern process. While it may seem daunting for a large item, a light steaming helps to “set” the stitches and ensures the border lies perfectly flat. This is especially important if you used natural fibers like cotton or wool, as it allows the fibers to relax and the floral motifs to bloom to their full potential.
Finally, consider adding a personalized label to your work. Whether it’s a simple ribbon with your name or a custom leather tag, it marks the blanket as a genuine “hand-crafted” item. Your Flower blanket in crochet – Pattern is now ready to provide warmth and beauty to your home, standing as a testament to your patience, creativity, and the timeless appeal of the art of crochet.
1. Is a Flower blanket in crochet – Pattern suitable for absolute beginners?
It is achievable for beginners who have mastered the basic stitches (sc, dc, tr) and are comfortable working in a circle. Starting with a simple flat flower pattern before moving on to 3D versions is a great way to build confidence.
2. How long does it take to finish a full-sized flower blanket?
This depends on the complexity of the motifs and your speed, but most crafters spend between 40 to 80 hours on a standard throw-sized blanket. It’s a perfect long-term project!
3. What is the best yarn for a baby’s flower blanket?
A “baby acrylic” or a “soft cotton-acrylic blend” is best. These are soft on sensitive skin, hypoallergenic, and can be machine-washed and dried, which is essential for busy parents.
4. How many squares do I need for a queen-sized blanket?
For a standard queen-sized bed, you will likely need between 150 to 200 squares, depending on the size of each individual flower motif. Always make a sample square first to calculate your final dimensions.
5. How do I prevent my flowers from sagging or losing shape?
Using a slightly smaller hook for the flowers and choosing a yarn with good “memory” (like a wool blend or high-quality acrylic) will help the petals stay upright and defined over time.
6. Can I mix different flower types in one blanket?
Absolutely! Mixing different types of crocheted flowers (roses, daisies, sunflowers) within the same blanket is a fantastic way to create a “sampler” style quilt that is visually engaging and unique.
In this article, we have journeyed through the intricate and rewarding process of creating a Flower blanket in crochet – Pattern. We explored the importance of selecting the right yarn fibers and color palettes to set the tone for your project, and we dove into the technical skills required to create 3D floral motifs that bring texture and life to your work. We also discussed the various assembly methods, from the classic whipstitch to the efficient Join-As-You-Go technique, and how a well-designed border can provide the perfect finishing touch. Finally, we emphasized the importance of blocking and finishing to ensure your blanket remains a durable and beautiful heirloom for years to come.
The art of crochet is a wonderful way to express creativity and practice mindfulness. A Flower blanket in crochet – Pattern is more than just a home accessory; it is a labor of love that showcases your dedication to craftsmanship. We hope this guide has inspired you to start your own floral masterpiece and explore the endless possibilities of yarn and hook. Please leave your sincere opinion and suggestions in the comments below! We would love to hear about your favorite flower patterns or any challenges you faced during your quilting journey.


